Finally, another Charcuterie Board finished!

luvmytoolz

Member
Joined
May 17, 2021
Messages
2,982
Location
Oz
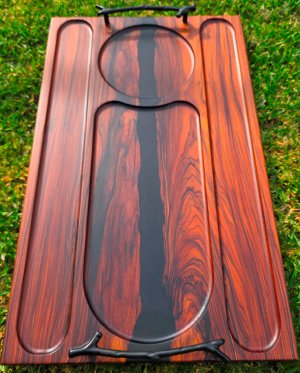
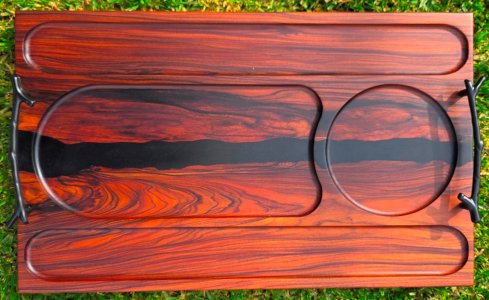
Well it's been pretty busy at work so I haven't been able to work on completing any of the hundreds of projects on the go, but a piece of Rosewood I've had drying in the shed for some time now was at a good MC level, so I thought I'd finally get this commissioned Charcuterie Board with Rosewood and black resin made. The timber didn't take the Odie's Oil as well as I expected, but after many coats and much buffing it turned out nice. Still need to hand it over so I might do a couple more coats.

The Rosewood absolutely glows in the sun, amazingly beautiful timber! I'll be making another board out of it soon!
 

Attachments

  • Rosewood.Board1.jpg
    Rosewood.Board1.jpg
    912.6 KB · Views: 55
  • Rosewood.Board2.jpg
    Rosewood.Board2.jpg
    299.3 KB · Views: 53
That's absolutely beautiful...the color is so intense. Are those 2 boards joined in the middle or a single board that you cut a resin pathway into?
Thanks Cheese! It was made from one long narrow piece, the black down the middle is the resin.
 
This is a very nice piece! Do you make templates and router out the recessed areas?
I was using a template originally, but prefer to do them on the CNC until I design new templates so I can use a large clearing milling cutter with them. The boards are 515mm x 315mm (almost perfectly Golden Mean) and the templates by hand were a bit risky with such large pockets.
 
What a beautiful piece! IMHO it is great to see that piece of timber left in a larger size where it can show all that rosewood character and beauty.

Peter
Thanks Peter, the client quite rightly wanted as narrow a strip of jet black resin as possible.
 
I was using a template originally, but prefer to do them on the CNC until I design new templates so I can use a large clearing milling cutter with them. The boards are 515mm x 315mm (almost perfectly Golden Mean) and the templates by hand were a bit risky with such large pockets.
You just need a bigger sub-base, something well over the width of the pocket, makes it simple. Taking the fences off of the acrylic edge fixture works for me. The retail version is fairly expensive, but anyone should be able to replicate a functional version. I know I have a better pic of that thing, but I can't seem to find it.
 

Attachments

  • Feature wall fill slots.jpg
    Feature wall fill slots.jpg
    318.4 KB · Views: 28
Thanks Cheese! It was made from one long narrow piece, the black down the middle is the resin.
So that tells me it was made by joining 2 long narrow pieces together and then machining a resin pathway down the middle of the 2 boards. How were those boards joined together? Dominos? Just glue? Some other joining method?
 
You just need a bigger sub-base, something well over the width of the pocket, makes it simple. Taking the fences off of the acrylic edge fixture works for me. The retail version is fairly expensive, but anyone should be able to replicate a functional version. I know I have a better pic of that thing, but I can't seem to find it.
I actually have one of the standard bolt-on router table inserts I use as a large base. I just have to pull my finger out and make some new MDF templates. I made perspex ones but stupidly put all the pockets on the one sheet too close together. Not a good idea.
 
So that tells me it was made by joining 2 long narrow pieces together and then machining a resin pathway down the middle of the 2 boards. How were those boards joined together? Dominos? Just glue? Some other joining method?
As the boards took up the whole area in the mold, I just used a rough grinding wheel like the attached pic to shape the edges back a little, and dig trenches along the middle of the inside edges for the resin to grip to.

No joiners or fasteners are needed, a coat of resin is brushed into the edges, let dry a little, and then pour the rest. It's rock solid and would take a very significant thump to damage, as the resin actually soaks into the timber to a degree and bonds incredibly well.
 

Attachments

  • grinding.wheel.jpg
    grinding.wheel.jpg
    85.7 KB · Views: 19
As the boards took up the whole area in the mold, I just used a rough grinding wheel like the attached pic to shape the edges back a little, and dig trenches along the middle of the inside edges for the resin to grip to.

No joiners or fasteners are needed, a coat of resin is brushed into the edges, let dry a little, and then pour the rest. It's rock solid and would take a very significant thump to damage, as the resin actually soaks into the timber to a degree and bonds incredibly well.
While the board looks fantastic, I have that same grinding disc. Is there Harbor Freight in OZ as well?

At least here, at Harbor Freight, that wheel is significantly more affordable than the Kutzall wheels.
 
As the boards took up the whole area in the mold, I just used a rough grinding wheel like the attached pic to shape the edges back a little, and dig trenches along the middle of the inside edges for the resin to grip to.

No joiners or fasteners are needed, a coat of resin is brushed into the edges, let dry a little, and then pour the rest. It's rock solid and would take a very significant thump to damage, as the resin actually soaks into the timber to a degree and bonds incredibly well.
Very nice...that's what I was looking for. :) I've done some wood & epoxy filler work and have always vacillated between "working the natural gorge too much and making it not look real and working the gorge too little" and not being to able to tie everything together. Nice job...love the black epoxy. :) I've always used clear epoxy before because I like to light up the transition with LED's.
 
Very nice...that's what I was looking for. :) I've done some wood & epoxy filler work and have always vacillated between "working the natural gorge too much and making it not look real and working the gorge too little" and not being to able to tie everything together. Nice job...love the black epoxy. :) I've always used clear epoxy before because I like to light up the transition with LED's.
Thanks! I always used to worry the resin wood bond wouldn't stand up to a little rough treatment, but it is surprisingly tough and really takes a beating. Generally as with wood glue, in the tests I did the timber broke, not the resin seams.

But I definitely wouldn't do it without giving it a good key by roughing the edges up first. I'm starting another board with the Rosewood left over from this one, but I'll mix some chameleon red in the black resin which I think will give a really nice touch.

I like the idea of LED's in the board, that would look great!
 
While the board looks fantastic, I have that same grinding disc. Is there Harbor Freight in OZ as well?

At least here, at Harbor Freight, that wheel is significantly more affordable than the Kutzall wheels.
I just used the first pic I found of a grinding wheel, I actually bought a set of barely used Kutzalls off a fellow woodworker. They're fantastic quality, I think they'll easily outlast me.
 
I was using a template originally, but prefer to do them on the CNC until I design new templates so I can use a large clearing milling cutter with them. The boards are 515mm x 315mm (almost perfectly Golden Mean) and the templates by hand were a bit risky with such large pockets.
Thank you.
 
Back
Top