- Joined
- Oct 16, 2015
- Messages
- 5,791
I would just break the corners by hand with a sanding block. Anything smaller that an 1/8" or so is difficult to do with a machine anyway.


sebr023 said:...apply stain, apply “clear”.
Cant justify the cost for now, but definitely on my list!Vtshopdog said:Nice work. At this rate you will be able to plug then in within a few days. Always fun moment to fire them up first time.
From question in earlier post, yes Domino machine is absolutely wonderful. If you can justify cost of owning one, highly recommend as will many others on this forum
Thank you for this! Will definitely follow your advice.Cheese said:sebr023 said:...apply stain, apply “clear”.
If this side is going to show, I'd suggest starting the staining process on a small area of this side of the cabinet. There appears to be several areas where excess glue squeezed out and those areas may or may not take the stain depending upon the amount of glue on the surface/in the grain and the color of the stain.
Some light sanding and then testing with alcohol or water will give you an idea of what areas will hold the stain.
[attachimg=1]
I have one, but I don’t know if it’s not sharp enough or what, but didn’t find it very useful. Light chisel pass seemed to work betterChuckS said:Cheese's advice is spot-on. All glue residue spots must be cleaned up before finishing, or they'll show.
A card scraper user? If so, it'll just take a few sweeps to fix a spot, without damaging the veneer to the core.
sebr023 said:Thank you for this! Will definitely follow your advice.
I’ve tried staining the edge and the result wasn’t very nice, seemed butchy at some spot.
Will try to remove as much glue as I can before
")


How were you able to make the “pocket” where the router bit is going toward the Center in order to let more wood for the screws? Like the offset?!Vtshopdog said:[member=78111]sebr023[/member] they're looking good, nice rescue of the bulging glue up.
Have you cut the driver openings in your baffles yet? Depending on frame shape and recess depth mid and bass driver openings can benefit from chamfering the backside of the opening to open up air flow around perimeter of the cone. Just takes a couple minutes and can't hurt anything.
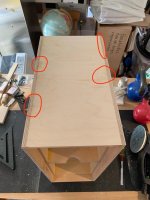
Below pic is an example, in this case I had to cut the chamfers before gluing, veneering and making final opening cuts on the front of box once it was assembled. I sometimes do not extend chamfer behind mounting screws, especially in MDF, depends on driver frame and screw placement dimensions. These are the 6 unrecessed areas around radius marked in Sharpie pen you see in this photo.
Also, here's a link to an article about this:http://www.troelsgravesen.dk/chamfer.htm
[attachimg=1]

They are done by now. But I remember I wanted to ask you.Vtshopdog said:I used my router mounted on circle cutting jig with a plunge base.
Made one shallow pass full 360 degrees then followed with individual segments plunged deeper to create the chamfers for the driver backs.
I did this before making the driver cutouts. Since yours are already cut best bet will be using a piloted chamfer bit to cut the segments. If your boxes are already glued (I think this is the case, no?) then you won’t be able to do it this way or you will need some sort of router bit with top mount pilot bearing, likely hard to find and/or expensive.
Cut out by hand with a rasp??