I know . . . not another one!
I'm sure this subject has been done to death in this forum but having looked at other folks' efforts on YouTube etc, I didn't see/find this simple accuracy enhancement.
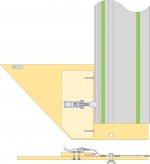
I was wondering how to get the square 100% accurate - and we all know how good a screw or two can be to get that exact adjustment. So on the shoulder piece, I added a couple of pan-headed machine screws, a very tight fit in the block, which bear against the back edge of the rail. They allow a perfect 90 degree angle to be gained between the straight edge and the rail. Adding the adjustable latch makes for a fit perfect every time.
All the wood is 12mm baltic birch ply.
The main piece is 500 x 250mm with an accurate 45deg cut.
The shoulder piece is 105 x 225mm, glued and screwed to the main square. It is only finally fixed once the stop screws were set in place and left sticking out by 5mm to allow for adjustment and the rail is in place (see image attached).
The clip is a 'CT-02221-W-1 Adjustable Latch Without Catch Plate Zinc Plated 93-110mm' purchased from goodhanduk.co.uk.
It is held down by a couple of M5 countersunk machine screws, probably overkill, but again, I had them sitting around.
I used pan-head machine screws - because I had them, but any non-marking, non-scratching screws would do.
For the rail hold-down, I used 8mm bolts (with a 12mm AF head), with two opposite faced ground down a bit to fit the rail slot.
Importantly, the holes drilled in the ply to take these bolts must be oversized (I made them 10mm) in order to allow for the slight lateral adjustment and for the latch to pull tight against the stop screws. Only then are the underneath wing-nuts tightened.
You could alternatively use a spare piece of rail connecting bar, but again, it should have some lateral movement for the same reason.
Apologies if this is covered elsewhere!
I hope it's helpful to someone!
View attachment 1
I'm sure this subject has been done to death in this forum but having looked at other folks' efforts on YouTube etc, I didn't see/find this simple accuracy enhancement.
I was wondering how to get the square 100% accurate - and we all know how good a screw or two can be to get that exact adjustment. So on the shoulder piece, I added a couple of pan-headed machine screws, a very tight fit in the block, which bear against the back edge of the rail. They allow a perfect 90 degree angle to be gained between the straight edge and the rail. Adding the adjustable latch makes for a fit perfect every time.
All the wood is 12mm baltic birch ply.
The main piece is 500 x 250mm with an accurate 45deg cut.
The shoulder piece is 105 x 225mm, glued and screwed to the main square. It is only finally fixed once the stop screws were set in place and left sticking out by 5mm to allow for adjustment and the rail is in place (see image attached).
The clip is a 'CT-02221-W-1 Adjustable Latch Without Catch Plate Zinc Plated 93-110mm' purchased from goodhanduk.co.uk.
It is held down by a couple of M5 countersunk machine screws, probably overkill, but again, I had them sitting around.
I used pan-head machine screws - because I had them, but any non-marking, non-scratching screws would do.
For the rail hold-down, I used 8mm bolts (with a 12mm AF head), with two opposite faced ground down a bit to fit the rail slot.
Importantly, the holes drilled in the ply to take these bolts must be oversized (I made them 10mm) in order to allow for the slight lateral adjustment and for the latch to pull tight against the stop screws. Only then are the underneath wing-nuts tightened.
You could alternatively use a spare piece of rail connecting bar, but again, it should have some lateral movement for the same reason.
Apologies if this is covered elsewhere!
I hope it's helpful to someone!
View attachment 1