Handling tear-out before staining

Ivanhoe

Member
Joined
Jan 23, 2014
Messages
164
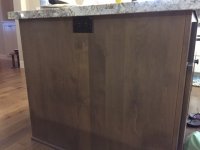
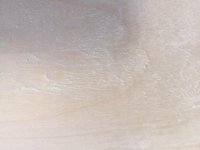
I have an issue with some tear-out on 1/4" alder ply and was looking for some guidance on how to handle the situation. The tear out is due to when it was produced and not something I caused (as in where I made my cuts with the track saw on the edges.) Since the tear out is in the face of the thin veneer I am worried about too much sanding. There are several patches that have the problem (approx 1"x2") Unfortunately I was not able to hand pick the ply as we had to order it so returning it is not an option. The 23"x54" piece will be added to our coffee bar as a "backsplash" for lack of a better word. Pics attached - The idea is to match the base of the center island as my wife does not like the current white background. Thanks for any help!

Rod
 

Attachments

  • IMG_0045.JPG
    IMG_0045.JPG
    68.7 KB · Views: 274
  • IMG_0049.JPG
    IMG_0049.JPG
    74 KB · Views: 311
Hey, Rod,
    Do you use blue tape to cover the area being cut?  This might be a help.  Just be careful to pull the tape off afterwards and do it away from the material being cut, and at 90° to the freshly-cut edge.  Also, make sure that your splinterguard is freshly re-cut.  Know how to do this?
 
Can you use a this strip of molding to cover the edge after it's installed?

Mike A.
 
thanks guys - but the tear out is not something that I produced. I may be using the wrong word here - All my edges are fine.
The problem is the sheet ply has small areas that you can see the grain has lifted where the grain changed during the initial
composition of the plywood. Maybe I need to get a pic to show what I mean. It may be hard to pick up in a photo....
 
Here is a pic of the defect- it looks much worse than what it really is. I tried sanding with some 320 grit and it helped somewhat.
 

Attachments

  • image.jpg
    image.jpg
    29.8 KB · Views: 260
This won't work if you intend to finish with a grain filling stain.

If you seal the ply heavily with something like shellac and then sand it you should seal the loose grain so that it is not so visible. You may need to repeat this several times. This will work even better if you then coat with a tinted finish.

 
Bohdan said:
This won't work if you intend to finish with a grain filling stain.

If you seal the ply heavily with something like shellac and then sand it you should seal the loose grain so that it is not so visible. You may need to repeat this several times. This will work even better if you then coat with a tinted finish.

Good idea, Will the shellac change the colour of the stain?
 
AdrianH said:
Bohdan said:
This won't work if you intend to finish with a grain filling stain.

If you seal the ply heavily with something like shellac and then sand it you should seal the loose grain so that it is not so visible. You may need to repeat this several times. This will work even better if you then coat with a tinted finish.

Good idea, Will the shellac change the colour of the stain?

Yes. On light stains more than dark.

The shellac acts as a barrier coat (light sealer) so it will block the penetration of the stain into the wood. A wiping or gel stain will be coat this much better.

It will be difficult to match the washed look of the original cabinet if that is the intention.

I would buy another piece of ply, unless the other side is usable.
That piece of veneer was of poor quality. It should not have been applied to the sheet. Poor quality control.
Tim
 
Thanks again - Unfortunately returning the ply is not an option. And I agree, it is substandard.
I am willing to give it a go as it is a good opportunity for learning.

If I understand correctly, the steps would be

1) shellac to fill in the problem areas
2) wipe on or gel stain (which I have left over oil based stain from the center island)
3) oil based poly over the top?
4) crack one of these open and call it good:


Attachments

  • urquell.jpg
    urquell.jpg
    74.2 KB · Views: 144
ivanhoe said:
I am willing to give it a go as it is a good opportunity for learning.

Good!

ivanhoe said:
If I understand correctly, the steps would be

1) shellac to fill in the problem areas
Shellac to seal, sand nubs and then repeat if necessary being careful not to burn through the veneer.
ivanhoe said:
2) wipe on or gel stain (which I have left over oil based stain from the center island)
3) fill voids with stainable wood filler mixed with stain to match drag fine brass brush or tooth brush to create some grain in the patch to follow the existing.
ivanhoe said:
4) oil based poly over the top?
5) crack one of these open and call it good:

The rest of your schedule will work.
Tim
 
Back
Top