Home Office Remodel

Cheese said:
[member=65062]DynaGlide[/member]  and  [member=7493]Sparktrician[/member]

I'm not familiar with that style of fan, where does it go and what does it vent to?  What would be the cause for the high current draw and the burned twist connector? Bad bearings in the fan? Seems if it's bad bearings, then that problem could raise its ugly head again sometime. That'd make me nervous.  [scared]

Locally ridge vents, plain static vents (they look terrible) or large attic fans (24"-30" diameter) turning at a low rpm are popular.

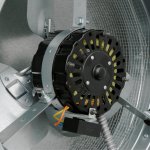
[member=44099]Cheese[/member], the fan type I mentioned are sometimes called mushroom fans.  Here is one example.  There's a small motor inside the dome.  I think the wiring got burned because whoever wired it in used an older type of wire nut that didn't have the spiral spring inside that really digs into the wire and holds the wires together.  I suspect that over time, a high-resistance short developed and caused the heat that burned the wiring.  All that got fixed this morning when I wired in the new fan.  It's up there spinning merrily away, cooling the attic.  (And I'm out of the attic, scrubbed, clean and smelling a whole lot better now.)  [big grin]
 

Attachments

  • granite-master-flow-power-roof-vents-erv6smww-66_1000.jpg
    granite-master-flow-power-roof-vents-erv6smww-66_1000.jpg
    119 KB · Views: 542
TSO_Products said:
[member=65062]DynaGlide[/member] - your project pictures along with pointers from the likes of Sparktrician are a big helpo for many facing this kind of work.

Your LR-32 Hex bar extension pictures the same solution we developed last year when we ran into the same limitations with the short standard bars and the awkward tightening/releasing of the FESTOOL attachment. We hesitated to put it into production because we were not sure if the market is big enough to justify the effort.

Maybe some other LR-32 users, who would rather do woodworking than building shopmade fixtures, will speak up ? ?

Hans

I definitely want longer bars.  If you use LR-32 just for trivial support pins, it's overkill, but for installing slides it "must have" item. 

Thes
 
[member=4105]tjbnwi[/member] or anyone else:

I started spraying Kem Aqua Plus surfacer today. I have two coats on and I think I have the application down but I'm running into an issue.

i-Wj3jwrP-X3.jpg


After it's had time to dry there's some bleeding through the Surfacer on some of the Maple pieces.

i-jW8Pc9b-X3.jpg


i-kvC6bmG-X3.jpg


It's worse on some vs the others. I'm applying the Surfacer wet like a lake and hand sanding w/ 220 between coats. This is only on the Maple frames not on the MDF panels.

I read somewhere I can let it cure overnight and hit it again and it might take care of it before moving onto top coats. Any advice? Not looking to switch to Kilz or equivalent I'd like to stay with the KA+ system as it is designed to work together.

Matt
 
[member=65062]DynaGlide[/member],

Honestly, I’ve never seen this before.

Wash those areas with denatured alcohol tomorrow. Scuff sand, reshoot.

You may be putting it on to heavy, 5 mils wet is where you want to be.

Any pieces not shot pre-clean with DNA (if you can get Prepsol 3919S or 3812S reducer they work well also). I think this is a contamination issue. 

If you had to do any filling are these areas that were filled? If so what filler did you use? KA does not play well with Timbermate fillers.

Tom
 
[member=4105]tjbnwi[/member] Upon further inspection all the maple has the spots to some degree. There's no filling in the areas where it's happening. It doesn't happen at all with the mdf panels.

I'm stumped. I'll try cleaning and scuffing and reshooting and see what happens.
 
I believe it is a contaminate. I've never seen the issue on maple, we use a ton of it (on each build).

Tom
 
[member=4105]tjbnwi[/member] Tom this is silver maple if that matters. I think I'm experiencing tannin bleed through. The wood was raw and sanded before I started. If it comes to it can I apply bin shellac under either the Surfacer or the top coats of the KA+?
 
[member=4105]tjbnwi[/member] I hope you're in for a laugh. I went to the Depot to try to find the Denatured alcohol. They didn't have it so I said screw it and put another coat on. This time I pulled out the mil gauge. Apparently my definition of "wet like a lake" is more in line with "dry like a desert." The mil gauge barely registered a 1 when I checked with what I was laying down.

I'm going to go ahead and say that was my issue. I got a nice thick coat around 4 mil on all the pieces. I'll have to re-do the backs of the doors before moving on.

 
All smiles over here [member=4105]tjbnwi[/member] Tom. My biggest issues were the suicidal bugs flying through my spray and some cool weather micro foaming this morning but I worked through it.

For someone that does this as a hobby figuring it out as I go I'm really pleased.

i-SRtpVpB-X3.jpg


Matt
 
I've said these 2 things many times;

Finishing s the harest thing any woodworker will ever do.

Spary with your ears, not your eyes.

Sand with 240 Garnat Net if you have it.

If something got on the finish between topcoats, denibb it----DO NOT SAND BETWEEN TOP COATS!!!!!!!!!!!

Tom
 
tjbnwi said:
I've said these 2 things many times;

Finishing s the harest thing any woodworker will ever do.

Spary with your ears, not your eyes.

Sand with 240 Garnat Net if you have it.

If something got on the finish between topcoats, denibb it----DO NOT SAND BETWEEN TOP COATS!!!!!!!!!!!

Tom

All good advice.
Finishing will humble you faster than your partner ever will.
Tim
 
Ok I haven't been lurking much lately, posting zero...

And I admit I've just been looking at pictures. Congratulations on getting rid of that closet folding-abomination.

I have to throw a major curve ball in. MAJOR.

Monitor arms. It doesn't look like you planned for them. I'll never live without them again. There's nothing better than opening up the desk space and have ergo viewing. If I moved my office into a room with beautiful cabinets, I'd hack them up any way necessary to implement monitor arms. They need a little space behind them sometimes for how they adjust. At this point I doubt you have a wait to accommodate but truthfully you're obviously very crafty so I wholly suspect I could be very surprised.
 
I know it's been a while but I just put some of the finishing touches on this week. Baseboard and shoe moulding and swapping some outlets. I just realized I haven't posted any updated pics. I've been using the office since mid August and working on it as I could.

This is what I'll call Phase 1. Next I need to replace the double doors leading to the bedroom with sliding doors then after Christmas I'll build and install bookshelves to go on top of the desk. They will have their own lighting.

i-RL5QBRN-X3.jpg


i-48FSzFt-X3.jpg


After scribing this panel in I made it removable along with the toekick for hiding wires:

i-r5DbP5C-X3.jpg


A


i-dwkLF2N-X3.jpg


i-XmXwdrW-X3.jpg


i-qTFVQpv-X3.jpg
 
DynaGlide said:
[member=4105]tjbnwi[/member] I hope you're in for a laugh. I went to the Depot to try to find the Denatured alcohol. They didn't have it so I said screw it and put another coat on. This time I pulled out the mil gauge. Apparently my definition of "wet like a lake" is more in line with "dry like a desert." The mil gauge barely registered a 1 when I checked with what I was laying down.

I'm going to go ahead and say that was my issue. I got a nice thick coat around 4 mil on all the pieces. I'll have to re-do the backs of the doors before moving on.
denatured alcohol for cleaning is no longer sold. Now labeled as cooking fuel. Amazon sells it by the quart. I ordered 4 quarts, so I should be good for awhile.
 
Sparktrician said:
Great job, Matt.  Is SWMBO happy with the results?  [big grin]

Thank you Willy! Yes she is. I'm still a little taken back that I pulled this off as my first cabinetry project.

1) Never remodeled anything  before
2) Never built a real cabinet or door or drawer outside of Greg Paolini's class
3) Never built a countertop or scribed anything before
4) Never had to paint anything before that had to look this nice. .and first time with SW KA+

There is just no replacement for experience. I already have some thoughts on things I might do differently.

neilc said:
Nice work!  You put a ton of work into that and the results look great!

Congrats, Matt!

Thanks neil!
 
i-B3T39k4-X2.jpg


Hello all,

I'm hoping to get some design advice for the bookshelves. I was originally going to do lighting but have scrapped that in favor of simplicity so I can get them done. I'll save learning the ins and outs of LEDs for another day.

Here is the general idea of what I'm after. The model is outdated but gets the point across:

i-sXtcBPN-L.png


I'd like to avoid painting so I'm looking at either a white TFL material or melamine from the box store. If I go Melamine I have to deal with PB core. If I order in a TFL I can pick the substrate, I believe MDF.

My thought is to make each unit separate, i.e. two sides and a full size back. Then when I install screw them all together in place and to the studs in the wall through the backs. I'd cover the exposed front edges with trim and brush paint in place. They need to be a few inches shy of the ceiling to allow for crown molding (not sure how much there either, never done crown before).

I'd likely make the shelves adjustable with shelf pin holes. Either bore them full length or within designated ranges (i.e. 6 holes either direction of each shelf location).

The countertop is 24" deep. The bookshelf units I'm targeting 12" deep including the entire carcass. The opening over the right desk area will be wide enough to accommodate my wife's 27" iMac with some room to spare.

Looking for advice from anyone who's been there, done that.

Thanks,
Matt
 
Back
Top