How are you Organizing Your Festool and Systainers?

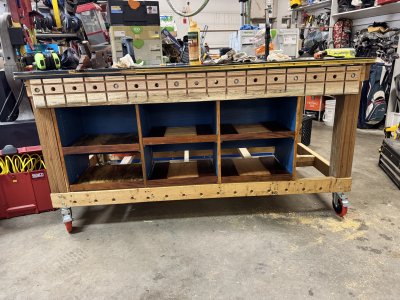
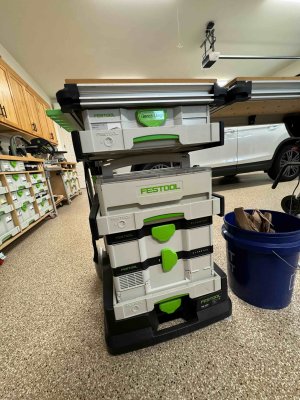
Thanks all for your thoughts. Most of my tools are stacked and that’s getting irritating. Was able to finish the one side of the Sys storage for the workbench.

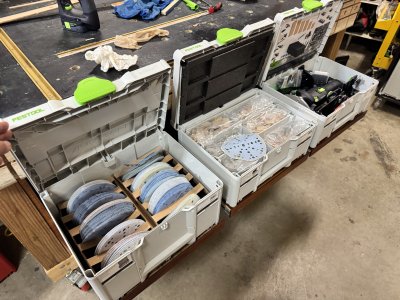
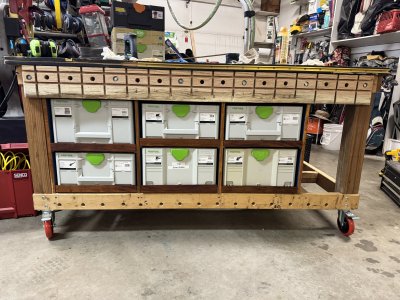
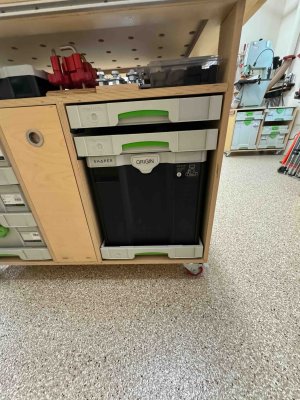
The cabinet isn’t really a cabinet, per se. In order to maximize height, I built the cabinet with three sides from some 3/4” painted plywood I’ve had for many years. I originally designed it with 418mm to fit the Sys Pro 3D printed sliding rails. However, I discovered that despite the slide, they don't slide out enough to access the contents of the Systainer readily. Ended up pivoting to 14" sliders to get the systainers to clear the workbench top. And since I hadn't planned on using sliding drawers, I had to scrounge around for cutoffs and assembling panels with the domino (I tend to be very cheap with shop projects).

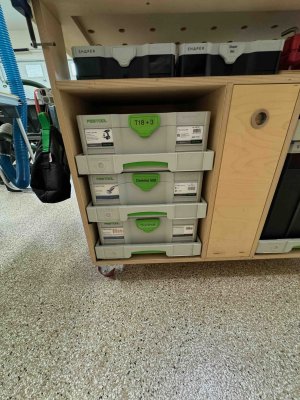
But the first side is done and I think it looks pleasant. The cabinet and slides are trimmed in Hawaiian Koa with a pure tung oil finish. I've arranged the systainers in the way I tend to work at the bench. I like the 150mm abrasives and Dominos to be at the ready. Then my medley of favorites: DF 500, ETS EC 150/3, ETS 150/5, RO150 FEQ. On the other side I'm thinking of placing the TS55 FEQ and EQ saws and then adding the CT22 with boom arm attached to the bench itself.
 

Attachments

  • IMG_1854.jpeg
    IMG_1854.jpeg
    5.5 MB · Views: 41
  • IMG_1856.jpeg
    IMG_1856.jpeg
    4.7 MB · Views: 34
  • IMG_1857.jpeg
    IMG_1857.jpeg
    4.8 MB · Views: 35
Most of my tools are stacked and that’s getting irritating.
That's how things were at the old shop. I honestly think that I may have used some tools less simply because unstacking to get to them presented effort more than my mind might accept on a particular day. With everything organized and each container able to easily slide out, whether on a pullout or on a simple shelf, I do find myself grabbing something more frequently.
 
I store some on wire shelves, but most are on pull-outs below benches, or in a Festool MW1000

Three thoughts...
1- Either use the SysAZ drawers or create some simple pull-outs for easy access and the ability to open the Systainer without removing it. I've seen some people create recesses in plywood pullouts to keep the Systainer in place. I personally like the SysAZ drawers a lot. Fast to install, locking when closed, and easy to relocate as the collection changes.
2- I label all my Systainers with clear labels on the green latches in 1" high letters. Makes it a lot easier to find them across the room. I have a couple of sandpaper Systainers and store them below the sander
3- I make storage cabinets and instead of 32mm hole spacing, use 16mm hole spacing which gives a bit more flexibility with the different heights of Systainers that have been around...

A few photos are attached...
 

Attachments

  • IMG_1028.jpeg
    IMG_1028.jpeg
    542.2 KB · Views: 32
  • IMG_1083.jpeg
    IMG_1083.jpeg
    762 KB · Views: 27
  • IMG_1069.jpeg
    IMG_1069.jpeg
    754.3 KB · Views: 30
  • IMG_1036.jpeg
    IMG_1036.jpeg
    987.9 KB · Views: 28
  • IMG_1035.jpeg
    IMG_1035.jpeg
    995.3 KB · Views: 33
I've seen some people create recesses in plywood pullouts to keep the Systainer in place.
That's how I designed my pull outs before cutting them on the CNC...recesses appropriate to the Systainer "feet". The original ones had provisions for both Gen one Systainers in addition to the T-Loc and Sys-3. Since I replaced any of the original boxes with newer ones, I stopped cutting the extra recesses.

Thanks for the mention of the 16mm hole spacing...I may employ that for any future cabinets for Systainers.
 
That is the major downside of that, least expensive method.


Mine are all in similar cabinets. When I was still working, they were arranged slightly differently, but still grouped together as like-items. They are on pullout trays, that are deeper than the Systainer. That leaves storage space behind also. Sandpaper, Dominos, extra MFK700 bases, etc.
View attachment 381527
AC in the workshop :love::love::love::love:

How does the fan in that thing react to a dusty environment? Did you put an extra filter on the intake?
 
AC in the workshop :love::love::love::love:

How does the fan in that thing react to a dusty environment? Did you put an extra filter on the intake?
My shop also has a mini split. As long as the filer is cleaned on a regular basis, there's no problems. It provides my heat in the cold months and cooling in the warm months.
 
jim_in_pa and jefinsgf really nice to see the organized shops… nice job! Where are the washer/dryer, freezer, golf clubs, dog beds

😝
RE: Organized Shop.
The varnish on the top of that cabinet was barely dry when the photo was taken. I haven't seen the top of that cabinet in 4 years. :ROFLMAO:

The cabinets are IKEA Sektion. Wouldn't have bought them ready-made, but we bought too many for a project at work, so the price was right. Since the picture was taken, I added spacers behind each Systainer so they flush out with the front.
 
Last edited:
Are these custom printed labels? Stickers? Or something else?
Custom printed labels on Weatherproof Matte Inkjet paper attached to Bodno PVC cards that fit into the Systainer recesses on the front and the sides. It's been a culmination of several iterations of different printing materials, different graphics and now with the new SYS³ Systainers no longer having card recesses on the sides of the Systainer, different adhesives. I started off using the standard Festool label graphics but modified that over time by just labeling what the tool is rather than to include a photo of the tool. Including the photo of the tool looks nice up close but at further distances it's just a lot easier to see the printed label minus the photo.
Here's an example of the better label visibility from across the room.
 

Attachments

  • Label, LR32.png
    Label, LR32.png
    67.7 KB · Views: 12
  • LR_32.png
    LR_32.png
    52.1 KB · Views: 12
I actually considered those as they have convenient sizing, but in the end, opted to cut my own. They clearly worked out nicely for your storage!
Only niggle is they're not quite wide enough to use drawer slides to make pull-out shelves. However, if you're just starting out and are totally SYS3, they work perfectly with the SYS3 locking sliders. Only...with those you're back to completely removing the container.
 
Love the photo with your daughter ?? as a visual reference... :D :D :D
Haha, she's good for gauging scale.

Yeah overall it's been about a year since installing this and so far it's been great. I've bought and sold a few tools since this and overall think I could benefit from making one more column for the new wider systainers.
 
Back
Top