tjbnwi said:Thinking about a stop. Simply run a screw into the edge of the spacer, leave it stick out an inch or so.
Tom
Or maybe a domino for little more stability.
tjbnwi said:Thinking about a stop. Simply run a screw into the edge of the spacer, leave it stick out an inch or so.
Tom
tjbnwi said:Everyone,
You're welcome and thanks for the additional suggestions.
Today I used the "rips in the field" method again.
I chose a screw for a stop, because everyone can find a screw (get your minds out of the gutter) but not everyone has a Domino.
I hope everyone who wishes to use this method can make it work for them.
Tom
Ken Nagrod said:tjbnwi said:Everyone,
You're welcome and thanks for the additional suggestions.
Today I used the "rips in the field" method again.
I chose a screw for a stop, because everyone can find a screw (get your minds out of the gutter) but not everyone has a Domino.
I hope everyone who wishes to use this method can make it work for them.
Tom
I know when I lose a screw, that's the first place I look.
Brilliant! I love this forum for sharing (stealing) ideas!CarolinaNomad said:Just wanted to add to Tom's Brillant idea and Iwood's pictures, instead of clamping the rail to the spacer board, try drilling holes in two columns in a staggered pattern in increments of what you need. Then all your doing is placing Qwas dogs in the holes as the rail. You can use the router attached to the track to make the hole patterns in the increments needed while retaining parallel
[attachimg=#]
CarolinaNomad said:Just wanted to add to Tom's Brillant idea and Iwood's pictures, instead of clamping the rail to the spacer board, try drilling holes in two columns in a staggered pattern in increments of what you need. Then all your doing is placing Qwas dogs in the holes as the rail. You can use the router attached to the track to make the hole patterns in the increments needed while retaining parallel
[attachimg=#]
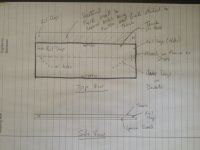
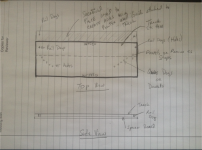
tjbnwi said:[member=61142]Patrick Cox[/member]
The drawing.
Tom