idea for a kitchen cabinet job, well sort of...

jmbfestool said:
Rob-GB said:
Lovely looking timber isn't it, Jacques. Thanks for the update. [smile]
I found a pic of the turning I made some while back....

captive_ring_goblets%281408_x_1056%29.jpg


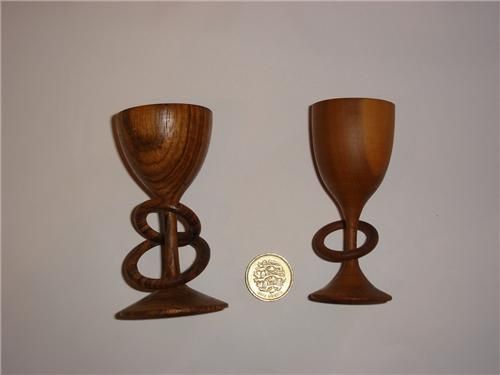
The goblet on the left is Zebrano and the one on the right is Yew, both have darken a bit with age and were finished with shelac.
It is the only time I have worked with it.

Rob.

Nice

I like the left one I don't like the one on the right the yew looks to smoothen plain. Needs wood grain scratching in it lol

Jmb

Cheers JMB,  ;D The Yew one was my first attempt at turning a captive ring, and the wood is silky smooth so no grain detail, the Zebrano one is my second attempt  [laughing] I used a sharpened up OBO nail to turn the rings (a hardened masonry nail for those overseas).

Jacques,we are being threatened with snow over here this week, doubt it will get this far south though. Looking forward to the next progress report [big grin]

regards Rob.
 
Hello guys,

Well, I spent the evening cutting the other piece to smaller pieces for a kind of homemade kitchen furniture, which I decided to invent (or just make, as I am sure, someone did it before, you never know).
The TS is a gem amongst tools, and completely splinterfree.
I have sanded in wet 800 grain today, and it's getting smoother  [big grin] The underside is now finished after 7 layers of oil. I use a nive woodblock for wetsanding, and oil from Spekva.
Anyway, I want to ask something:
Now, I need to make cut-out's for the enormous amount of tubes running all over (5), and I intended to do as usual, either the Trion all the way in the cut, or drill the diameter (+4mm), and then cut straight with the trion. But I seem to remember another way to make this: something like not making the cuts straight, but more like angled away to either side, let's say 30-45 degrees from the hole drilled (or cut).
Is this a smarter way to do it, or is there some other better way to do it? I would like to reinstall the pieces behind the tubes afterwards, so I am looking for a good way to do this too.
The wall cannot be finished before I recieve the hardned glass (white, not green) which I'll put up on the wall. Far left is a little space which I am making into a small hidden door for storing a folding table. The other end of the kitchen will have the same. Most left is my trusty old kitchen blaster which plays old school 1970'ies music all day long while making the room, and can take the sawdust, oilstains etc.  [big grin]
This project takes a loooong time, as I only have two hours in the evenings.

Going horizontal now. ZZZzzzzz...

Cheers,
Jacques.
 
Yeah when you angle the cut this will allow you to close up the cut. If you cut straight then ofcorse the piece you cut of is smaller by two jigsaw blades or saw widths. Angling the cuts let's you slide the piece forward to close the gaps up but the piece will be smaller in depth so wont be flush at the back  this is normally not  a problem because a splash back or skirting would cover this.

Jmb
 
Hi JMB,
Thanks. I'll try it out. Maybe I can cut a thin slice to get same distance to wall and glue up. I will make a test on a cut off.
The wall will be covered with white glass and I expect it to be either 6mm or 8mm thick, which should cover the minimal distance off the wall and I will set the screws for the tabletop so, that the innermost one is fixed, and the two outer ones (away from the wall) will have a longhole so the wood can move with temp. and waterpercentage in the air.

Cheers,
Jacques.
 
HI JMB,

Thanks. Very explanatory. That's what I had in mind. A friend suggested to me that I could also cut bevel in the horizontal plane in the same time, but that would probably make it too fragile in the edges, so I opt for this solution you have drawn.

I ran into a nasty problem today. I am going to build a square box of the same wood around two cabinets. Since it's 40mm thick and  want to cut 45 degrees bevel, my TS55EBQ cannot cut deep enough....  [scared] It lacks 3mm.
I tried to install the Trion on the guiderail, but it's too unprecise to cut through.
I tried to cut with the TS upside down, but that is too unprecise too.
Any ideas, before I cut it all in a normal ordinary way???  (by that I mean a square cut, and let the top and bottom cover the two endpieces)
Maybe a solution with a router?
Unfortunately I don't know anyone with a TS75.

Cheers,
Jacques.

 
Redfox said:
HI JMB,

Thanks. Very explanatory. That's what I had in mind. A friend suggested to me that I could also cut bevel in the horizontal plane in the same time, but that would probably make it too fragile in the edges, so I opt for this solution you have drawn.

I ran into a nasty problem today. I am going to build a square box of the same wood around two cabinets. Since it's 40mm thick and  want to cut 45 degrees bevel, my TS55EBQ cannot cut deep enough....  [scared] It lacks 3mm.
I tried to install the Trion on the guiderail, but it's too unprecise to cut through.
I tried to cut with the TS upside down, but that is too unprecise too.
Any ideas, before I cut it all in a normal ordinary way???  (by that I mean a square cut, and let the top and bottom cover the two endpieces)

Maybe a solution with a router?
Unfortunately I don't know anyone with a TS75.

Cheers,
Jacques.

When you say horizontal cut aswell do you mean making a compound cut?i might misunderstood what you said but what your friend said would cause the piece to drop down so it wont be flush with top like it ain't flush at the back it won't be flush with the top of the worktop either. i don't see the point to angle it on the other edge any way.

when i had to do a angle cut on a work top and my ts55 didn't just make it all the way through.  I decided to cut it with my ts55 any way as i didn't want to buy the ts75 yet. I used my hand saw to cut the rest off I then used my electric planner to clean it off it worked for me. That's what i would if i was you.   I now own the Ts75 now so don't need to worry about stuff like that heeheee  [tongue]

Jmb
 
Hi JMB,

Thanks, I hear you. That's what makes you good people so great for someone like me on a forum like this.  [big grin] I will do that as the TS55 don't "cut" it.
When you use the electric planner, did you plane it all over the surface once again, so you took a little off the length? Or just the bit where the saw cut through, so letting the planner "walk" on your TS cut? If it's all over the cut, it would mean the piece had to be longer to accomodate for the planning?

Yeah, but I think the TS75 is a little over the top for my use, but hey, you never know. Maybe I will dig a little bit deeper into woodworking, as I quite like it. A domino is on my wish list for the future projects  [tongue]

As for the cut outs for tubes, you're right, it would make the bits sink deeper. So I will make it tomorrow hopefully, as I need to go and get some "holesaws" (or what ever it's called) as I don't have all of those needed.
I'll get back and tell if it came out well.
Darn, that daytime job is sometimes in the way. And in two weeks time it's my wife's birthday, so I better finnish up soon, to keep the peace of the house  [big grin]

Cheers,
jacques.
 
Redfox said:
I ran into a nasty problem today. I am going to build a square box of the same wood around two cabinets. Since it's 40mm thick and  want to cut 45 degrees bevel, my TS55EBQ cannot cut deep enough....  [scared] It lacks 3mm.

Jacques,

How thick (exactly) is the top? In the past, I have done the same as you are trying, with the TS55. That was with tops that were 'nominally' 40mm, but actually nearer 39mm. With those, the TS55 will cut through on the guiderail when set to full depth. It does leave a slight 'lip', but that can be easily taken off with a block plane.

Even if it is a full 40mm, or even slightly more, you could still do it. First, clamp the rail along your cut line,with a clamp at each end. Then cut the board at that point, but at 90 degrees (square cut):

[attachthumb=1]

This will mean that there is very little waste to support during the next part.

Then, swing the saw over to 45 degrees and full depth, and cut along the guiderail again, without moving it. You will then have a waste piece still attached, which can be cut off by hand and the resulting cut cleaned up with a block plane:

[attachthumb=2]

Hope that helps,

JRB
 
Redfox said:
Hi JMB,

Thanks, I hear you. That's what makes you good people so great for someone like me on a forum like this.  [big grin] I will do that as the TS55 don't "cut" it.
When you use the electric planner, did you plane it all over the surface once again, so you took a little off the length? Or just the bit where the saw cut through, so letting the planner "walk" on your TS cut? If it's all over the cut, it would mean the piece had to be longer to accomodate for the planning?

Yeah, but I think the TS75 is a little over the top for my use, but hey, you never know. Maybe I will dig a little bit deeper into woodworking, as I quite like it. A domino is on my wish list for the future projects  [tongue]

As for the cut outs for tubes, you're right, it would make the bits sink deeper. So I will make it tomorrow hopefully, as I need to go and get some "holesaws" (or what ever it's called) as I don't have all of those needed.
I'll get back and tell if it came out well.
Darn, that daytime job is sometimes in the way. And in two weeks time it's my wife's birthday, so I better finnish up soon, to keep the peace of the house  [big grin]

Cheers,
jacques.

It all depends on how short your TS comes from the end if it's like few mm i would just use a a sharp block plane but if it's a bit more (i prefer to use power tools than hand tools) i use my electric planer then use the block plane to finish it flush with the TS55 cut. So answer to your question i would plane it to your TS cut so you don't need to make it longer.
I must admit an electric planer is more risky so i would recommend to take your time more and use a block plane all the way

Like jonny said i would cut it square of then cut the angle it puts less strain on your TS.

Jmb

Jmb
 
I cut out for the tubes, but I fail to get how I can get the pieces behind he tubes, as they are too big. Anyone?

Cheers,
Jacques.
 
Redfox said:
I cut out for the tubes, but I fail to get how I can get the pieces behind he tubes, as they are too big. Anyone?

Cheers,
Jacques.

I would cut the pieces down in depth so you can get them behind and tilt the pieces upright. As you won't know the the peices are thin as you would make sure ey are flush at the top and you won't look underneath to see it's thinner so it wont mater.

Have i made sence? If not ask me to explain again better

Jmb
 
Thanks JMB, I'll try it out tomorrow.

Only progress made today is the cut out for the tubes and the built in gas cooker, is finished and is being oiled. Had to shovel a LOT of snow to get to town and around. [big grin]
Must admit I swapped the Trion Festool blade for a trusty bosch as it working real well =less deflection. Sanded the cut out down from grit 40 to 400 before oiling. Nice and smooth, which I like even if it's not being seen.
Pic shows an alternative way to support the cut out  [smile], as I only have two hands; works a treat.
Even though this is a very simple work for all of you guys, it involved a lot of effort for me as a complete rookie. The kitchens and other things I've done before were way more easy to do. Even the tiling and laying out a new concrete floor in the bathroom. So, slowly but steady I am getting closer to a finished kitchen. Lot of small plans for finishing though. We'll see about that later. Looking into diode lighting right now.

Cheers,
Jacques.
 
Hi guys,
So the sink in in place and being quite flat with the surface. I did not chose to rout in 1mm down, as the seal would be much more visible.
Yes, I know, lots of fingerprints, but I'm not finished yes  [big grin]
Next is tubing for the drain.
Q: Is there a standard for hinge holes for the euro style cabinet doors (I am thinking of diameter in the door)?

Cheers,
Jacques.

ps: I discovered a small "windscratch" in the surface of the worktop, and I guess I should justt fill it up with enough oil to expand?

 
Redfox said:
Hi guys,
So the sink in in place and being quite flat with the surface. I did not chose to rout in 1mm down, as the seal would be much more visible.
Yes, I know, lots of fingerprints, but I'm not finished yes  [big grin]
Next is tubing for the drain.
Q: Is there a standard for hinge holes for the euro style cabinet doors (I am thinking of diameter in the door)?

Cheers,
Jacques.

ps: I discovered a small "windscratch" in the surface of the worktop, and I guess I should justt fill it up with enough oil to expand?

35mm hole

Jmb
 
Have you considered building a little bump out on your back wall to hide those pipes?  It will make tiling easier as you won't have to work around them. 

Great job so far, it looks excellent.
 
jmbfestool said:
Redfox said:
Q: Is there a standard for hinge holes for the euro style cabinet doors (I am thinking of diameter in the door)?

32mm hole

Jmb

Euro hinges fit a 35mm hole, not 32.

32mm would be far too sensible for the "32mm system"!
 
jonny round boy said:
jmbfestool said:
Redfox said:
Q: Is there a standard for hinge holes for the euro style cabinet doors (I am thinking of diameter in the door)?

32mm hole

Jmb

Euro hinges fit a 35mm hole, not 32.

32mm would be far too sensible for the "32mm system"!

SORRY!!   I had 32 35 in my head and thought it was the 32!  If in doubt check your tools!  Thats what I just did any way and my cutter is a 35mm cutter!  Sorry I was wrong!  I have altered my post!
[attachimg=#]

JMB
 
Hi all,
Thanks for the replies. The idea is that on each side is a small space like 100 mm. This I have cut two doors for, and I would like to replicate the hinging from the rest of the cabinet doors. I have the hinges, which is not so easy to measure, the are spring loaded - therefore the asking.
No, I really really really don't like tiles in a kitchen. I knocked down the tiles which was there. I also removed the bix built around the tubes. More open and a little more space. I am going to ask a glass maker to produce some iron free white glass pieces cumstom made for my kitchen. As it's ironfree, they will be totally white, and not with a green shade.
Btw. I also took the same type boz around the tubes in the bathroom away, when I rebuild that. Much more nice  [big grin]

Okay, it looks like I am going to try to get a 35mm drill specially made for hinges.

Cheers,
Jacques.

ps: Dear Santa, I have been a good guy this year, and I would like a RO90 for Christmas  [smile]
 
That drill, does it have a centershaft, apart from the 35mm cutting?

I have a piece of tabletop which is a little bent between two opposite corners. Is there a good method I can straighten it with? (40mm zebrano)?

Cheers,
Jacques.
 
Back
Top