Introduction table and chairs pics

dukebird

Member
Joined
Dec 28, 2007
Messages
22
Hello Fog  Well i have been around a while and wanted to share some of the projects i have been doing.    I started this all around the first of October so i am not a speed demon.  I have 2 small children that require some attention.  I work in the lumber industry.    So wood is not a problem.

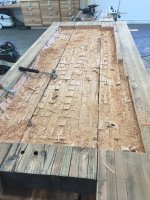
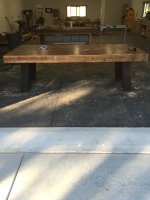
The first set of pictures is the Dining table  I used reclaimed fir out of the factory where i work.  The beams are 5" thick so i needed to hollow out the back.    I needed support so i made the support out of steel tubing.  The wrap on the steel legs is VG df  that i torched and then wire brushed the char.    The table is long and heavy  about 106" 

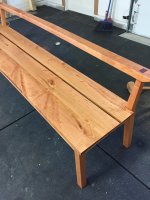
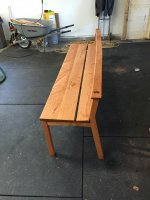
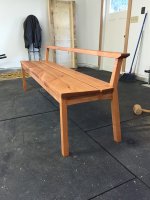
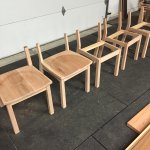
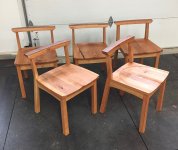
On to the bench and chairs.  I copied the design of the bench and chairs from the Thomas Moser Edo chairs and bench.  My wife picked them out and i thought they were pretty cool so away i went.    Hope to contribute more soon. 
 

Attachments

  • IMG_2414.jpg
    IMG_2414.jpg
    2.4 MB · Views: 480
  • IMG_2517.jpg
    IMG_2517.jpg
    1.4 MB · Views: 421
  • IMG_2577.jpg
    IMG_2577.jpg
    1.3 MB · Views: 317
  • IMG_2601.jpg
    IMG_2601.jpg
    1.5 MB · Views: 282
  • IMG_2602.jpg
    IMG_2602.jpg
    1.4 MB · Views: 225
  • IMG_2603.jpg
    IMG_2603.jpg
    1.5 MB · Views: 259
  • IMG_2714.jpg
    IMG_2714.jpg
    556.7 KB · Views: 314
  • IMG_2759.jpg
    IMG_2759.jpg
    892 KB · Views: 363
Very nice.  I'm a fan of Thomas Moser, too.  You executed the style well. 

Like those shop drawers shown in the first pic, too!

Hope to see more of your work.
 
The shop drawers were pretty simple i used rustic hickory plywood/ Pro core.    then i took aluminum angle and cut 4" Pieces and used them as the handles.  Not too glamorous but plenty cheap.  please excuse the mess.  New shop
 

Attachments

  • IMG_2343.jpg
    IMG_2343.jpg
    1.9 MB · Views: 349
Looking really good, that table won't be going anywhere in the wind.
 
Did you chisel out that entire table by hand?  Or did you do some initial roughing out with the 1400 I see in the background?
 
Looks great!  Did you CNC those scooped chair seats or do them by hand?  I only ask because I have a VCarve file on my CNC that does that exact shape you used.  The CNC definitely gives me better results than when I used to scoop seats with an angle grinder.  If you did all those by hand, I'm even more impressed!
 
Hey guys thanks for the looks.  I used a worm drive skilsaw to cut a thousand squares in the bottom of the table and broke them out with the chisel.  Then built a router sled to smooth the inside. 

Yes stall matts  Tractor supply was where I got them

The seats were done with a table saw.  I watched a popular woodworking video and built a jig and it worked pretty well.    Then came the sanding.  I used Rotex 150 and finished them with the new ets ec 150.  Chairs require huge amounts of sanding
 
Buy yourself a donut wheel for a mini grinder to holo out the seats and a template if needed until you get use to the tool, carving is so quick with these.

Depending on your grinder you can also make a jig for repeated work, saves allot of time.
 
danbox i was amazed at how fast i could do a seat.  It probably took 10 minutes per seaton the saw and then 10 minutes to sand.  I looked at the kutzall and the others.  I would love the creative side of using them.  If i was just making just one that is how i would have done it. 
 
That is really really nice.

I have simular bench project planned inspired by a Mosher mailer i got a number of months ago.

I already have a dinnig set i love and refuse to part with so no need for the table and chairs.

Sure wish i had the room and need though as i would love to build something in this style.
 
thanks for the compliments ice.      I think the most useful tool in building the chairs and bench was the domino xl.  I wanted the mortises to be on  parallel with the rails.  So i cut all the mortises deep before all of the tapered cuts.  The trick was the 10 degree mortise in the back legs so i built a reference jig  to  mortise parallel with the resting surface of the floor.  If that makes any sense. 

 
Back
Top