You are using an out of date browser. It may not display this or other websites correctly.
You should upgrade or use an alternative browser.
You should upgrade or use an alternative browser.
Let's make some Drawers
- Thread starter Overtime
- Start date
There's a program, Snag-It, that works great for stuff like this.
http://www.softwarecasa.com/snagit.html?gclid=CKrl98zlv5kCFQwxawodLXfQsg
http://www.softwarecasa.com/snagit.html?gclid=CKrl98zlv5kCFQwxawodLXfQsg
All:
Great tutorial, great timing for me. Just about to make a decision on a dovetail jig. One other option I am considering is to purchase drawer boxes either ready to assemble or assembled ready to install. It's a trade-off of money versus how many hours do I want to devote to this one task. My intention is to build new kitchen cabinets for myself. I'm a hobbiest and use of a dovetail jig beyond this project would be minimal...perhaps a few decorative boxes.
The question is: Has anyone made the calculations of cost of pre-assembled drawer boxes (approximately 36) versus cost of materials (S2S hardwood--no planer in my shop) for drawer boxes PLUS acqusition cost of a mid-grade dovetail jig. I own several routers already. I realize there is also the intrinsic joy of doing one's own work. However, this seems to me to be a lot of repetitive steps which is more a production routine than a creative fun routine. I can expend my time and energy on building the false fronts which is the "showcase" part of the drawer assembly.
Thoughts please......
Overtime
Member
- Joined
- Jan 25, 2007
- Messages
- 265
Chowman, there are more options for quality drawers that are much less complicated and some with lower tooling costs. You can use baltic birch plywood skip the solid wood and still make a fine product. Lock miters, rabbits, and there's the domino drawer. search - domidrawer. Get a domino and the job will be a breeze. The domino drawers are rock solid and look good too.
But if your going to get a dovetail jig get this http://www.leighjigs.com/d4.php
http://www.highlandwoodworking.com/index.asp?PageAction=VIEWPROD&ProdID=6886 Free shipping 2 free clamps - they are the best and so is Leigh Tools. Free clamps special 5 days to think about it, expires mar 31. There might be ? an extra discount for forum members ?
In the future I may loose the VS 600 for the Leigh")
But if your going to get a dovetail jig get this http://www.leighjigs.com/d4.php
http://www.highlandwoodworking.com/index.asp?PageAction=VIEWPROD&ProdID=6886 Free shipping 2 free clamps - they are the best and so is Leigh Tools. Free clamps special 5 days to think about it, expires mar 31. There might be ? an extra discount for forum members ?
In the future I may loose the VS 600 for the Leigh
Overtime
Member
- Joined
- Jan 25, 2007
- Messages
- 265
All the parts are milled now.
The parts were marked on the bottom edges, then the inside facing drawer parts get a light buzz with the ROS to remove pencil marks etc.
150 then 180 - Sanding the insides now is much better than after glue up.
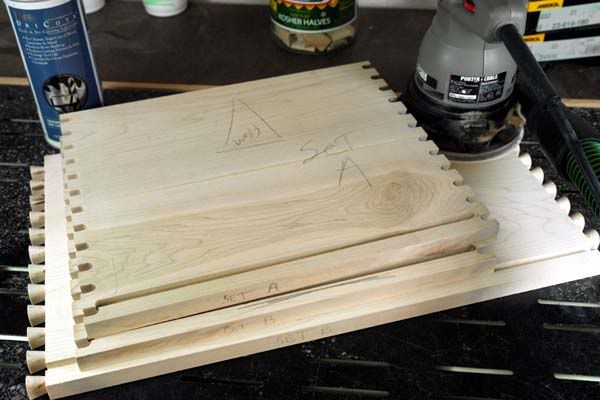
Then the upper edges get a little kiss from the edge sander to remove fuzz, saw marks, burn marks etc. A Freud Glue Line Rip 32 T blade was used to rip the stock and gave a nice clean cut.

And here are all the parts ready for glue up. Note the Set Up jig is saved for next use of the SZ 14 template. (its not glued) The adjustments made on the template during set up will remain the same even after it is removed from the main unit.
So next use all that is required is the height of the bit and that's why you save the jig. Just set the two parts in place and lower bit to match the jig. And it will give you dovetail cuts just the same as last use.
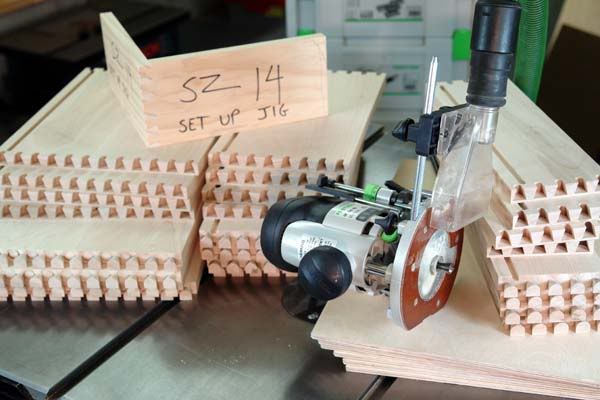
The VS 600 has it's quirks and here are a couple
The dust hood needs to be back because it hits the little knobs on the indexing tab deals. I can / will grind a little bit of the clear plastic to make it get closer. Result will be better dust collection when it's a bit closer. as it is it's about 75%
When routing the last pin to the right the router needs to be pivoted with the handle more toward the user in order to go all the way into the template index slot. because the unused hose housing on the router base will bump the template Knob. ( This is only an issue for the very first use of the unit ) The router is not tilted, bent or anything you just turn the router 10 Degrees thats it No big deal.
The big knobs for clamping the work should have a better grip to them. They are smooth plastic and they need to be tightened pretty good to keep the stock from moving. Grip gloves are the answer.
related to clamping the work parts - The long grey hold down bars that the clamp knobs go through could use a rubber tape strip to make contact with the wood. It's something I keep forgetting to do. Just slap some grip tape of some sort on the underside of them.
When flipping the template down into position there is just a tiny bit of "play" or slop.
So you need to push the template back so both ends bottom out while keeping it flat then lock the template handles down.
No big deal but you can get slightly different results with the same set up if the template is not seated properly.
After you make a few parts you get to know the equipment and it will make great joints. All these quirks are overcome when familiar with the equipment.
Time for glue - then we'll move onto the notches on the bottom and the locking devices.
The parts were marked on the bottom edges, then the inside facing drawer parts get a light buzz with the ROS to remove pencil marks etc.
150 then 180 - Sanding the insides now is much better than after glue up.
Then the upper edges get a little kiss from the edge sander to remove fuzz, saw marks, burn marks etc. A Freud Glue Line Rip 32 T blade was used to rip the stock and gave a nice clean cut.
And here are all the parts ready for glue up. Note the Set Up jig is saved for next use of the SZ 14 template. (its not glued) The adjustments made on the template during set up will remain the same even after it is removed from the main unit.
So next use all that is required is the height of the bit and that's why you save the jig. Just set the two parts in place and lower bit to match the jig. And it will give you dovetail cuts just the same as last use.
The VS 600 has it's quirks and here are a couple
The dust hood needs to be back because it hits the little knobs on the indexing tab deals. I can / will grind a little bit of the clear plastic to make it get closer. Result will be better dust collection when it's a bit closer. as it is it's about 75%
When routing the last pin to the right the router needs to be pivoted with the handle more toward the user in order to go all the way into the template index slot. because the unused hose housing on the router base will bump the template Knob. ( This is only an issue for the very first use of the unit ) The router is not tilted, bent or anything you just turn the router 10 Degrees thats it No big deal.
The big knobs for clamping the work should have a better grip to them. They are smooth plastic and they need to be tightened pretty good to keep the stock from moving. Grip gloves are the answer.
related to clamping the work parts - The long grey hold down bars that the clamp knobs go through could use a rubber tape strip to make contact with the wood. It's something I keep forgetting to do. Just slap some grip tape of some sort on the underside of them.
When flipping the template down into position there is just a tiny bit of "play" or slop.
So you need to push the template back so both ends bottom out while keeping it flat then lock the template handles down.
No big deal but you can get slightly different results with the same set up if the template is not seated properly.
After you make a few parts you get to know the equipment and it will make great joints. All these quirks are overcome when familiar with the equipment.
Time for glue - then we'll move onto the notches on the bottom and the locking devices.
John Stevens
Member
- Joined
- Jan 16, 2007
- Messages
- 812
Overtime said:The VS 600 has it's quirks and here are a couple
Patrick, great job, and you get extra credit for having the integrity to mention the quirks.
Overtime said:The dust hood needs to be back because it hits the little knobs on the indexing tab deals.
Ask your seller (or the tech guys at Festool) whether there are replacement parts that will eliminate this problem. I recall reading about them back when this forum was on Yahoo Groups...about a month after I returned my VS600 :
") C'est la vie.
C'est la vie.Regards,
John
Overtime
Member
- Joined
- Jan 25, 2007
- Messages
- 265
All glued up, The Good, The, Bad, The Ugly
Poor clamping job. Nothing a little skim of bondo won't cure.
And I have a few minor gaps I'll put the pic up later on the ugly.
But all in all they came out nice for production cabinet drawers.
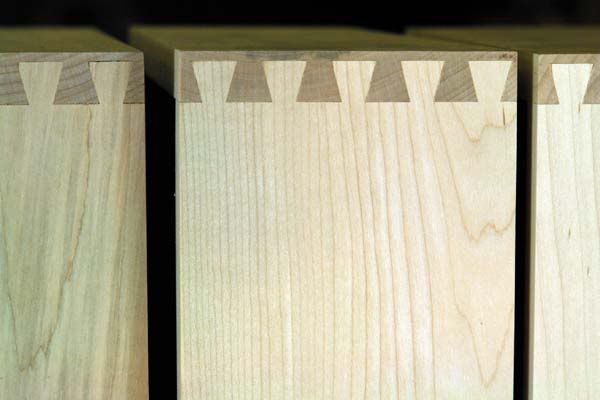
Tips - make the joints snug on the dry fit and use less glue during assembly rather than loose fitting and lots of glue.
Now to bore you with some more pics and specs.
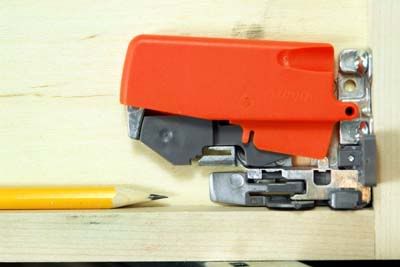
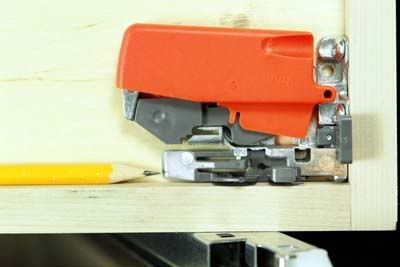
These are the standard locking devices L and R they clip and hold front of drawer locked in.
The mounting screws are 1/2" # 6 truss head screws that are driven in on an angle. It holds them into the corner flush.

You can get by just fine with out the drilling jig. Just use the specs for locaton and hole size. You can use the locking device as a drilling guide for the angle of screw. see Drawer preparation, page 15 blum tandem brochure
I used the jig and tool kit # T65.9000 page 54
These gagets made it silly simple.
Poor clamping job. Nothing a little skim of bondo won't cure.
And I have a few minor gaps I'll put the pic up later on the ugly.
But all in all they came out nice for production cabinet drawers.
Tips - make the joints snug on the dry fit and use less glue during assembly rather than loose fitting and lots of glue.
Now to bore you with some more pics and specs.
These are the standard locking devices L and R they clip and hold front of drawer locked in.
The mounting screws are 1/2" # 6 truss head screws that are driven in on an angle. It holds them into the corner flush.
You can get by just fine with out the drilling jig. Just use the specs for locaton and hole size. You can use the locking device as a drilling guide for the angle of screw. see Drawer preparation, page 15 blum tandem brochure
I used the jig and tool kit # T65.9000 page 54
These gagets made it silly simple.
Overtime
Member
- Joined
- Jan 25, 2007
- Messages
- 265
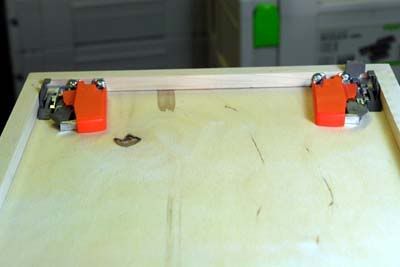
The first drawer goes in with a nice "click"
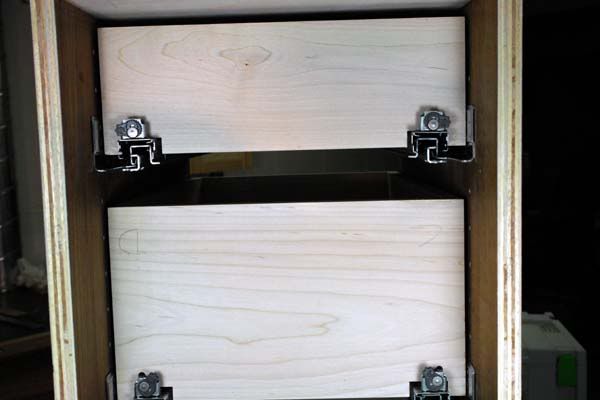
Here's what the back cam adjustments can do L and R
Mounting nailers will be added via pocket holes for mounting to wall.
There are little grey cam tabs that will raise the drawer up off the rail. L & R are independent of each other so you can adjust for tilt ( 2nd pic shows the right side up off the runner while the left is down)

More adjustments for the front of the drawer.
By sliding the grey tabs towards the pencil a wedge lifts the drawer up off the front portion of the rail
Amazing flexability with the adjustments 8)
The drawer slides operate incredibly smooth. They soft bump if pulled out too hard. And they retract with just a gentle push, Pulling closed all nice and soft like ;D
There's more engineering in those little drawer runners and hardware then there was in my first POS car
The fit and operating tolerances of this hardware requires accuracy with the box construction. It must be as close to spec as possible.
I'm adding 3" stretchers that will be centered on the line where the drawer false front faces will be. Yep they will all each be a height mutiple of 32 mm.

The outside overall width of the cabinet box is 14"
The boxes will be removed then preped for spray. Then I'll get the fronts on them.
Here's what the back cam adjustments can do L and R
Mounting nailers will be added via pocket holes for mounting to wall.
There are little grey cam tabs that will raise the drawer up off the rail. L & R are independent of each other so you can adjust for tilt ( 2nd pic shows the right side up off the runner while the left is down)
More adjustments for the front of the drawer.
By sliding the grey tabs towards the pencil a wedge lifts the drawer up off the front portion of the rail
Amazing flexability with the adjustments 8)
The drawer slides operate incredibly smooth. They soft bump if pulled out too hard. And they retract with just a gentle push, Pulling closed all nice and soft like ;D
There's more engineering in those little drawer runners and hardware then there was in my first POS car
The fit and operating tolerances of this hardware requires accuracy with the box construction. It must be as close to spec as possible.
I'm adding 3" stretchers that will be centered on the line where the drawer false front faces will be. Yep they will all each be a height mutiple of 32 mm.
The outside overall width of the cabinet box is 14"
The boxes will be removed then preped for spray. Then I'll get the fronts on them.
Brice Burrell
Member
- Joined
- Mar 13, 2007
- Messages
- 7,325
Patrick, I must commend you on your efforts to produces such great tutorials! Good job and I'm looking forward to seeing the finished product.
Patrick, I must commend you on your efforts to produces such great tutorials! Good job and I'm looking forward to seeing the finished product.
I agree completely. Thank you for taking the time to post in this detail.
Overtime said:Thanks Brice and hafner !
Sorry for delay I'll get back to it soon.
Meantime here's some intermission music. Music while waiting for glue to dry ;D
Schubert's Symphony n.8 Unfinished
thanks for the tutorial I have been enjoying the read...
To top it off you put in one of my favorite "classical" pieces. If you dig that piece check out the recording of the Cleveland Orchestra conducted by George Szell. The opening motif and probably the most famous part of the piece is played actually in unison with first clarinet and first oboe. On that recording there is two of the great orchestral musicians of the twentieth century playing the parts, at least in my opinion but I am sure I could get others to agree
. The first clarinet was Robert Marcellus and the oboe player was John Mack, I think it was John, I have been out of music for a while.well I am sure that was way more information than was necessary, but thanks again for the tutorial!
JJ
Overtime said:A table full of Goodies 8)
And Deep thread Pozi system screws, for mounting the drawer slides. 661.1450.HG Flat head for 5 mm system holes, 14.5 mm length
These system screws come in short or long (shown here) for 5/8" or 3/4" cabinet wall thickness.
They are made to fit into the standard 5mm system holes. They grip very tight.
If you are using the LR 32 or are drilling 5mm system holes in plywood, sheet goods etc. then you do not need to use pilot holes, vix bits, and wood screws.
This a very good tutorial, thanks.
But FWIW The screws are Euro Screws with a Pozi drive head. There is no Pozi system as such
for more info see http://en.wikipedia.org/wiki/Pozidriv
Overtime
Member
- Joined
- Jan 25, 2007
- Messages
- 265
Jerome - thanks for the correction. Blum calls them "Deep thread System Screws" with Pozi head.
32mm = Festool = Euro = System ;D
And I should mention that I use the blum pozi screw driver and never gave much thought about a difference between standard Phillips drive and pozi. Big difference - the pozi heads, when using the correct driver is real nice - no slip at all and you can really reef them down tight. Makes you want to give the cordless driver a rest.
I like the use of the term System because it is a direct reference to the 32 mm system. When you see items listed as system hardware, system screws, system this or that, you know that it (most likely) uses the standard system hole size of 5mm And also that (most likely) it will reference from the same 37mm from the front edge.
JJ - Love that tune - needs bigger deeper strings in opening - more cello, viola and bass. I will soon have my copy of the Cleveland Orchestra"s version. Thanks
Overtime
Member
- Joined
- Jan 25, 2007
- Messages
- 265
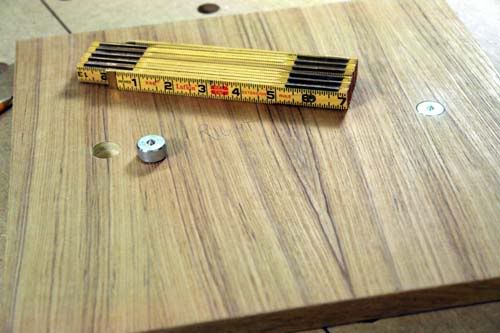
Using the Nylon Drawer Front Adjusters 661.1300.HG and 65.2950.10 marking gauges, For the drawer faces or fronts.
There is a cam like metal piece inside the nylon body of the adjuster that allows the screw to move about 1/8" in any direction 360 deg.
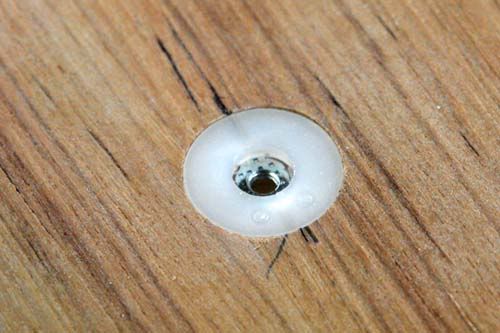
A 20mm forstner bit was used to drill the holes to the thickness of the adjusters.
The marking gages (tools) fit perfectly in the 20mm holes. They will drop out when tilted over. They have a little weight to them.
Care must be taken to insure locations do not conflict with drawer pull hardware.
The nylon inserts are barbed and fit snugly, they will not come out.
Here is a drawer front being located. I put a quart can of finish in the drawer to simulate normal use and eliminate any slack.
Also a couple of pieces of wood edge tape for spacers.
Then the board is held into position and pressed. the points on the locators give clear marks where to drill.

There is a cam like metal piece inside the nylon body of the adjuster that allows the screw to move about 1/8" in any direction 360 deg.
A 20mm forstner bit was used to drill the holes to the thickness of the adjusters.
The marking gages (tools) fit perfectly in the 20mm holes. They will drop out when tilted over. They have a little weight to them.
Care must be taken to insure locations do not conflict with drawer pull hardware.
The nylon inserts are barbed and fit snugly, they will not come out.
Here is a drawer front being located. I put a quart can of finish in the drawer to simulate normal use and eliminate any slack.
Also a couple of pieces of wood edge tape for spacers.
Then the board is held into position and pressed. the points on the locators give clear marks where to drill.
Overtime
Member
- Joined
- Jan 25, 2007
- Messages
- 265
Then the locators are removed and replaced with the inserts.
Pic shows dimple near dead center of pic
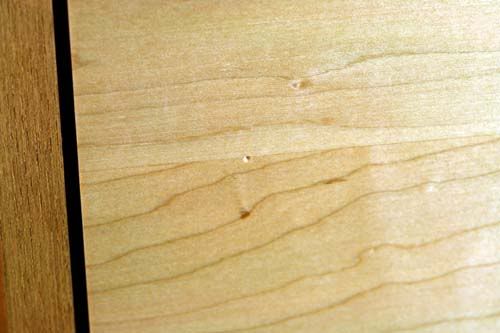
The holes are drilled through the drawer. The mounting screws are used just like pull hardware screws. The fronts are adjusted by lightly tightening the screws then moving the front till it is where you want it then tighten them up. When cabinet is in place make any final tweeking and lastly drill through for mounting pull hardware.
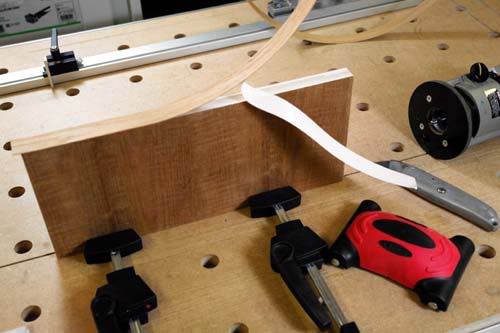
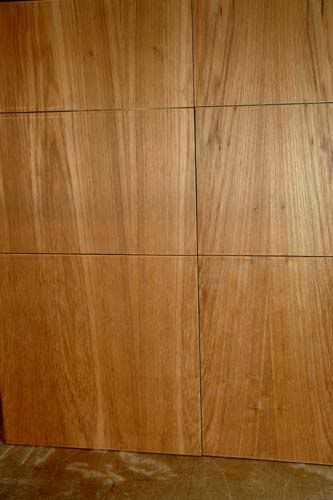
The Drawer fronts are made of Teak ply and Fastedge Teak unfinished wood tape by Fastcap.
The drawer front height size are multiples of 32mm (point of contact before spacing) as mentioned before and were cut to account for the thickness of the wood tape and gaps between the drawers. So actual size is ply + wood tape
This is a dry fit before finish. These two base units will be split but the grain pattern will match the center unit.
Finnished install pics soon.
Pic shows dimple near dead center of pic
The holes are drilled through the drawer. The mounting screws are used just like pull hardware screws. The fronts are adjusted by lightly tightening the screws then moving the front till it is where you want it then tighten them up. When cabinet is in place make any final tweeking and lastly drill through for mounting pull hardware.
The Drawer fronts are made of Teak ply and Fastedge Teak unfinished wood tape by Fastcap.
The drawer front height size are multiples of 32mm (point of contact before spacing) as mentioned before and were cut to account for the thickness of the wood tape and gaps between the drawers. So actual size is ply + wood tape
This is a dry fit before finish. These two base units will be split but the grain pattern will match the center unit.
Finnished install pics soon.
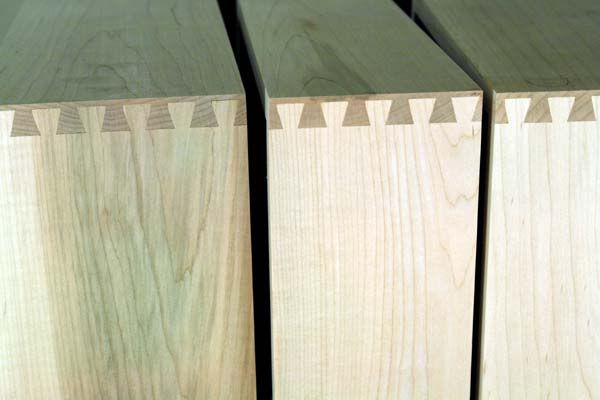
Glue ups for deep drawers! You totally rock! I wimp out at about 7" and get the plywood. Plywood dovetails are just plain nasty, I hate myself every time I do it. And edge banded drawer side tops are nastier still. But that's a lot of work for a kitchen but you've inspired me! Next time I make a glue up. I don't have a big planer but I could go 12" anyway.
I'm impressed with those notches in the back of the drawers. How did you cut those and did you know you were going to take pictures of them before you cut them? Mine are, what's the word? Not quite so perfect considering that they will only be seen about 4 times in the next 30 years. I like to go with through dovetails on drawers that have an applied front and that messes up the notches. But that's what I call uncompromising. Again, you rock.
A word of advice on the little plastic draw front adjuster thingies to all those who might try them. Make sure the hole is deep enough BEFORE you insert one. On one memorable occasion yours truly did not. You said they fit snugly and won't come out. Boy howdy.
Plywood for drawer fronts? It certainly is pretty. Was the teak ply easy to deal with? Did you have any problem with flatness or warping. Are there going to be any slab doors in the project? I've never done it except on a router table but I'd love to use quality ply for cabinet fronts, simple and beautiful slab doors. Yours look outstanding. But there's so much angst in the industry about it. I've always been scared to try. Obviously you don't have a problem with it. So you've had good luck with this in the past or is it a new thing for you?
There's an outfit making cabinets that are all plywood and I think their stuff looks great. It's called Kerf Designs and they make furniture and cabinetry out of ply and don't do any edge banding. The look of the plys is part of the design. It's kind of in the Mid Century Mod style. I wish I knew where to get plywood like that, that's REAL veneer core.
I agree that Kerf's stuff is awesome. I think they were using Europly at one time http://ecohaus.com/C-14/panel+%26+sheet+goods and the edges were finished using OSMO http://kerfdesign.com/finishing.html . They cut their stuff using CNC now but did it all traditional and still maintaining super tolerances. I personally love plywood and laminate myself! Another cool Seattle company is http://www.henrybuilt.com sustainable materials, clean modern design... check em out!
Mark Enomoto said:I agree that Kerf's stuff is awesome. I think they were using Europly at one time http://ecohaus.com/C-14/panel+%26+sheet+goods and the edges were finished using OSMO http://kerfdesign.com/finishing.html . They cut their stuff using CNC now but did it all traditional and still maintaining super tolerances. I personally love plywood and laminate myself! Another cool Seattle company is http://www.henrybuilt.com sustainable materials, clean modern design... check em out!
Thanks for the info, this is very interesting. I suppose that those Kerf folks don't have any problem using plywood for drawer sides......... That's a joke. Anyway, I don't want to hijack this excellent thread on drawers but this plywood thing has me fascinated. I'm going to check in the Building Materials forum and see about this plywood. I may start a thread to explore this cool plywood further because it's new to me. My experience only goes as far as baltic birch. I haven't seen Europly before. It's pricey but not outrageous and opens up some interesting possibilities.
Back to the drawers. Should half blind be faster than through when using a jig? With my Leigh Super 18 it seems like it takes about the same time to get a drawer cut.
Similar threads
- Replies
- 6
- Views
- 8K
- Replies
- 32
- Views
- 10K