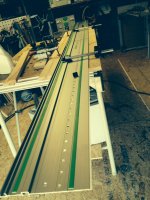
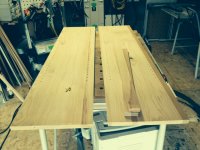
LR32 Short rail.....long panel....what to do....???

gnlman

Member
Joined
May 8, 2010
Messages
216
Hi. I recently picked up the LR32 Kit and the 55 holy rail but have not had time to use it as I'm away from home a lot right now.

I am planning on adding some more cabinets to my workshop and thought I would start with some upper cabinets to get used of the LR32, but I really need to build a kind of tool pantry first....(6-7 feet)
I thought for most of the cabinets I will be making I could get by with the shorter rail for now, but thinking about another 55 and the LR32 spacer for larger panels. I have a regular 55 and 75 rail as well...

I have done a fair bit of reading and watched a lot of videos on the LR32 and can't seem to find a demo of anyone using the 55 rail on a longer panel and how they do it. I did read where some move the rail once the first holes are drilled and use the router bit plunged to index and carry on drilling more holes with the rail clamped down.

My question is:
If you are making a panel, and the panels length is divisible by 32, could you start at say the bottom of the panel with the stop 16 up and out, drill your holes til you run out of rail then remove the stop from the bottom move the stop to the other end of the rail and index off the top of the panel without rotating the panel or rail....would the holes line up if the panel is divisible by 32...

Sorry I don't have any way of drawing a picture or anything, hope what I'm asking makes sense....If I was home I could give this a try, just got to thinking about it and feel the holes should line up as long as everything is divisible by 32......Any thoughts......
I want the holes to run the complete length of the panel.
Thanks, Greg.
 
Greg, there's no reason that shouldn't work as long as your panels are dead on.  Also, you could have +/- 32mm space between where the holes meet between the two runs (when you relocate the rail), as long as the odd spacings all falls in the same place.
 
Thanks Brice. In theory judging from what I've read I thought it would work, but like you said they would have to be dead on......Leaving a space in the middle has given me another idea..Given the height of the cabinet, it would probably not be a bad idea to have a fixed shelf in the middle somewhere to stop any racking....that is where I could leave the space and just index from top and bottom to a shelf that is fixed in the middle...I guess the only other issue would be having to move the center hinge for the doors a wee bit up or down due to the fixed shelf....Can't wait to give it a try!!
Thanks again for the input.
Greg
 
Just make sure you figure out a way to clamp the rail at both ends so it doesn't move on you.

Before I bought the longer LR32 rail I used a regular rail and two rail connectors so I could clamp both ends of the rail.   It makes for a time consuming task, not having a longer LR32 rail, but it can be done.  Just pay attention to what you are doing.  Trust me….I've screwed up some plywood!   The frustration made me buy the longer LR32 rail for this task.

Eric
 
I just use two 55" holy rails with the connector bars when I need a longer holy rail.  I also use a Betterley Straightline Connector to ensure that the two rails are dead nuts in alignment.  Frankly, I wish I had bought the two holy rails from the beginning instead of the standard rails that are only $5.00 less expensive, but I didn't have the foresight about that usefulness of the LR 32 system and the OF 1010.  Besides, the shorter rails are less susceptible to damage when I'm on site, compared to the longer holy rail, and far easier to carry and store.  Also, the LR 32 Guide Rail Index (496938) which comes with the LR 32 is used to space the two holy rails apart so you get an accurate 32mm hole spacing at the junction of the two rails. 

 
Hi. Thank you so much for the replies....

Eric:
Yes was thinking the same thing, attaching my regular 55 to the holy rail so I could use clamps at both ends.  Also watched a Festool video where the woodworker used a clamp on the mft and a piece of wood to hold down one end of the rail....pretty smart I thought....he was the guy that did the chaos wall....can't remember his name...
The other way I was thinking to clamp was using the parallel guides. When I use them now, I clamp them once they are installed so there is no movement. Was thinking once you get your setback using the LR32 edge stop, before removal you could attach the parallel guides and once set and clamped they could be moved without adjustment for other panels..(got the idea from a video Brice did on repetitive panels using Lr32) 
I have really enjoyed your You Tube videos, and in particular your explanation of the 32 mm system and the importance of panels divisible by 32....until I saw your videos I was using metric but not really understanding how it all ties together...Thank you again, I'm thinking many folks benefited from your efforts.....much appreciated!!

Sparktrician:
yes up til now that was my plan to buy and join 2 holy rails, and still might buy another 55 holy rail instead of the longer rail. My Betterly connector arrived yesterday in the mail and am looking forward to using this for joining my 55 and 75 regular rails as well.. I was just curious from what I've read if the longer panels could be done with just one rail, but thinking I'll still order the extra 55 holy rail, and then I will have enough rails to be able to leave my parallel guides attached to one rail for when I want to make shelves ect.
I'm just a home hobby guy so I don't have to worry about transporting rails like you all that go to jobsites ect...

Hmmm I'm going to have to look in the LR32 kit again, as I don't seem to remember seeing the guide rail index in the systainer....have it on my wish list with lee valley along with another 55 holy rail.....I'll have another look in the systainer when I get a chance to go home...

Thank you all for your replies, I feel honored to having so many FOG Pros answering my post!!
Greg

 
gnlman said:
Sparktrician:
yes up til now that was my plan to buy and join 2 holy rails, and still might buy another 55 holy rail instead of the longer rail. My Betterly connector arrived yesterday in the mail and am looking forward to using this for joining my 55 and 75 regular rails as well.. I was just curious from what I've read if the longer panels could be done with just one rail, but thinking I'll still order the extra 55 holy rail, and then I will have enough rails to be able to leave my parallel guides attached to one rail for when I want to make shelves ect.
I'm just a home hobby guy so I don't have to worry about transporting rails like you all that go to jobsites ect...

Hmmm I'm going to have to look in the LR32 kit again, as I don't seem to remember seeing the guide rail index in the systainer....have it on my wish list with lee valley along with another 55 holy rail.....I'll have another look in the systainer when I get a chance to go home...

Greg, you'll find that the parallel guides work very well with the holy rails and the LR 32 when you want to make cabinets and you need to line-bore system holes that are not just 37mm in from front and back edges.  Yes, you can set up the indexing to intervals other than 37mm using the edge stops, but they aren't long enough to reach to the center of a 608mm deep cabinet.  Why is this necessary?  Let's say you want to make a cabinet with half-depth shelves to be supported at the rear of the cabinet and the center, but not the front.  Another example is drawer glides that are supported at 96mm and 128mm increments from the 37mm in front hole.  Take a look at the literature for Accuride glides, as an example.  You'll note regularly spaced holes (index, F, G and H, depending on glide length) on the glides' fixed piece.  You might want to look at this thread for a more descriptive discussion of using the parallel guides with the LR 32.  You will also find the FS Rapid Clamp and Fixed Jaw invaluable for securing the guide rails to sheet goods whether line boring or just breaking down sheet goods.  Good luck! 

 
yes that is the video I watched that gave me the idea of using the the parallel guides to help clamp the single rail when using on longer panel....have to admit I didn't get what Brice meant about drawer glides til you all chimed in on this thread, and I bought and started reading about the lr32 system...previous to this, I had a Rockler jig for drilling holes and fashioned a fence on it that allowed me to connect the parallel guides to it.. I used it to drill the center holes in my drawer cabinets to allow me to use those fancy 5mm screws to attach the drawer slides on the cabinet....worked pretty good....took a long time to measure...lol The lr32 will be faster, and more accurate I'm sure.

My good wife gave me the rapid clamp for xmas a couple of years ago. You are correct, it works great with the guides although i noticed more care is needed when i have the 55 and 75 joined together as when you tighten the clamp it has a tendency to  pull the rail to the left on the side you ratchet the clamp on ( i am probably doing it up too tight..)......on the 55 by itself, not an issue for me it stays solid and does not move....maybe just the long distance of the rail magnifies this....not sure...I have all the festool clamps, and to me the rapid clamp is the least celebrated but one of my most used clamps with the guide rails....it's faster to use than the other clamps for sure.
Once I get chance to play with the lr32, I'll have another look at the links you suggested and i am sure I will learn something else that I'm not seeing now.
Thank you for all the info and the help
Greg.
 
If you already have a LR 32 system and 1 holy rail, get a second one. The end stops that come with the kit have a equal sign = on the 16 side. connect the 2 rails ensure the = is in the middle of the gap use rail connectors to connect the 2 rails together and tighten.

Then use the edge stops (what ever they call them) to set the 37mm set back. move them about clamp the rails and you should be in good shape.
 

Attachments

  • photo.JPG
    photo.JPG
    493.7 KB · Views: 682
  • photo 2-2.JPG
    photo 2-2.JPG
    397.9 KB · Views: 575
Hi. Yes thinking another rail is in my future, just don't have that many tall cabinets to build in my future...yet...lol
Thanks for the info on the end stop...I was wondering if this was the same thing as the lr32 guide rail connector (496938)...now it is confirmed and I can save 40 bucks or so!!
Thank you very much.
Greg
 
If you're only going to have a rare need for a long LR 32 rail, you can "leap frog" using a regular rail as an extension. It's more tedious and time consuming but works. Use the side stops to maintain the distance from the hole series to the the edge of the work piece and plunge the bit back into an existing hole for a longitudinal reference. Of course, you want the router on the sled and the sled in a detent for that reference...

If you're making many of these, that's probably not the way to go but for a rare situation, it works fine.

Tom
 
My question is:
If you are making a panel, and the panels length is divisible by 32, could you start at say the bottom of the panel with the stop 16 up and out, drill your holes til you run out of rail then remove the stop from the bottom move the stop to the other end of the rail and index off the top of the panel without rotating the panel or rail....would the holes line up if the panel is divisible by 32...

It's been answered in this topic before, but yes you can. I did it on one panel when I had only one holy rail. Did the top, flipped the rail and stop and did the bottom. Guess what, it turned out the panel was 1mm off! So when I got to the middle the last set of holes didn't line up. But as long as you reference the cup holes from the same side everything works fine. It's just the 'middle' hole that theoretically one mm off :)

Also when using Blum hinges the "Inserta Drilling Jig" is a nice little jig to have lying around. You can make the perfect cuphole with the LR32 and with this jig make sure your screw holes are dead-on straight.

JIG1005_01.jpg
 
Tom. Good idea, never thought of that.....would also help solve the clamping issue as I could use my rapid clamp or regular rail clamps as the joined rails would overhang both ends....
Dutchie. That's a neat looking little jig. I have something similar that marks the hinge location on the inside of the cabinet, as well as the door itself. It only marks where to drill the cup and screw holes, and so far the few I've done I just drill the cup and use a square to position the hinge and drill thru the hinge...your jig looks much faster...
Thanks, Greg
 
the 1400 holy rail ca be used as a reg guide rail to ( Im sure you already knew that) so you could sell your reg 1400 rail and buy another holy rail then you'll be set
 
Back in early 2006 when I bought my first Festools I had been out of the cabinet making business for almost 10 years. I was approaching retirement from my career. After I bought my TS55 and CT22, I received a commission to build a series of tall book cases, some double sided.

In those days the Holy rail options were the 1080mm and the 2424mm. I realized that if I joined 2 of the 1080mm, I still had a rail too short. Of course I needed one of the 1080mm rails for ordinary cabinets, so I had bought that along with my first OF1010 and the LR32 kit. I broke down, bit the bullet and bought the long Holy rail.

That has proven to be a very good investment. Several times a week over the past 8 years I have made money with my long Holy rail. Sure, eventually the 1400mm replaced the 1080mm Holy rail and when I bought more TS55s I took the Holy rail option. You can never have too many clamps or raila or green Kool Aide!
 
Back
Top