Making a Luggage Rack with Shaper Origin...

nclemmons

Member
Joined
Jan 22, 2007
Messages
3,201
I was fortunate to have the Shaper team reach out to me about visiting my shop in Chicago and doing a video of me making a luggage stand using the Origin.  This was about 1/2 day total time between rough lumber to setup, project tweaking and cutting

video

Shaper Origin is really an amazing tool and makes projects like this so easy.  Minimal footprint in the shop, a little 'Domino' tape on adjacent boards, double stick tape to hold the work in place and cut away. 

The design was done in Fusion 360, a free CAD program for Makers, and then exported to the Origin via WiFi.

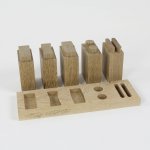
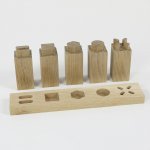
The luggage rack was made from 3/4" Sapele for the legs and top slats.  The center rail was a 1.25" piece of square Sapele that I chamfered in my CMS to yield an 8-sided piece.  The tenons for the legs and the center rail were cut using the Origin.  A little Festool sanding and it was ready for assembly and finish.

The four legs are identical except for the holes to accept the tenons.  All holes were 3/4" diameter.  Two were through, two were 1/2" through the 3/4" material leaving a 3/4" shoulder for a screw.  Tenons in the top rails were 1/2" diameter.

Finish is General finishes wipe on satin.  Straps were 2" brown webbing from Amazon. 

Really simple project that shows how quickly you can cut curves and tenons.

Beyond the luggage rack in the video are a few shots that show window repair i did using the Origin.  It's so easy to cut a pocket out where there was rot and cut a mating replacement with the tool. 

Happy to share the Fusion file and SVG's if anyone is interested.

Neil
 
Full fusion interactive 3D model is here - https://a360.co/2kI3pEB

Leg model which is inserted in the full model is here - https://a360.co/2JCFAI9

Fusion allows you to insert a component in another model so that you can change in one and have it reflected in the other.  Makes things like this easier to tweak in the design process.

Forum won't allow SVG attachments but PM me with your email address if you are interested. 
 
Nice job Neil.  It's nice to see someone use this, admittedly I haven't investigated the origin much, but looks fairly useful for things. 
 
I’m trying to remain ignorant, but seeing quick bites like this makes it harder!  First I need to learn Fusion 360!  Thanks for sharing!
 
What is the status of the orders? I assume that they are just working through their pre-orders. Their site seems to be the same about closed for pre-orders for a long time and Rockler says coming in 2017.
 
Thanks for posting this Neil!

I’d like to see a post on that jig/table you used to cut the tenon (at 3:50 in the video).
 
Thanks Neil, I did see that Udemy thread a few weeks ago.  I just need to carve out time to go through the videos.
 
Hi Neil,

Really beautiful luggage rack, and I enjoyed seeing you working in your shop! The Shaper people made a great video - seeing you cut the tenon with the Shaper Origin was cool, too!

Kind regards,
Oliver
 
Michael Kellough said:
Thanks for posting this Neil!

I’d like to see a post on that jig/table you used to cut the tenon (at 3:50 in the video).

Michael -

Here area  couple of photos of the tenon cutting jig.  Shaper calls it a 'vertical workstation'

[attachimg=1]

[attachimg=2]

I've since modified this one slightly - added more depth and two sets of T-tracks for clamping.  There are 1/2" holes for delrin alignment pins.  Below is one I just saw that is made with MFT hole spacing and plans to use dogs and clamps.

Setup is easy.  Clamps to the benchtop - I use through dogs with knobs, but can also use clamps.  The tenoned piece is captured flush with the top surface and you cut away.  In the video I made a reference piece to match the angle and curve of the leg.  But I also plan to just use a straight piece and set an angle in instances where you might want to do a tenon into a piece at 45 degrees for example. 

There's a set of pre-formed 'tenon' SVG's that Shaper created with a range of unique tenons from cross to arrow shaped etc.  All kinds of unique example beyond what we usually think of with the Domino. 

Here's a cool 'valentines box' with heart shaped tenons and mortises for joinery.  REALLY easy to do with this simple jig. 

I also plan to use it for finger joints.

Size is about 24x30 with a sacrificial piece of MDF next to the bench for routing and tearout management.  It can be flipped when ragged.  Two drywall screws also can adjust the top flush or if it's trimmed due to damage.  Clamping is with Festool or other T-track screw or rapid clamps.It really does work great.  Shaper Domino Tape goes on the surface in front of the inset hole and you place your Tenon SVG over the end of the piece you are cutting.  I normally just keep the tape on mine now that it's built for fast easy setup.  The layout is highly repeatable and the beauty of the SVG is you can place it on the matching piece where you want to cut the mortises.

I can see similar 'jigs' being made to do all kinds of work with the Shaper - think hinge mortises, or lockset placement on doors, for example.

One Shaper user turned their cutting boards on end and were doing decorative inlays and handholds in the sides of them.

Here's a photo of the jig with dog-holes as another example.

[attachimg=3]

And examples of the kinds of joinery you can do...

[attachimg=4] 
[attachimg=5]
 

Attachments

  • image1.jpg
    image1.jpg
    299.1 KB · Views: 3,657
  • image2.jpg
    image2.jpg
    342.7 KB · Views: 3,280
  • shaper VWS w holes.jpg
    shaper VWS w holes.jpg
    178.5 KB · Views: 2,878
  • tenon1.jpg
    tenon1.jpg
    327.6 KB · Views: 2,736
  • tenon2.jpg
    tenon2.jpg
    303.5 KB · Views: 2,552
Neil,

Great video and piece.  The vertical workstation and tenons I think are maybe the coolest part.  How do you locate the tenon on the workpiece so that it is centered (or consistent)?

Charles
 
Charles -

Good question.  Several ways to do it.

I usually will use a 2D drawing program and create the tenons as a flat piece of art.  Alternatively, you can 'draw' with the tool to create circles, squares, rounded corner rectangles, lines.  If you draw in a drawing program, you can export those as an SVG and 'upload' to the Shaper 'hub' via a web browser.  Whatever you want to draw in the drawing program is fine - circle, rectangle, rounded corner, star, etc.  The 'hearts' in the previous video I shared are one simple example.  I'll typically add 'guide lines' to the drawing to define the piece I'm placing it on. So it might be a 1" square tenon on a 3" piece.  So I'd do a 1" square centered or offset in a 3" 'guideline' square.  If you make the 3" line blue, Shaper will ignore it and treat it as a 'guide'.  Then you can decide if you want to cut 'inside' or 'outside' the 1" square.  that lets you create the mortise and tenon from one file with the reference guide to where you want to place them. 

Here's a simple drawing - the center hole is 3/4". The square dimensions are 1.5". The 8 sided chamfered is what it looks like after being run through the CMS table to shape it.  So I place that drawing over the end of the center piece with it clamped vertically.  The blue lines give me alignment to get it centered to the wood since I scanned the workpiece with the Shaper camera before placing.  The Shaper looks at the blue lines and treats them as guides.  The black lines are 'cut lines' that can be cut inside or outside, or offset on tool in .001 increments from the line for tight fit.  All of this is done interactively - so cut a tenon, check it for size, recut it with different 'offsets' etc.

[attachimg=1]

You can also just use a pencil and mark where you want the tenons and when you scan the tenon and tape with the shaper camera, you can see the pencil, wood grain, etc and place the tenon aligned to the pencil line, blue tape, etc. 

On-tool, Shaper will let you download the image as an SVG via WiFi or flash drive, and then you place it, scale it larger or smaller, align it left, right, center, top, bottom, etc.  These are relatively simple tools that offer a lot of capability.  In time I think Shaper will do software updates that let you define via 'wizard' to drill a set of 32mm holes, for example.  For now, you'd do that row of holes in a drawing program and download that to the tool for placement.  (SVG stands for Scalable Vector Graphic which is a standard in the graphics industry.  Unlike a JPG, it's got details on the size and placement of the lines versus 'pixels' in JPG files.)

In addition, the tool also lets you layout a 'grid' in the virtual space on the surface.  Grid spacing is defined on-tool.  Alignment can be to an edge.

The combination of the grid, guide lines in the drawing program and on-tool capabilities make it possible for a lot of ways to accomplish what you want to do.
 

Attachments

  • tenon svg.jpg
    tenon svg.jpg
    7.1 KB · Views: 2,345
Hey Neil, love those tenons and mortises. Of the samples you’ve shown, was there final sanding done on them or are they directly from the Shaper?
 
I did an MFT type layout directly from the machine using the grid and circle functions.  It made perfectly sized and spaced holes.
 
Cheese said:
Hey Neil, love those tenons and mortises. Of the samples you’ve shown, was there final sanding done on them or are they directly from the Shaper?

Those were shared from Shaper as an example.  The ones that I have done fit well.  The on-tool 'line-offset' makes it easy to get a good fit if the first pass doesn't work and with no sanding.  I'd say easier to fit than Dominos which I always have to sand or put in the microwave!

Here's a video of cutting two of them and them fitting right off the tool.
 
Back
Top