You are using an out of date browser. It may not display this or other websites correctly.
You should upgrade or use an alternative browser.
You should upgrade or use an alternative browser.
MFT(s) with a twist (cred - Paulk Design)
- Thread starter Scorpion
- Start date
Thanks everyone for your compliments!
I like the Incra stuff but a fence setup was fairly expensive when compared the route I took. The 3030 profile in a 48-inch length was just over $50 shipped. I have about $20 in the rest of the hardware. What is lacking using the extrusion is some of the features that are available in the higher-end fences like micro-depth adjustments, offset sides, etc. If I wanted/needed any of those features it would be a closer comparison.
I think the extrusion will work fine for dust extraction. The plan is to use the extrusion itself as the dust port (off of one end. Maybe I'm wrong but won't know it until I work that part out.
shed9 said:That's just superb...
I'm interested that you used extrusion for the fence, did you consider using an Incra variant? Are there any downsides to this method? I thought about using it myself on a similar project but felt it was too heavy and having a room for the bit didn't allow for good dust extraction.
I like the Incra stuff but a fence setup was fairly expensive when compared the route I took. The 3030 profile in a 48-inch length was just over $50 shipped. I have about $20 in the rest of the hardware. What is lacking using the extrusion is some of the features that are available in the higher-end fences like micro-depth adjustments, offset sides, etc. If I wanted/needed any of those features it would be a closer comparison.
I think the extrusion will work fine for dust extraction. The plan is to use the extrusion itself as the dust port (off of one end. Maybe I'm wrong but won't know it until I work that part out.
Truly a great job. Ron really had a lot of nerve waiting so long to show his idea for router set up. Some guys are just hard to deal with that way. :")
I really like your "router buds" I might just steal that idea somewhere in my own small shop.
A little side note: (a little off topic as per habitual) [unsure]
I had a small metal lathe I had inherited from my dad. I had thought I might make use of it (for projects such as you show so well) some day but had no tools to use with it. My son (when still a teenager and knew everything) was becoming interested in cars and motorcycles. He found a mechanic/machinist who had sort of taken him under his wing. David, by then was not listening to me about a lot of things and since he was learning a lot about mechanics that I was not really so great at any how, I sort of sneakily encouraged the relationship. The more my son learned the more our friend seemed to want to teach him. He found out I had a metal lathe at the same time his own lathe broke a part. or some sort of disaster. I took the lathe to his shop with directions to keep it until his own came back. Eventually, I was so glad for what he was showing my son I just conveniently forgot about the lathe. The guy eventually lost his own business and moved out of town. I never went after the lathe but sometimes I think I should go after it. That never developes beyond the "just a thought stage." It had been put to a good use during a valued time.
Tinker
tallgrass said:What mill are you using.?....need a pic.
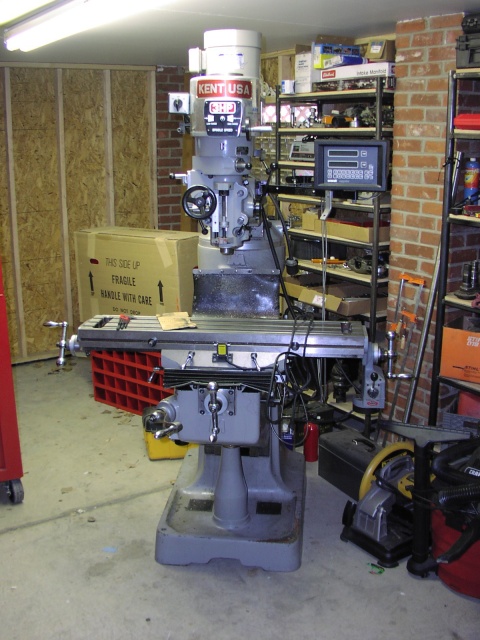
It's a Kent USA mill I picked up at an auction in the late 90's. Here's a picture of it shortly after bringing it home. The winning bid was $4k, a couple hundred for fees (which I knew about), then taxes, and then a couple hundred to have it forklifted out of there and put on my trailer (which I didn't know about). I almost lost the auction because any bid over $2k needed to be certified and I had to get that mess pulled off in about 15 minutes to get the bid to stick. It was my first large equipment purchase experience and a learning one at that.
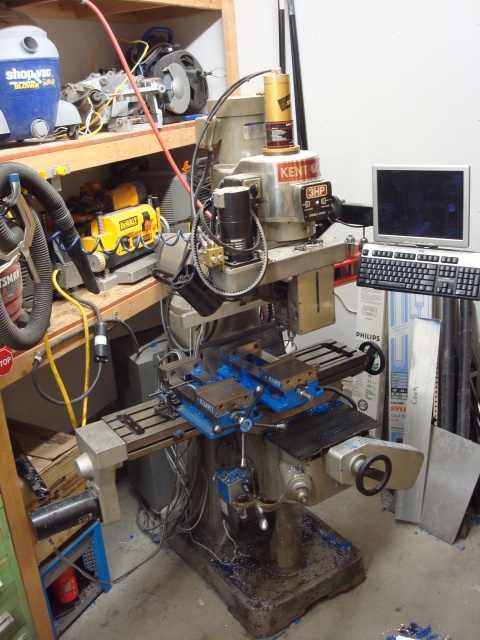
About a year later I did a Centroid CNC conversion. Here's a shot after cutting some blue plastic, forgive the mess. One thing's for sure, it's clearly not as clean as it was the day it came home.
Tinker said:...My son (when still a teenager and knew everything) was becoming interested in cars and motorcycles. He found a mechanic/machinist who had sort of taken him under his wing. David, by then was not listening to me about a lot of things and since he was learning a lot about mechanics that I was not really so great at any how, I sort of sneakily encouraged the relationship. The more my son learned the more our friend seemed to want to teach him...
That story of your son reminds me of an experience I had (my first) with a lathe. Shortly after I purchased my mill I got the bug and had to have a lathe. I started shopping around and one day I happened across this old timer that was selling a manual lathe that had just enough left in it for a kid like me to use as his first go. On inspection the machinist requested that I take some instruction from him so that, as he put it, the lathe didn't rip my arm off and beat me with it as my first experience. At that time I happened to be out of work and spent the next 2 weeks from 8am to 5pm every day learning (playing). For just meeting the guy he really took me in and let me use his tooling, consumables, and materials as he walked me through the various operations. I learned more in that 2 weeks about machining than I could have in years and it really made a difference on the mill as well (understanding feed rates, rpm, chip load, etc).
When you're lucky enough to happen to experience individuals like these you're one of the blessed.
shed9
Member
- Joined
- Mar 22, 2014
- Messages
- 497
That's some serious amount of metal in that mill [smile]
Doing my own rebuild of a Bridgeport Series 1 CNC. Have a smaller Weiss WMD30 clone in the mean time and a semi decent lathe which will also probably be hit with the CNC stick in the next few years.
Doing my own rebuild of a Bridgeport Series 1 CNC. Have a smaller Weiss WMD30 clone in the mean time and a semi decent lathe which will also probably be hit with the CNC stick in the next few years.
shed9 said:... and a semi decent lathe which will also probably be hit with the CNC stick in the next few years.
Love to CNC my lathe (I found a really nice one a few years back) but I don't think I can justify the expense of the conversion. I barely use the lathe compared to the mill and table saw. Maybe I'd use it more if I had thousands more into it.
")
tallgrass said:How were the ball screws and ways? Did you have to rebuild the mill(scraping ways ect). Or are you doing it with backlash compensation and screw mapping. Very cool.
ways were very tight when I brought it home. It was a few year old machine in a fairly small sized aluminum mfg shop here in Denver and it seemed that it really didn't see that much use. The ball screws were scrapped for some zero backlash units I bought through Dwain at Elrodmachine.com with the rest of he "kit". Backlash comp is still used to trim out the backlash I couldn't seem to eliminate when I installed the screws (which really irritated me but since then I've gotten over it). While was in there I replaced the yolk though I can't remember if I had to because I was replacing the screws. Then, to protect my investment I added an auto-way/screw oiler which can make a mess on the floor in a hurry but makes it harder to forget to oil on a regular basis.
If you're window shopping for parts, D.Elrod offers a very well thought out kit and everything you'd need to DIY. Might want to check out his site. He has solutions for rigid tapping, CNC servo brackets, and a variety of other needed parts that he's designed and manufactured. I think it was the videos that finally sold me. I still enjoy watching them actually.
Michael Kellough
Member
Great post Scorpion! Add me to the list of the envious.
Where do you get this triangular stock?
Where do you get this triangular stock?
Richard/RMW
Member
- Joined
- Jul 11, 2010
- Messages
- 2,947
Michael Kellough said:Great post Scorpion! Add me to the list of the envious.
Where do you get this triangular stock?
80/20 has it in their eBay store under Structural Shapes.
RMW
Michael Kellough said:Great post Scorpion! Add me to the list of the envious.
Where do you get this triangular stock?
For reference it's an extrusion used for making their gussets. Search "80/20" & "Gusset" on eBay. They usually only list overstock and slightly imperfects so there are periods where you won't see any listings. As an observation, the metric stuff is cheaper (they sell metric and sae sizes).
I really like what you have done.
Could you provide a little more detail about the plate you made for the pegboard guide. I would like to have one made or buy one from you. It appears you have quite a few holes in that plate. Why all the holes? Would you change anything when making a new one? What a fantastic idea. I built a Paulk bench, and wish I would have had this to make my holes. My holes work good for clamping but now I have some dogs that don't fit because my holes are not the right size and they are not even close to being square, but they are in a straight line. I think I will add a few rows that are square and 20mm if I can get a plate made. Thanks for sharing.
Could you provide a little more detail about the plate you made for the pegboard guide. I would like to have one made or buy one from you. It appears you have quite a few holes in that plate. Why all the holes? Would you change anything when making a new one? What a fantastic idea. I built a Paulk bench, and wish I would have had this to make my holes. My holes work good for clamping but now I have some dogs that don't fit because my holes are not the right size and they are not even close to being square, but they are in a straight line. I think I will add a few rows that are square and 20mm if I can get a plate made. Thanks for sharing.
nclemmons
Member
Scorpion, I've admired your work on Garage Journal. The Paulk modified MFT and stand are just awesome.
You have a lot of talent. Love the mill and the inventiveness.
When you laminated over the holes in the MFT top, how did you recut the holes? Just drill and then use a bearing guided bit?
Thanks for sharing!
neil
You have a lot of talent. Love the mill and the inventiveness.
When you laminated over the holes in the MFT top, how did you recut the holes? Just drill and then use a bearing guided bit?
Thanks for sharing!
neil
Capt'n 360 said:I really like what you have done.
Could you provide a little more detail about the plate you made for the pegboard guide. I would like to have one made or buy one from you. It appears you have quite a few holes in that plate. Why all the holes? Would you change anything when making a new one? What a fantastic idea. I built a Paulk bench, and wish I would have had this to make my holes. My holes work good for clamping but now I have some dogs that don't fit because my holes are not the right size and they are not even close to being square, but they are in a straight line. I think I will add a few rows that are square and 20mm if I can get a plate made. Thanks for sharing.
He first on I made I was tinkering and hadn't thought it through all the way. The excessive holes (bigger ones were to allow saw dust to get off the fixture easier (though admittedly not necessary). The smaller tapped holes are the ones in a 1x1 configuration and I added so many because I wasn't confident where they really needed to be but I thought I wanted them to be as wide as possible. There are a few holes in the plate that were used to attach it to the fixture I milled it on.
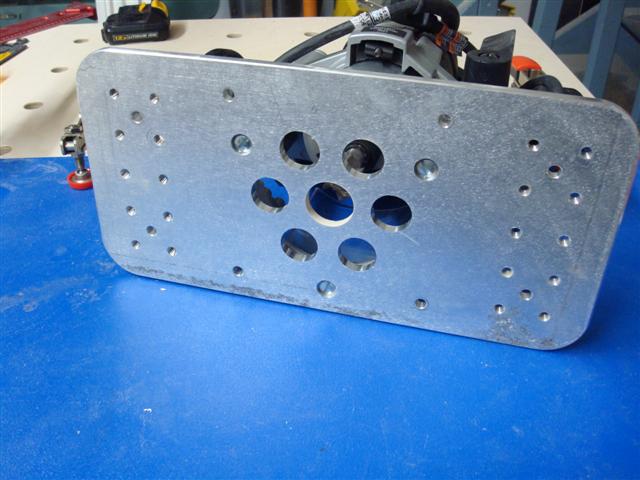
Then after tinkering I decided it was too damn big for my liking and wanted to make a smaller one. As luck would have it I had a circle cutting fixture that was neat in theory but too limiting given I used holes instead of a slot.
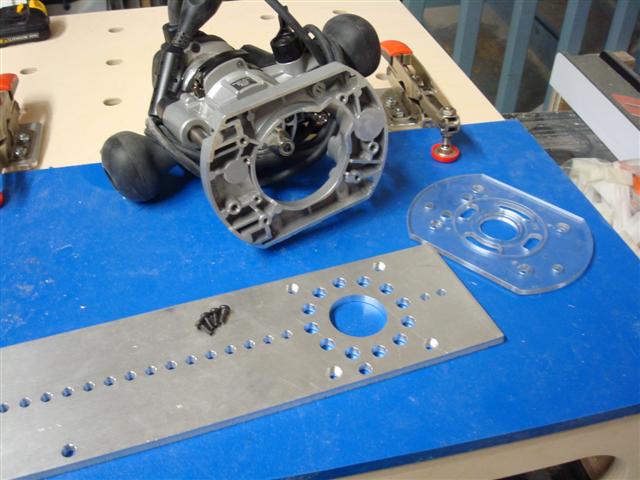
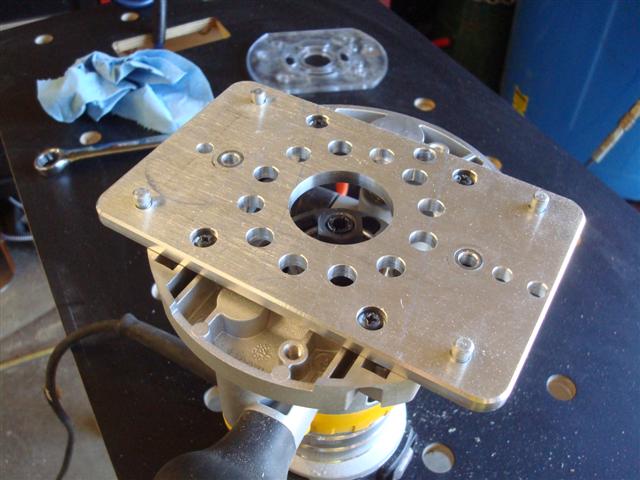
With the bulk of the work done, I added and tapped the locating holes after cutting it down to make the one I really use today. Only problem with it is it's set up for the smaller less horse power router so I still use the bigger one when quantity of holes are high.
Both plates could be simplified quite a bit.
neilc said:Scorpion, I've admired your work on Garage Journal. The Paulk modified MFT and stand are just awesome.
You have a lot of talent. Love the mill and the inventiveness.
When you laminated over the holes in the MFT top, how did you recut the holes? Just drill and then use a bearing guided bit?
Thanks for sharing!
neil
Thanks for the compliments. Much appreciated.
As you guessed I drilled a hole in the center of each hole from the bottom side and the flipped the thing over and used a small bearing guide 1/8-inch rad bit to break the edge. The radius actually leaves the surface with a little personality too.
Similar threads
- Replies
- 14
- Views
- 2K
- Replies
- 4
- Views
- 648
- Replies
- 3
- Views
- 378