More fun with 80/20...??

Slappy said:
Richard/RMW said:
Slappy said:
is that " 10 " series 8020 ??

where or what part # is those bolts ? or are those hardware store bought ?
I have some 8020 #10  1 x 3 rails & some 1 x 1 rails coming but I'm not clear on the hardware to use 
any suggestions would be great

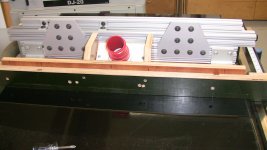
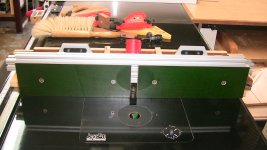
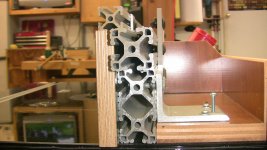
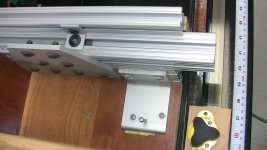
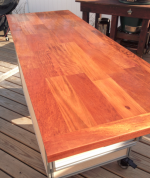
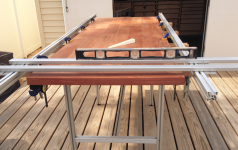
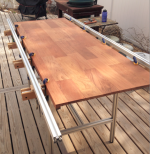
Slappy, those are 1515 (1.5") profiles. To give you a sense of scale the frame being clamped is 1.25" by 3.5" material just over 46" long. The cap screws are M8 probably 40mm long with tee nuts.

10 series uses M6 or 1/4" fasteners. 15 series is best with M8 or 5/16".

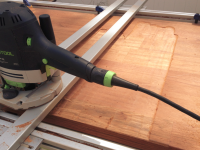
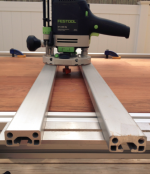
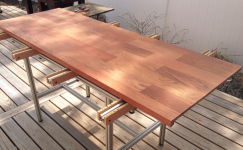
I have another panel to clamp up, this time I am going to use some wedges to let me adjust the clamping pressure. Will report back afterwards.

RMW

Is there any way to use a bolt head , maybe a carriage bolt in the slot & have the bolt body extend out & then tighten with a nut OR a Knob ?? 

5/16 carriage bolts work fine in the 1515. I don't know about the 1010 profile.

RMW
 
Was just fiddling around in the shop tonight and I stumbled across this.

jyqyqa6a.jpg


yzamy5uj.jpg


This is just the 1515 ULS profile. It sits nearly perfectly level and just a tad under 1/2" below the MFT surface. I cobbled this together in a couple minutes & the 80/20 extensions with MDF are within 1mm of being dead level with the top.

uby3ame7.jpg


uzujy7ub.jpg


pura3ene.jpg


dyve6uqe.jpg


Not something I would put a lot of weight on without legs to support it but a dead simple way to make extensions for the MFT/3.

RMW
 
Rusty Miller said:
Richard,
You are the 80/20 "Man"!

Rusty

Actually I just don't have a life so I end up standing around out there for hours, often with a cigar and ale, listening to audiobooks. Every now and then I pick up something I have been staring at and fit it to something else. [scratch chin]

Keeps me out of the bars...

RMW

 
Thanks for the heads up Richard. Works perfectly. I just checked it out and now I know what to do with the extra 1.5" profile I had laying around from my router fence build.

In case anyone's interested I've attached photos of the fence below. The core of the fence is made from 80/20 profiles stacked as follows:

15 X 30 (bottom)
15 X 15 (middle)
10 X 10 (top)
3/4" phenolic plywood (face)

There's all sorts of options - use your imagination. . .

Here's the back view:
[attachthumb=1]

And the front view:
[attachthumb=2]

The Side view:
[attachthumb=3]

And a close-up of the side view (right half of the fence):
[attachthumb=4]

80/20 is expensive but useful!

Victor


Attachments

  • RF_Back.JPG
    RF_Back.JPG
    953.5 KB · Views: 3,789
  • RF_Front.JPG
    RF_Front.JPG
    987.3 KB · Views: 2,949
  • RF_Side.JPG
    RF_Side.JPG
    988.3 KB · Views: 4,199
  • RF_Side_Half.JPG
    RF_Side_Half.JPG
    972.5 KB · Views: 5,982
ByrdieMan said:
Thanks for the heads up Richard. Works perfectly. I just checked it out and now I know what to do with the extra 1.5" profile I had laying around from my router fence build.

In case anyone's interested I've attached photos of the fence below. The core of the fence is made from 80/20 profiles stacked as follows:

15 X 30 (bottom)
15 X 15 (middle)
10 X 10 (top)
3/4" phenolic plywood (face)

There's all sorts of options - use your imagination. . .

Here's the back view:
[attachthumb=1]

And the front view:
[attachthumb=2]

The Side view:
[attachthumb=3]

And a close-up of the side view (right half of the fence):
[attachthumb=4]

80/20 is expensive but useful!

Victor

Great idea on the router fence.

RMW
 
I have an Oshlun AL blade for my Kapex and have used it to cut much smaller pieces than the 8020.  I'm planning to build a couple of MFT/Sysport rolling cabinets using 8020 and am wondering whether I should buy a dedicated chop saw for that purpose, which will involve lots of large (4545) extrusions.  I'd prefer to use the Kapex and save the money and space required for another saw, but what do people think?  (I know Carroll Adams recommends against cutting metal and wood on the same saw, but I've already broken that taboo, since I didn't have the luxury of multiple miter saws.)
 
lawhoo said:
I have an Oshlun AL blade for my Kapex and have used it to cut much smaller pieces than the 8020.  I'm planning to build a couple of MFT/Sysport rolling cabinets using 8020 and am wondering whether I should buy a dedicated chop saw for that purpose, which will involve lots of large (4545) extrusions.  I'd prefer to use the Kapex and save the money and space required for another saw, but what do people think?  (I know Carroll Adams recommends against cutting metal and wood on the same saw, but I've already broken that taboo, since I didn't have the luxury of multiple miter saws.)
I just ordered this ::::   \

http://www.amazon.com/dp/B0012YMVBE/ref=pe_385040_30332200_pe_309540_26725410_item
for my 14 year old  10" Delta chop / miter ( PN#36-075) saw to cut my 8020 stuff with .

I plan on getting a Kapex later this spring for the wood stuff but will use the dewalt till then

The Old  Delta will then be just used  as AL cut saw , it's small enuff to stuff away when not needed

i'd advise buying a used chop saw & place one of these blades on it for the AL & copper stuff ( the AL blades cut PVC & other plastics very well Too)

but get the smaller tooth AL cut blades as the more teeth the smoother the 8020 cut surface will be
that above is 100 teeth on a 10" blade

More is better when cutting the AL stuff Big Time
I was cutting some AL  angles & flat stock on my stock Dewalt carbide last summer but with the cost of the 8020
I wanted a finer cut surface
be safe & clamp down any metal pieces very well when using a chop saw    !   !    !   Go SLOW !
 
One of the reasons I like 80/20 so much is the ability to reconfigure it as needed. Yesterday I had to flatten a worktop made of recycled Brazilian Cherry flooring shorts. The top was cupped in the center; the worst spot was about 1/8” low.

It was the first really beautiful spring weekend we have had this year (the Laughing Gulls are back, what I consider to be the “official” start of spring) so the bonus was being able to set up the cutting/clamping table outside.

This setup is just another take on the router sled method for flattening a surface. The extrusions are the 15 series profile, after leveling everything I spent an hour running the router w/ a 30mm bottom cutting bit back & forth, followed by another hour of sanding and then on to the Osmo oil.

[attachthumb=#]

[attachthumb=#]

[attachthumb=#]

[attachthumb=#]

[attachthumb=#]

[attachthumb=#]

[attachthumb=#]

[attachthumb=#]

[attachthumb=#]

Along with the 80/20 a couple slotted plates made out of ¼” by 2” aluminum bar get used a lot to hold extrusions together as router guides, etc.

At the end of the day the table breaks down in 10 minutes and takes up minimal room on the shop wall. I find that having a couple full 97” lengths of 1515 around, along with a bunch of different shorter pieces, is handy to whomp up different jigs as needed.

RMW 
 

Attachments

  • 9.png
    9.png
    888.2 KB · Views: 2,148
  • 8.png
    8.png
    1.4 MB · Views: 2,903
  • 7.png
    7.png
    639 KB · Views: 7,185
  • 6.png
    6.png
    1.4 MB · Views: 5,092
  • 5.png
    5.png
    756.3 KB · Views: 5,431
  • 4.png
    4.png
    943.2 KB · Views: 1,907
  • 3.png
    3.png
    1 MB · Views: 3,314
  • 2.png
    2.png
    1.5 MB · Views: 2,589
  • 1.png
    1.png
    1.5 MB · Views: 4,205
jafenske said:
I don't know whats nicer... that 8020 table or the big green egg in the background.

The egg, which is about 12 years old, is basically being held together by that table. The bottom is split in two, crack has widened to 3/16", my own fault. It is difficult now to control temp, and it won't smother leftover charcoal at the end of a cook anymore. I stopped in at Fred's Music and BBQ in Shillington PA earlier today and checked the price for the replacement bottom, $420!!!

Seriously considering replacing it with the Kamado Joe @ $749 for the comparable model. They recommend it but I need to do some research myself.

And, I need to convince the boss it is necessary...

RMW

 
Richard/RMW said:
jafenske said:
I don't know whats nicer... that 8020 table or the big green egg in the background.

The egg, which is about 12 years old, is basically being held together by that table. The bottom is split in two, crack has widened to 3/16", my own fault. It is difficult now to control temp, and it won't smother leftover charcoal at the end of a cook anymore. I stopped in at Fred's Music and BBQ in Shillington PA earlier today and checked the price for the replacement bottom, $420!!!

Seriously considering replacing it with the Kamado Joe @ $749 for the comparable model. They recommend it but I need to do some research myself.

And, I need to convince the boss it is necessary...

RMW
make Yer own bottom for that green egg / a little concrete & chicken wire is all that is needed L O L
use the broke one as a mold
 
Yesterday we did pizza on the egg, which as noted below has a cracked bottom that has widened now to about 1/4". The top also shifted due to the crack & I can no longer regulate temperature via the top/bottom vents.

The first 2 pizza's turned out great:

[attachthumb=#] 

[attachthumb=#] 

[attachthumb=#] 

[attachthumb=#] 

6+ minutes for the 1st one, then
 

Attachments

  • 5.png
    5.png
    1.5 MB · Views: 1,158
  • 4.png
    4.png
    921.6 KB · Views: 1,051
  • 3.png
    3.png
    756.3 KB · Views: 943
  • 2.png
    2.png
    981.3 KB · Views: 999
  • 1.png
    1.png
    605.7 KB · Views: 1,036
  • 6.png
    6.png
    651.9 KB · Views: 1,519
Rich, are you going to share your sketch up file on how to burn down your porch while making Easter dinner? But how to save the house by using 80/20 and some festools? I'd love to get those links. Happy Easter
 
Sean KS said:
Rich, are you going to share your sketch up file on how to burn down your porch while making Easter dinner? But how to save the house by using 80/20 and some festools? I'd love to get those links. Happy Easter

Yep, the thread meandered into grilling...

Happy Easter to you also.

RMW
 
Before you get rid of your green egg, try some Refractory cement. It's what they use in charcoal forges, and also it's real common for rebuilding the bottom of cast-iron wood-burning/coal stoves. I use it to repair cracks in my cast-iron stoves.
 
Back
Top