Mounting a cabinet to the wall for easy removal

Crazyraceguy said:
Packard said:
Yeah, it sounds counterintuitive, but full contact can cause trouble, it doesn't have to, but the slightest warp of either one can do it.

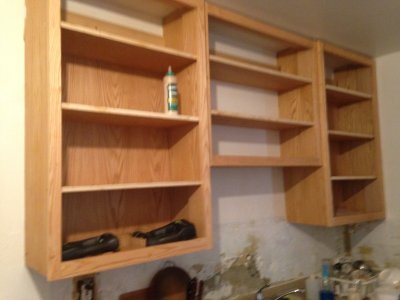
It should be easy to correct.  I will just cut out the center of the cleat on the wall, and add a few more fasteners.  I will give it a try.  Thanks.
 
presidentsdad said:
I've used french cleats a number of times for items that hang on the wall.  Anyone have experience with allowing the item to sit on the floor and just have the french cleat stabilize it?  In other words, a base cabinet vs. a wall cabinet.

Yes, I've used a z-clip/french cleat system to install headboards for built-in beds.  Everything gets scribed, then the cleat helps suck it up to the wall and functions a lot like an anti-tip bracket.

In nearly thirty years of cabinet installations, I have never dealt with Ikea cabinets until this year.  They were Swedeboxx brand carcasses with Ikea fronts, Blum Metabox drawers.  I was expecting the worst, but they were really solid and well-built frameless cabinets.  The system is super efficient.  The hangers are mounted in the top back of each box, and they have adjustment and clamping to take them on and off the rail.  Base cabinets use the same system, with the previously mentioned Ikea adjustable feet.  The adjustment allows the boxes to be clamped to the rail, even when the rail follows a wavy wall.
 
Shimming cleats…

I installed the plywood boxes in the photo below using French cleats in 1978. It was a pain to get them all level for two reasons. First the walls were not perfect so many wall cleats had to be shimmed so the box cleat could fully engage. Second the spacing was too great to use a bubble level between cleats and also too great to use string since it sagged. Had to use the ancient water level technique but it worked.

The boxes were made for the artist by Peter Ballantine. A phenomenal craftsman.

[attachimg=1][attachimg=2]
 

Attachments

  • IMG_0462.jpeg
    IMG_0462.jpeg
    162 KB · Views: 535
  • IMG_0461.jpeg
    IMG_0461.jpeg
    629.1 KB · Views: 544
The aluminum 'split batten' is a good option. Only needs 6mm (1/4") of space.
If using ply etc and you're worried about lifting, as mentioned above, you can rebate the cleats instead of cutting a bevel.
Used to do a lot of feature wall panelling in shops/restaurants/foyers etc and packing the cleats straight was a frustrating job sometimes. After that though, putting the panels on was quick and quite satisfying.
 
Lincoln said:
The aluminum 'split batten' is a good option. Only needs 6mm (1/4") of space.
If using ply etc and you're worried about lifting, as mentioned above, you can rebate the cleats instead of cutting a bevel.
Used to do a lot of feature wall panelling in shops/restaurants/foyers etc and packing the cleats straight was a frustrating job sometimes. After that though, putting the panels on was quick and quite satisfying.

That works too, though it takes some careful layout.
We have done it with a "typical" 45 degree cleat at the top of the cabinet and a second one lower.
The lower one is basically 2 opposing rabbets, with more travel/engagement. The lower cleats would catch first, then allowing the upper to pull the cabinet back against the wall. This holds the lower part against the wall solidly, rather than just gravity holding it back.
(Trying to get 2 rows of 45 degree cleats to catch at the same time is virtually impossible)
 
Crazyraceguy said:
Yeah, that's one of the advantages of rebated or aluminium - you can make just the top pair of battens bottom out, to set your height, while you space the other row (or two etc) a couple of mm further apart from each other. This holds your item back to the wall, but doesn't interfere with the height. Can't do that with 45 degree cleats.
We would always laser set the top row, then cut spacers to the right length to set the other row/s.
 
Back
Top