My 1st Domino project has miters and I could really use some help!

sakle2k

Member
Joined
Jun 30, 2015
Messages
2
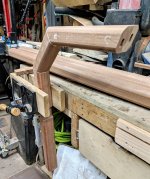
I've wanted a Domino for some time and finally bought one for the project I'm building now for a customer. It's a laptop stand to sit in front of his indoor bike trainer. It has a horseshoe shaped base with 2 vertical legs that will support the platform that the laptop will sit on. The idea is to use 2 dominos in each of the angled joints which are 22.5 degrees. The pic below are the parts I've milled so far:

[attachimg=1]

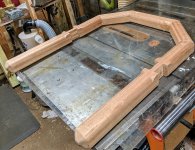
Each of the pieces are 2.25" x 2.25". I was able cut the first mortise, turning the piece on it's side so that the miter is vertical and setting the angle of the fence and using the trim stop to center the piece. The pics below show a test piece:

[attachimg=2]

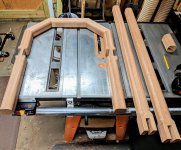
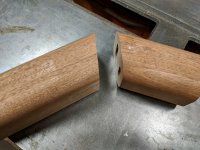
This pic shows the piece aligned properly to be joined.

[attachimg=3]

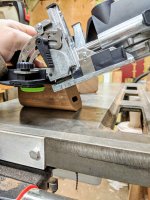
But I don't know how to cut the lower mortise (the one closer to the outside of the miter). I made the one in the practice piece by locking the piece in my bench vise, marking a line to line up to and plunging "freehand" because I couldn't use the trim stop. I'm wondering if I need to make some kind of jig for this or am I missing something simple here? I plan on a tight fit for the 1st domino and a looser fit for the 2nd.

Appreciate any help!
 

Attachments

  • Parts.jpg
    Parts.jpg
    3.1 MB · Views: 869
  • Domino placement.jpg
    Domino placement.jpg
    3 MB · Views: 855
  • Fitting parts.jpg
    Fitting parts.jpg
    3.5 MB · Views: 821
As the faces of your pieces are mainly flat you could place the second domino parallel to the flat face - at right angles to the first domino but roughly where you wanted the second domino to go.

Alternatively you could make a simple jig to position the Domino machine relative to the work piece.

My hand rail of my stairs presented a similar problem. It had been fine for 30 years with just glue on the two flat opposing faces but I repaired it with a single domino in the middle. I was unable to use the angle feature on the Domino machine and so marked a line on both pieces with a centre mark. I then used the Domino freehand but carefully and the joint was (and still is) spot on.

Peter
 
I would have built a jig even for as few mortises as you have to cut. There would have to be a left and right jig. Without a jig, I’d have trouble getting the mortises lined up so as to get a good joint.

That’s a tough first project.
 
Although it is not in line with the recommended number of tenons given the material thickness, could you just use one domino per joint?  I would think this will make for easier alignment.  Your project does not seem to be subject to intense stress or weight bearing.  If it were me, I wouldn’t hesitate to use just one domino and glue on all surfaces.

Your milling looks really clean. I think you’ll do fine however you end up performing the domino connections.
 
I suppose I would have rotated the joint 90 degrees, that way you just have to reference the 90 degree plane, not the weird angle. Drop a line on the of the piece for both to reference.
 
Like others have said, I'd construct a simple jig/fixture and only use 1 large Domino per joint.

If you approach this by using the inside surface of the horseshoe or the outside surface of the horseshoe as your datum, and if you're very careful about centering the Domino before plunging, then you only need to make a single jig/fixture.  [smile]
 
nvalinski said:
I suppose I would have rotated the joint 90 degrees, that way you just have to reference the 90 degree plane, not the weird angle. Drop a line on the of the piece for both to reference.

Thanks everyone for all of the suggestions. I didn't go with the jig, just rotated the pieces 90 degrees like nvalinski suggested, drew my line and went at it.

This being my first project with the Domino, I found that if I just drew a line across the joints, the line on the Domino didn't always line up. So I drew my line on one side of the joint, making sure that it was square to the face. Then I'd bring the other piece into position and just extend the squared line to that piece and the domino lined up perfectly. The only problem I had was very very tight fitting joints to the point I didn't think the first 2 pieces would fully mate. Then I realized the dominos probably swelled due to humidity so I had to lightly sand each one to fit. Live and learn :)

[attachimg=1]

[attachimg=2]
 

Attachments

  • Vice.jpg
    Vice.jpg
    2.7 MB · Views: 606
  • Glueup.jpg
    Glueup.jpg
    1.6 MB · Views: 474
sakle2k said:
The only problem I had was very very tight fitting joints to the point I didn't think the first 2 pieces would fully mate. Then I realized the dominos probably swelled due to humidity so I had to lightly sand each one to fit. Live and learn :)
Instead of sanding them down a short heat treatment in the oven/microwave is easier (and keeps the glue pockets intact).
 
Back
Top