You are using an out of date browser. It may not display this or other websites correctly.
You should upgrade or use an alternative browser.
You should upgrade or use an alternative browser.
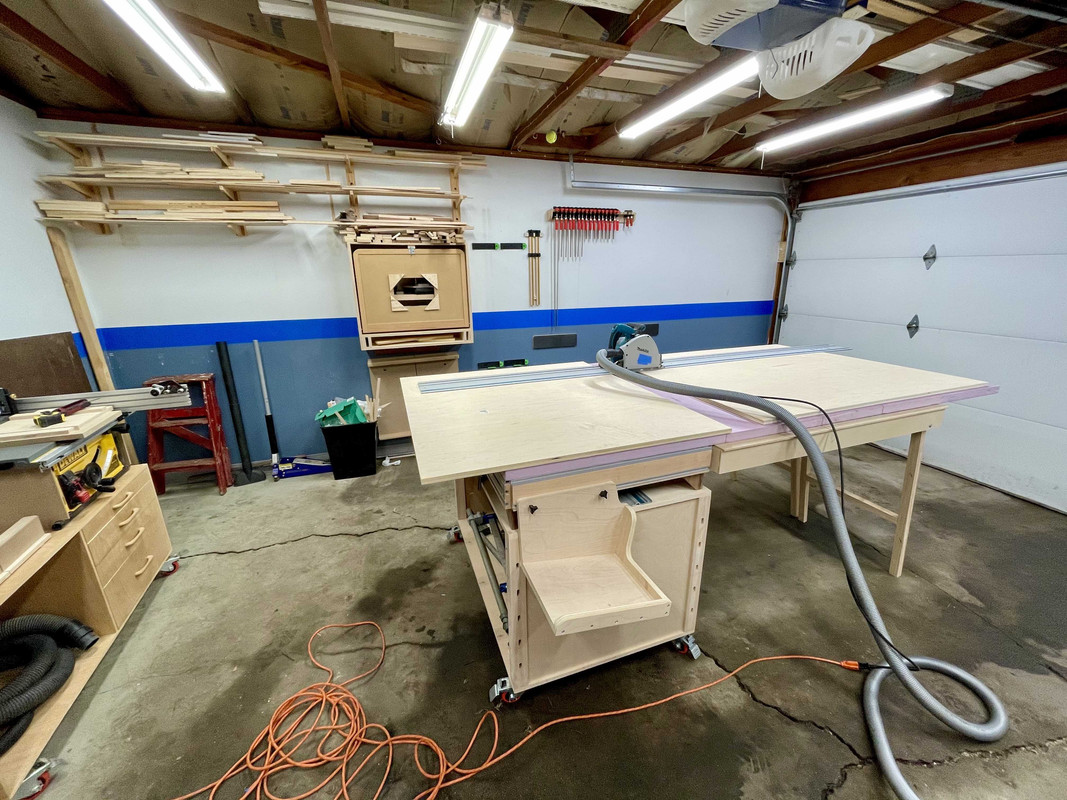
My hybrid version of a DIY MFT Sysport
- Thread starter nicholam77
- Start date
nicholam77
Member
- Joined
- Mar 7, 2019
- Messages
- 115
MikeGE said:Looking great, Nick! It's nice when the plan finally starts to come together.
Thanks [member=70363]MikeGE[/member] !
krudawg said:VERY NICE!
Thank you!
mkasdin said:Nice job on the MFT and base. What size are the wheels 3” or 4”? I was thinking 5” but then it would start to take up too much vertical real estate....
Sorry for the late reply. They are the 3" orange locking casters from Home Depot. The wheels themselves are 3", I believe the overall height they add to the bench is ~4". Thanks for checking it out!
Wood_Slice
Member
- Joined
- Dec 2, 2020
- Messages
- 108
Loving this design. I also for me would love to add the Peter Millard sacrifical strip where the blade goes. That usually works if doing only/mostly right angle cuts bit regardless very good idea
nicholam77
Member
- Joined
- Mar 7, 2019
- Messages
- 115
Don T said:You did an awesome job of adopting ideas and executing them.
Thank you!
Wood_Slice said:Loving this design. I also for me would love to add the Peter Millard sacrifical strip where the blade goes. That usually works if doing only/mostly right angle cuts bit regardless very good idea
Thanks! My plan has always been to add a sacrificial strip after I saw [member=63929]AtomicRyan[/member] do it. I'll probably get around to it when the current kerf no longer works [big grin]
Because I always set the rail up in the same place there shouldn't be a need to replace it too often. Me, personally, I only do 90 degree cuts with the rail supports. My usage of my "MFT" with the tracksaw is purely to square sheet goods. If I ever do implement a multi-angle solution it will be the fence that moves, not the rail position. I know some people cut all over their holey top, but I like my bench to look clean. Currently, if I need to cut angles, I just do pencil marks and line up the track free hand on a rigid foam backer.
Wood_Slice
Member
- Joined
- Dec 2, 2020
- Messages
- 108
nicholam77 said:I know some people cut all over their holey top, but I like my bench to look clean.
You and me both. My heart was pounding the first time I cut into it then I remembered it was a $10 work sheet (bought a 3/4" MDF full 4x8 sheet, can make 3 tops) and if you think about it- less than $5 per work side which will take me years to damage enough to flip the bottom side. So persevere and continue on cutting.
nicholam77
Member
- Joined
- Mar 7, 2019
- Messages
- 115
Did my first ply breakdown using the extension wings the other day.
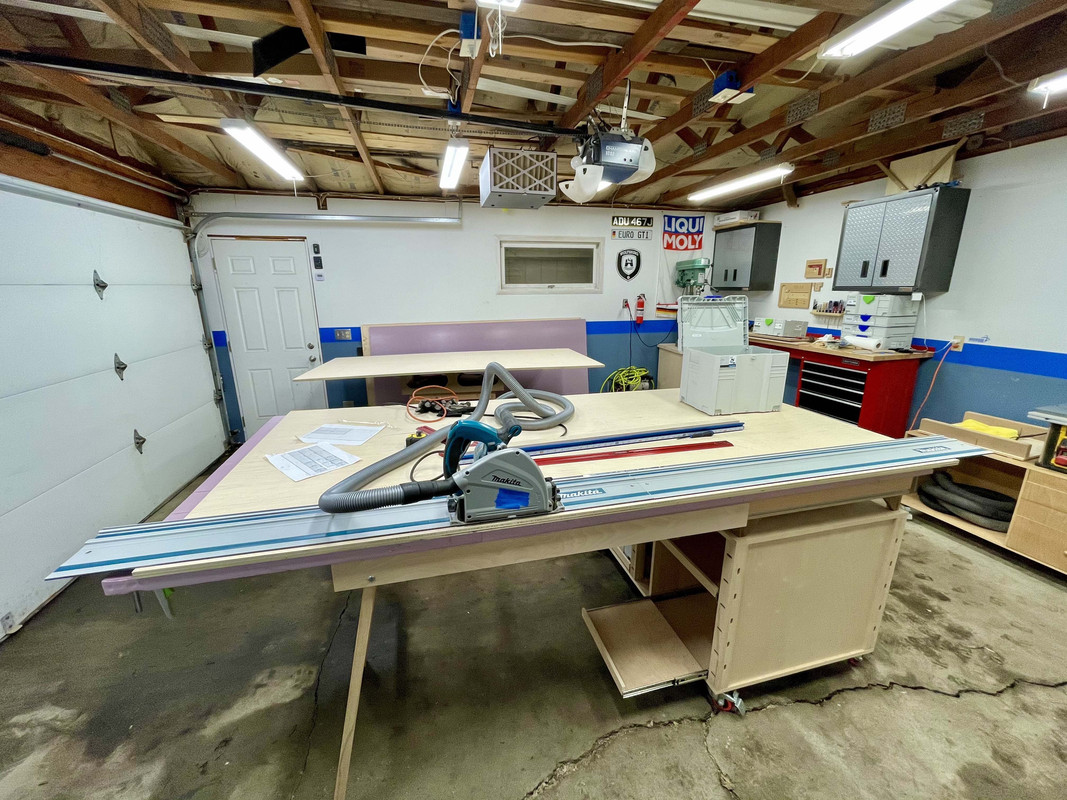
And the holster worked a treat!
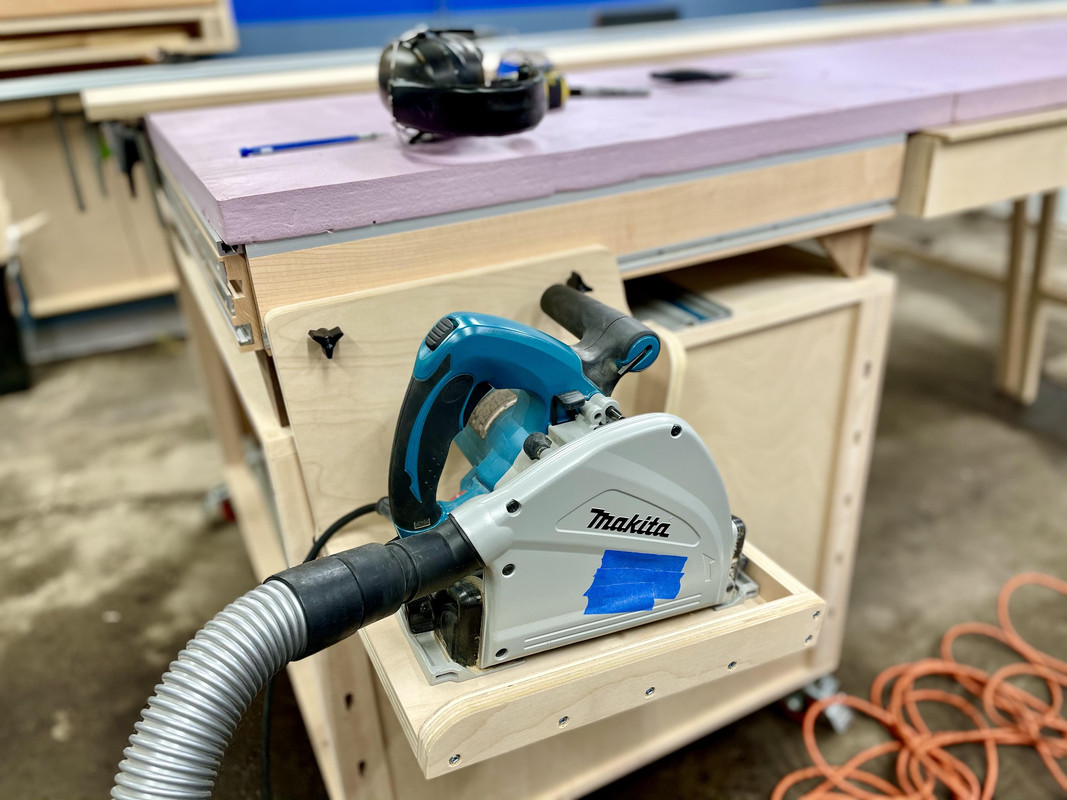
I think the bench has paid off because for the first time I was able to cut up several 3/4" 4x8 sheets without pain or annoyance!
[big grin]
And the holster worked a treat!
I think the bench has paid off because for the first time I was able to cut up several 3/4" 4x8 sheets without pain or annoyance!
[big grin]
nicholam77
Member
- Joined
- Mar 7, 2019
- Messages
- 115
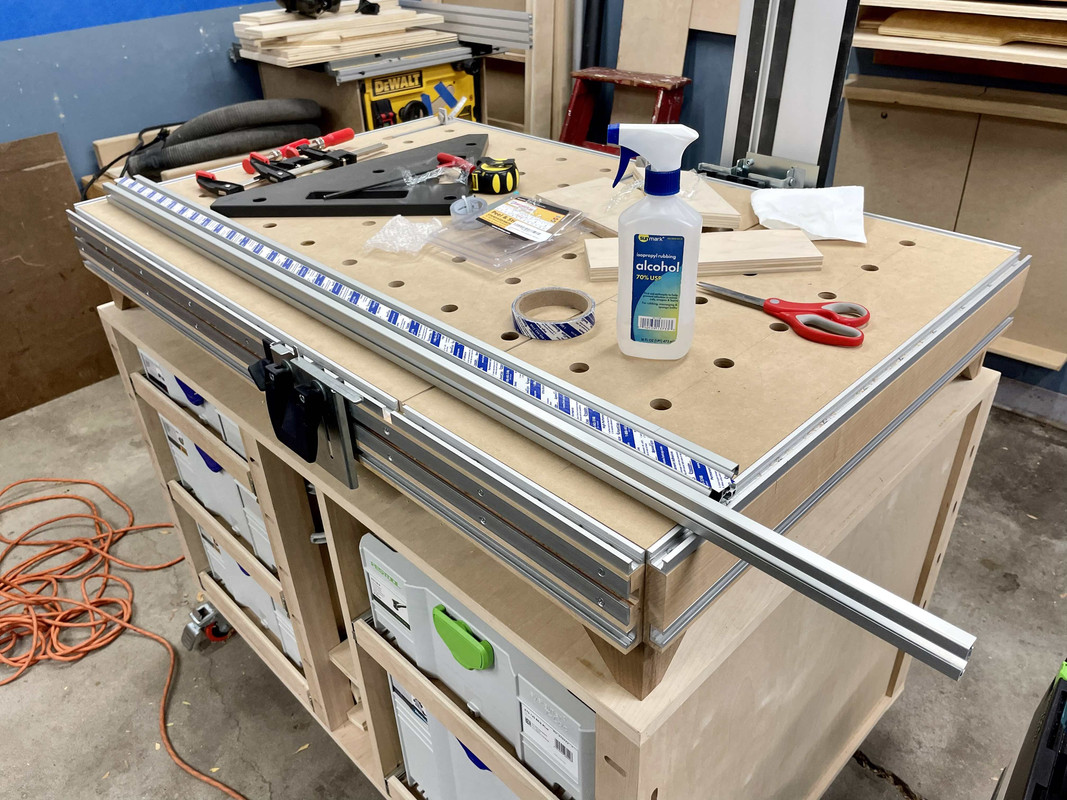
Not sure this is really an update, but I've acquired my 2nd Festool, a CT15 dust extractor, to live in the back side of the MFT:
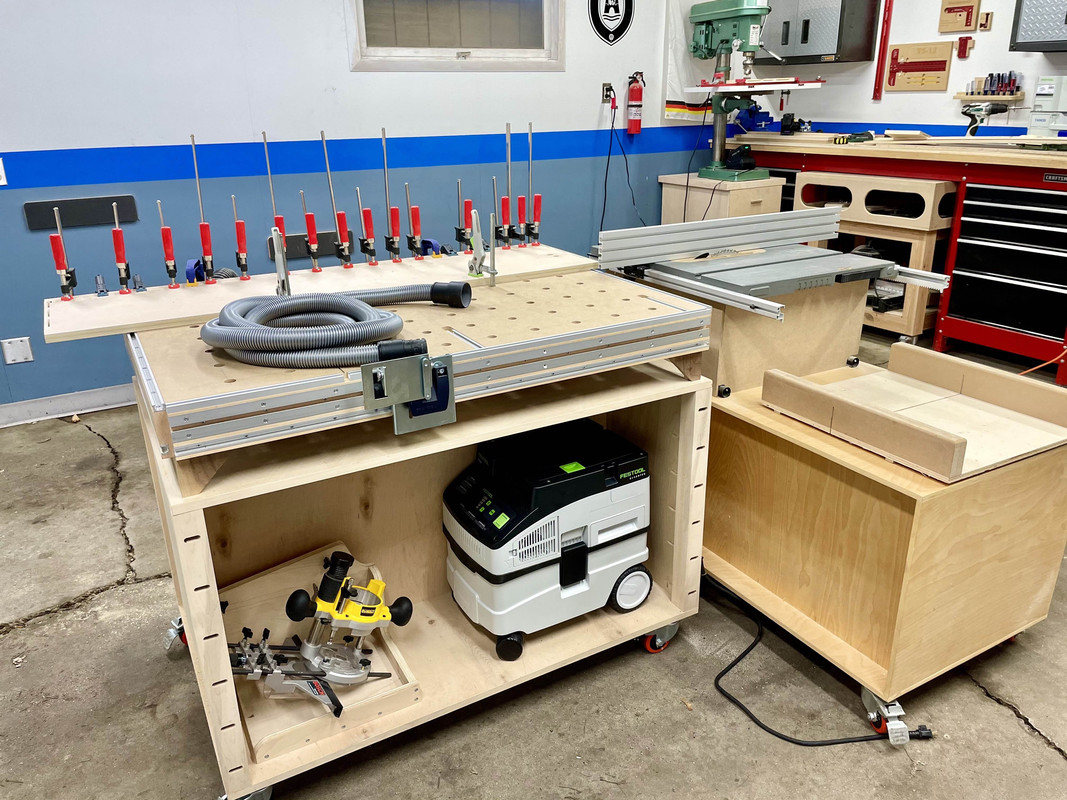
I kind of left this side of the MFT cart "blank" to wait and see what would go in it. Once I think about it some more I'll probably add some dividers and shelves to "dock" the vacuum and store other bench accessories. I also plan to make a boom arm for it.
[big grin]
I kind of left this side of the MFT cart "blank" to wait and see what would go in it. Once I think about it some more I'll probably add some dividers and shelves to "dock" the vacuum and store other bench accessories. I also plan to make a boom arm for it.
[big grin]
Nick
Excellent,
I am planning to build one MFT table so this is very helpful
I found a MFT tool set , which includes rail, Miter gauge, rail for miter gauge, stops etc.( made for MFT 3) which I am planning to buy.
I see that you have incorporated the rail holder in your aluminum profile. What kind of modification you have to make to make that work.
nicholam77
Member
- Joined
- Mar 7, 2019
- Messages
- 115
Jack01 said:Nick
Excellent,
I am planning to build one MFT table so this is very helpful
I found a MFT tool set , which includes rail, Miter gauge, rail for miter gauge, stops etc.( made for MFT 3) which I am planning to buy.
I see that you have incorporated the rail holder in your aluminum profile. What kind of modification you have to make to make that work.
Thank you [member=23161]Jack01[/member] .
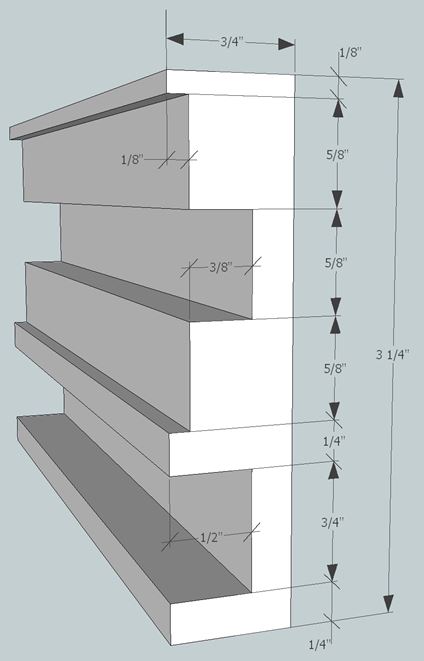
I would take a look at my original post in this thread, there are some decent pics of how it was routed out, and a resource to Guy Dunlap's youtube video. This is what I copied, and he goes over it in detail.
He also wrote about it in this FOG thread, here.
For ease of others wondering as well, I'll repost the dimensions he came up with, below:
If you have a good deal on the MFT bits, then that makes sense. Otherwise I'd also recommend looking at the Dashboard rail pivots - more precise than the Festool parts and don't require the MFT profile to mount. Let me know if you have further questions, thanks for looking!
nicholam77
Member
- Joined
- Mar 7, 2019
- Messages
- 115
Small addition - I made a docking station / storage solution for my Woodpecker MFT Square:
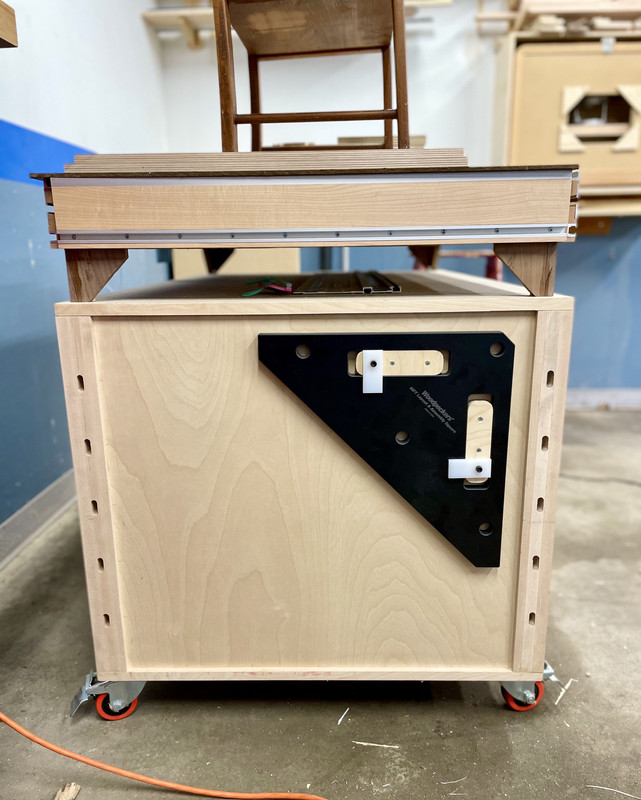
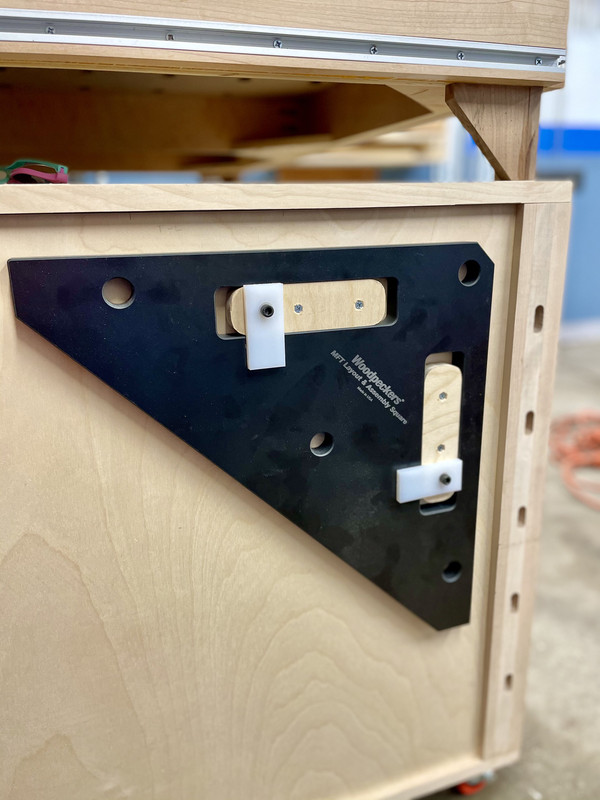
It's kind of large and before it didn't have a home. Now it's at the ready, on the MFT, stored vertically so it doesn't take up much space.
It's kind of large and before it didn't have a home. Now it's at the ready, on the MFT, stored vertically so it doesn't take up much space.
nicholam77 said:Small addition - I made a docking station / storage solution for my Woodpecker MFT Square:
It's kind of large and before it didn't have a home. Now it's at the ready, on the MFT, stored vertically so it doesn't take up much space.
That's pretty slick!
Wood_Slice
Member
- Joined
- Dec 2, 2020
- Messages
- 108
[member=70130]nicholam77[/member]
What size length drawer slides did you use in order to open the trays completely and open the lid fully?
What size length drawer slides did you use in order to open the trays completely and open the lid fully?
nicholam77
Member
- Joined
- Mar 7, 2019
- Messages
- 115
I used 14” full extension slides. My systainers sit back from the face of the drawer a bit because there is a 1/2” ply front, but in my situation 14” slides just barely cut it. 15” would be better. But you could get away with 14” especially if your trays don’t have front pulls.Wood_Slice said:[member=70130]nicholam77[/member]
What size length drawer slides did you use in order to open the trays completely and open the lid fully?
nicholam77
Member
- Joined
- Mar 7, 2019
- Messages
- 115
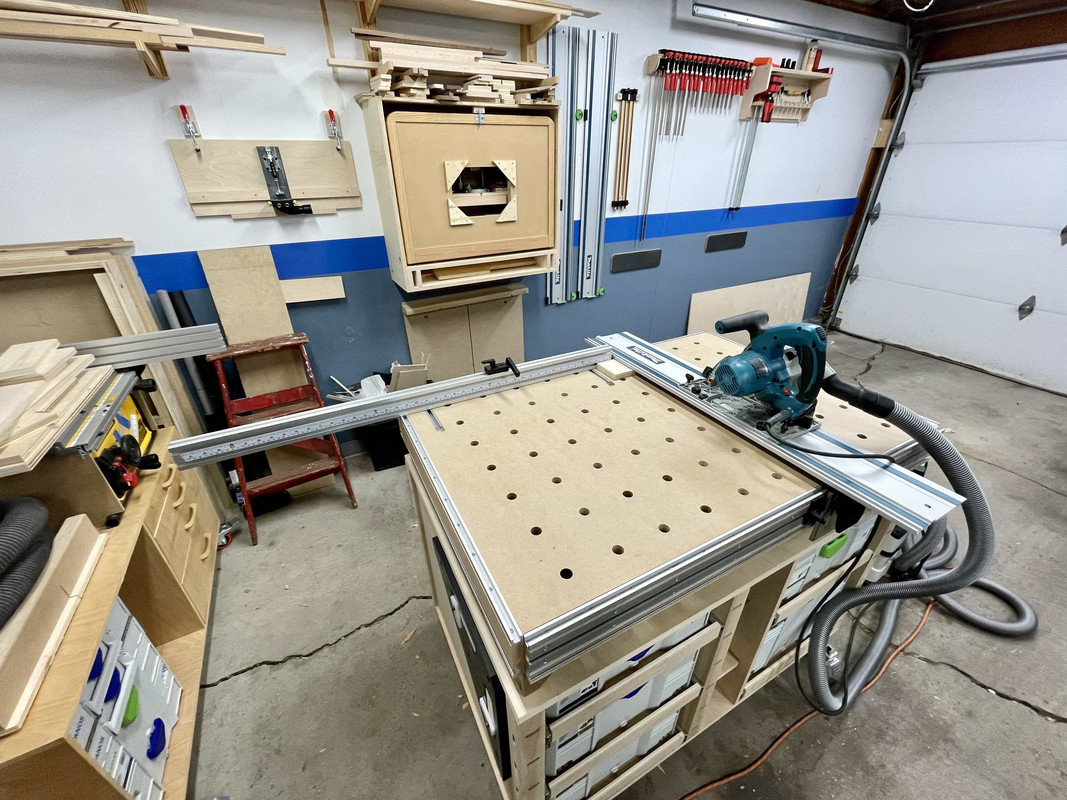
Fence Improvements
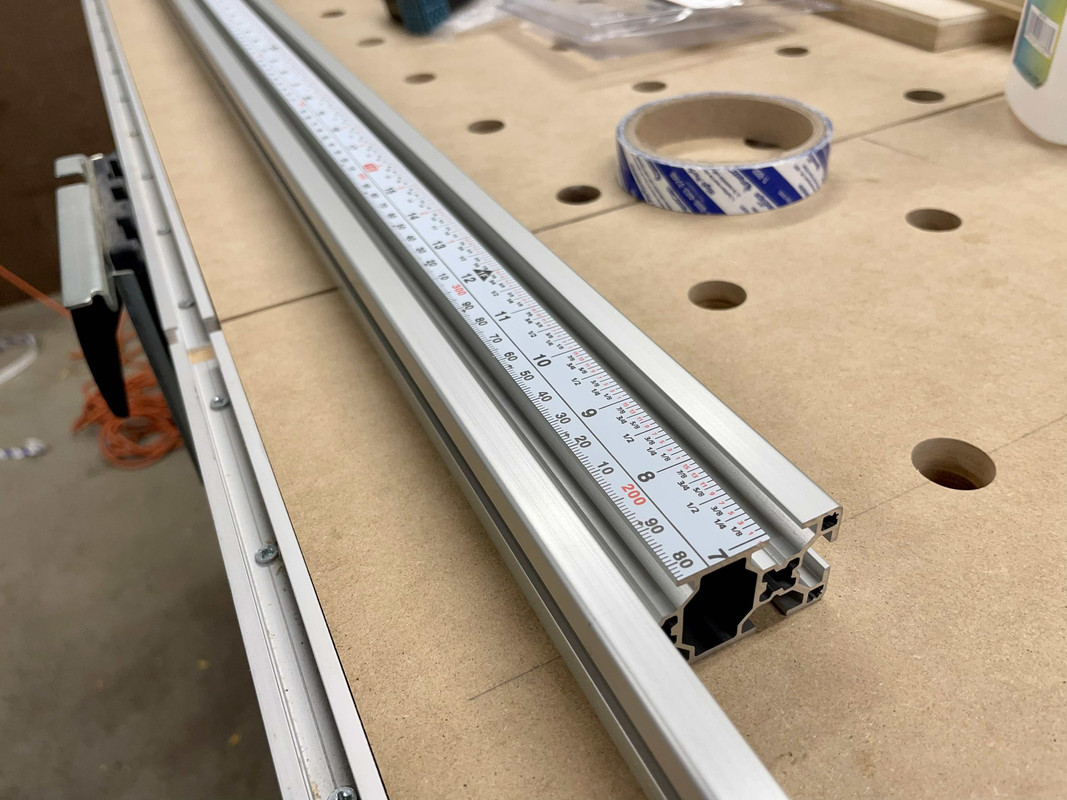
First off, I added a measuring scale to the fence. I went with Fastcap's peel & stick SAE/Metric combo scale because next time I build cabinets I think I want to jump into metric.
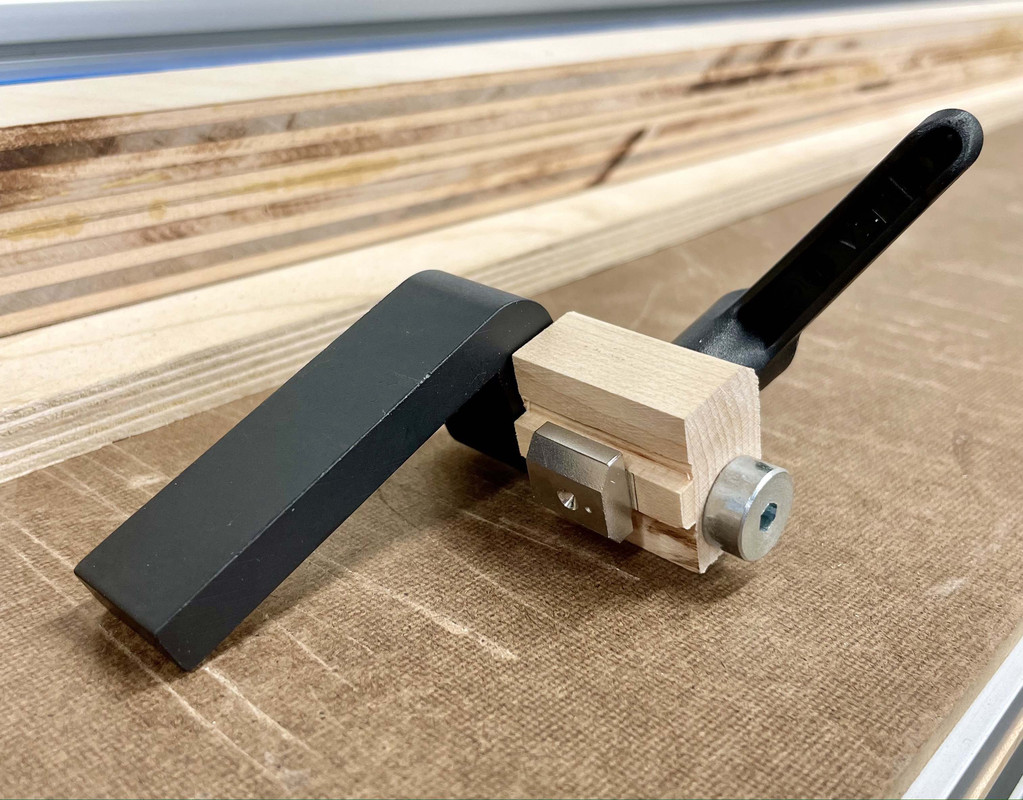
Second, up until now I haven't had a proper stop block or flip stop for my fence, because I got a 30x60 extrusion for some reason instead of the more common 20x40 that can use the Festool, Benchdogs, or other commercial flip stops. Normally I just clamp a block of wood.
Recently I made an attempt to make one out of maple and a $15 Peachtree commercial stop that sort of fit the dimensions, but in the end was not happy with how it turned out.
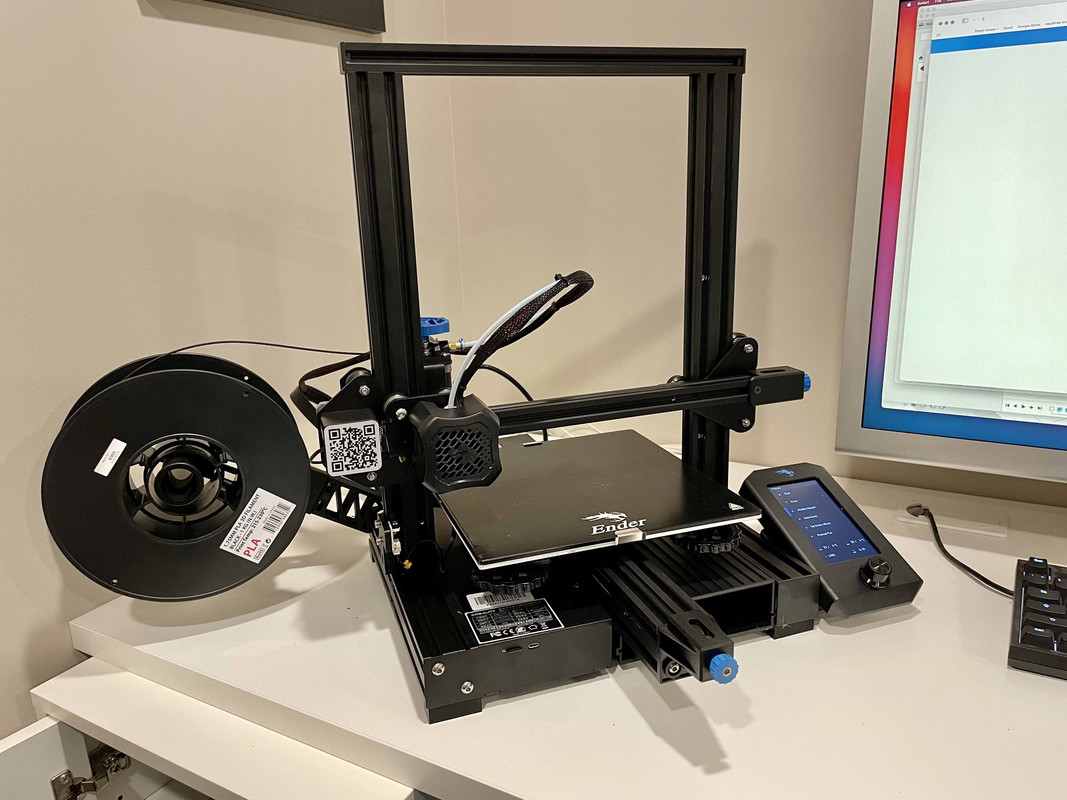
Fast forward to a week ago, I got a 3D printer and watched some Fusion360 tutorials [big grin]
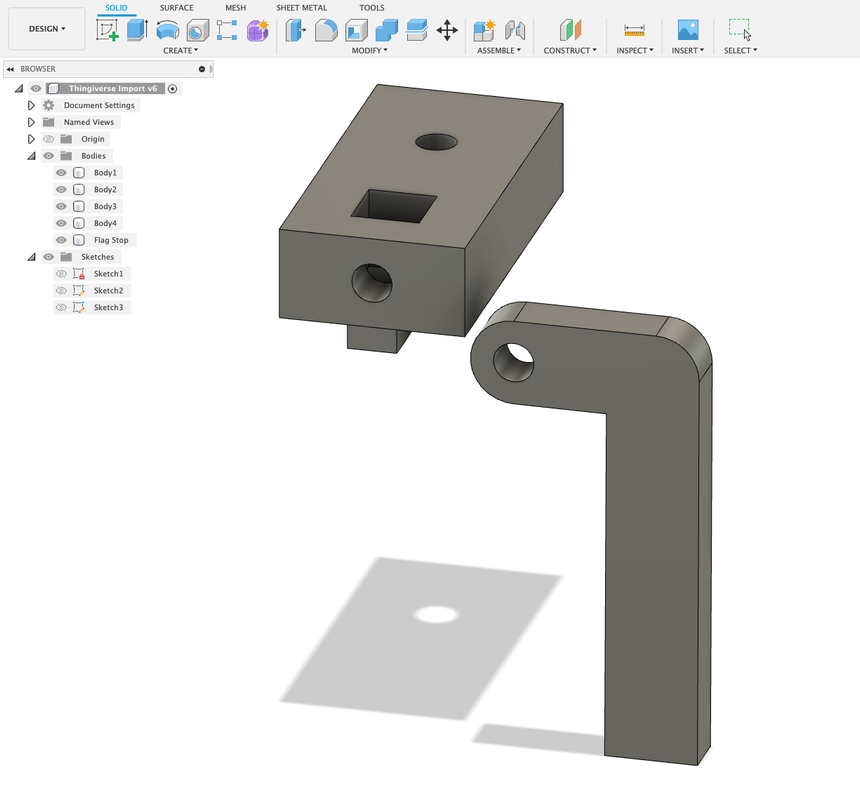
Despite being a novice I modeled this stop block and flag stop:
And with a ratcheting lever from McMaster it turned out pretty well:
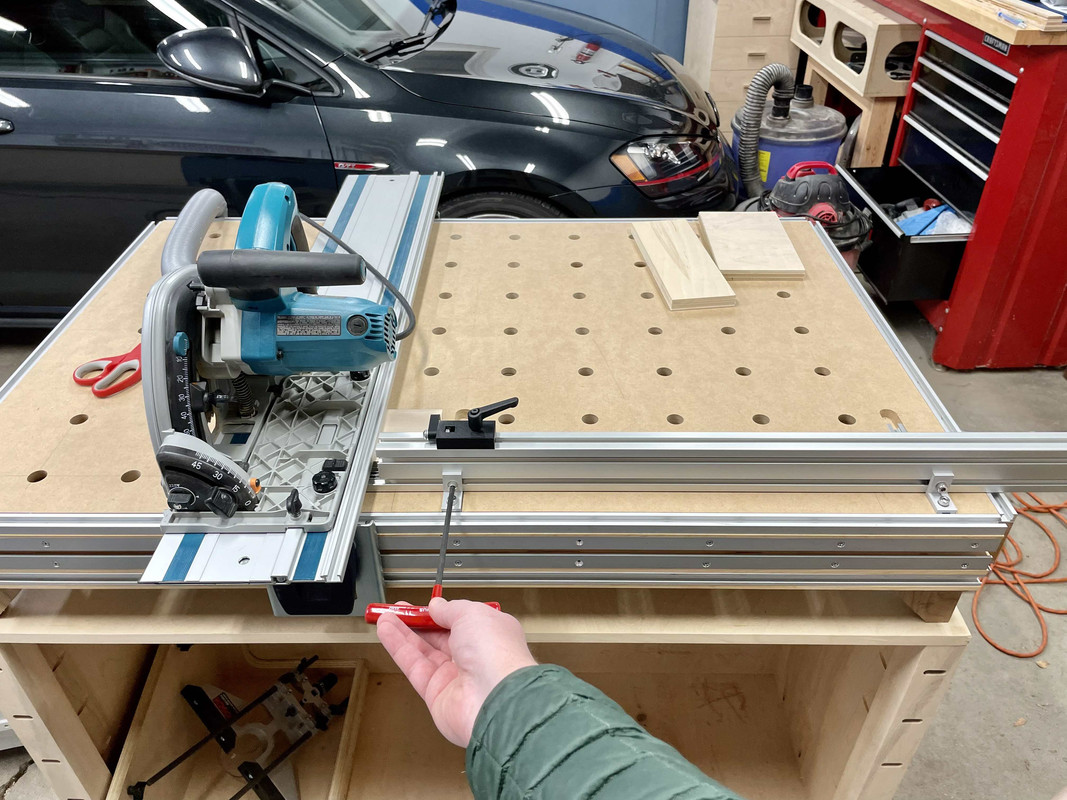
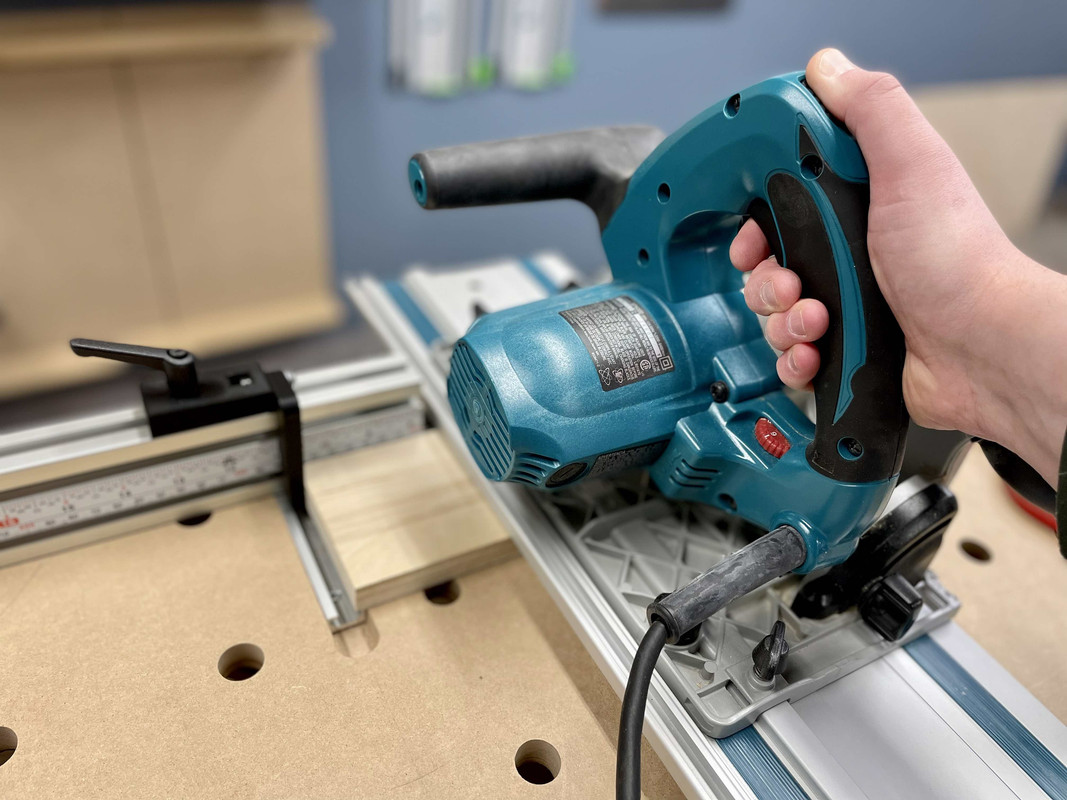
Probably unlike most, I set up my MFT every time I use it. My hole grid isn't perfectly orthogonal, so I don't use fence dogs or the hole positions to establish square, instead I use a Woodpecker MFT square. Below is how I calibrate the fence scale:
1/ Place known reference piece (in this case 250mm) against the fence
2/ Plunge saw all the way into the kerf and butt the known reference piece against it — this establishes exactly where the saw will cut, as I can't trust the kerf line in the table and there are variances in how the rail gets attached
3/ Set flip stop to the same measurement as the known reference piece (in this case 250mm)
4/ Loosen socket cap screws on back of fence brakes and slide fence towards saw until the flip stop just kisses the known reference piece
Now it is all set up. Let's do a test cut! I set the flip stop to 270 mm this time.
The results:
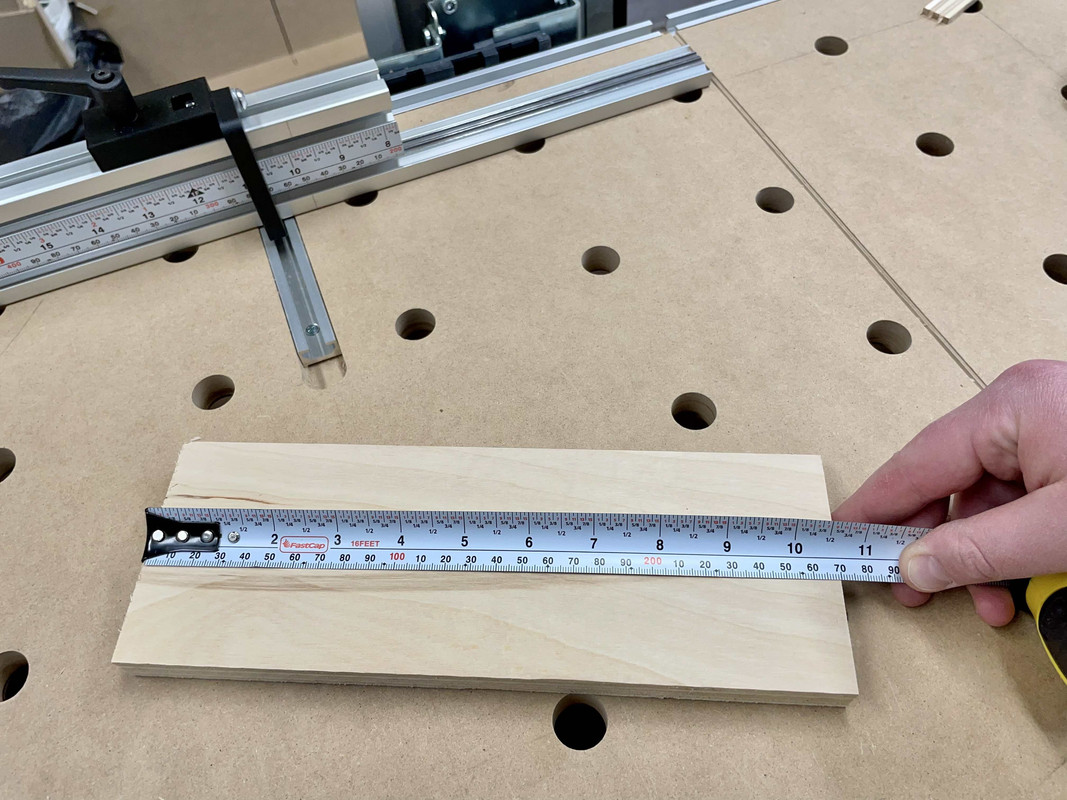
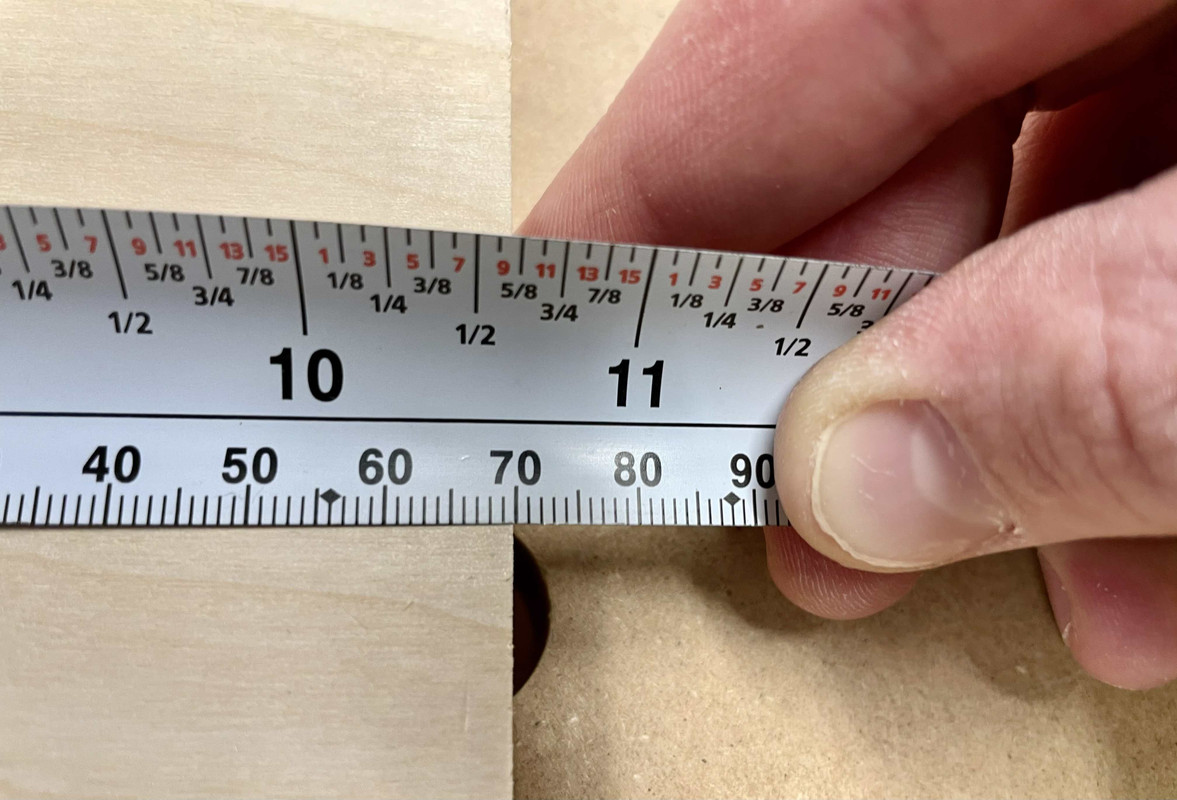
Pretty much spot on.
Maybe this is obvious to everyone but I am always trying to chase accuracy and setup efficiencies, so hopefully it can help someone. I park both cars in my small two-car garage and used to think it was a pain to have to set up each time, but with the processes I use I think it's actually a benefit. I can be sure everything is dead on each time I use the workbench.
An overall shot:
First off, I added a measuring scale to the fence. I went with Fastcap's peel & stick SAE/Metric combo scale because next time I build cabinets I think I want to jump into metric.
Second, up until now I haven't had a proper stop block or flip stop for my fence, because I got a 30x60 extrusion for some reason instead of the more common 20x40 that can use the Festool, Benchdogs, or other commercial flip stops. Normally I just clamp a block of wood.
Recently I made an attempt to make one out of maple and a $15 Peachtree commercial stop that sort of fit the dimensions, but in the end was not happy with how it turned out.
Fast forward to a week ago, I got a 3D printer and watched some Fusion360 tutorials [big grin]
Despite being a novice I modeled this stop block and flag stop:
And with a ratcheting lever from McMaster it turned out pretty well:
Probably unlike most, I set up my MFT every time I use it. My hole grid isn't perfectly orthogonal, so I don't use fence dogs or the hole positions to establish square, instead I use a Woodpecker MFT square. Below is how I calibrate the fence scale:
1/ Place known reference piece (in this case 250mm) against the fence
2/ Plunge saw all the way into the kerf and butt the known reference piece against it — this establishes exactly where the saw will cut, as I can't trust the kerf line in the table and there are variances in how the rail gets attached
3/ Set flip stop to the same measurement as the known reference piece (in this case 250mm)
4/ Loosen socket cap screws on back of fence brakes and slide fence towards saw until the flip stop just kisses the known reference piece
Now it is all set up. Let's do a test cut! I set the flip stop to 270 mm this time.
The results:
Pretty much spot on.
Maybe this is obvious to everyone but I am always trying to chase accuracy and setup efficiencies, so hopefully it can help someone. I park both cars in my small two-car garage and used to think it was a pain to have to set up each time, but with the processes I use I think it's actually a benefit. I can be sure everything is dead on each time I use the workbench.
An overall shot:
jroth33139
Member
- Joined
- Sep 12, 2011
- Messages
- 35
Really nice thread with lots of great ideas. Thanks for sharing.
By the way, I would encourage you to go metric. I did it a few years ago and I find it so much easier. The best way to transition is to go cold turkey — get rid of all your dual metric/English tapes and rules in favor of ones that are all metric. That way you aren’t doing conversions in your head and you start getting an intuitive sense of how long 100 mm is, for example, rather than thinking in terms of inches. FastCap has a nice all metric rule that I like.
By the way, I would encourage you to go metric. I did it a few years ago and I find it so much easier. The best way to transition is to go cold turkey — get rid of all your dual metric/English tapes and rules in favor of ones that are all metric. That way you aren’t doing conversions in your head and you start getting an intuitive sense of how long 100 mm is, for example, rather than thinking in terms of inches. FastCap has a nice all metric rule that I like.
nicholam77
Member
- Joined
- Mar 7, 2019
- Messages
- 115
[member=12527]jroth33139[/member] Thanks for checking it out!
I believe you that it's easier to go cold turkey. Maybe I'll consider that after I've done a project or two in metric. One bummer is I have a few imperial woodpecker measuring devices that I use all the time, that I'd have to give up or replace. As well as imperial-sized cutters (router bits, etc).
I believe you that it's easier to go cold turkey. Maybe I'll consider that after I've done a project or two in metric. One bummer is I have a few imperial woodpecker measuring devices that I use all the time, that I'd have to give up or replace. As well as imperial-sized cutters (router bits, etc).
Similar threads
- Replies
- 2
- Views
- 302
- Replies
- 7
- Views
- 462
- Replies
- 20
- Views
- 1K
- Replies
- 4
- Views
- 628