Imemiter
Member
- Joined
- Sep 17, 2019
- Messages
- 442
steadyliam said:I wonder if they’ll be updating the ETS EC with a light etc.
More lights on all the tools!
steadyliam said:I wonder if they’ll be updating the ETS EC with a light etc.
Christo-67 said:Hello FOG!
I'll have plasterboard to lay soon and I'm planning to do the plasters with the strips too!
I'm thinking of buying this machine when it comes out: ETSC 2 150 : 577723 with a CTM 36 E AC ( Or to big ? )
What do you think? Or is a planex better? Mikra Deros? [embarassed]
Is it possible to connect the ETSC2 to a cable via an adapter 220V ?
Ps: I have a TS 60 and also a Fermacell floor to do + vacuumed the whole site after the demolition we did.
steadyliam said:I wonder if they’ll be updating the ETS EC with a light etc.
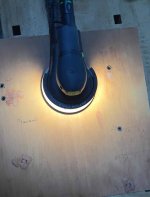
Smorgasbord - wondering how you're liking the Dutton light?I bought an aftermarket LED light for my ETS EC 150 from Dutton Tools. It clips around the sander and has a little low voltage socket for a plug that can come from the supplied wall wart with long enough cable, or from a largish battery pack - I got the cable version.
OK, so I snapped the light on (easy), put an electrical Y adapter on my Makita dust extractor, and plugged in both the low voltage wart and Festool plug-it cable, then plugged the light in. Use zip ties (a few supplied but I tripled the number) to tie the low voltage cable to the plug-it. For my setup, the light stays on all the time, even when the tool isn't running. I've seen things like this before, with LEDs drawing so little current that analog power systems leak enough. That's not a bad thing here, as turning the sander on and off works and turns the Makita on appropriately.
So, it's not a raking light. It illuminates the front half of the sander (more than 180º), but the light is necessarily up highish, and the light thrown is a bit away from the sander itself:
With my shop lights on:
[attachimg=1]
With just ambient light through the windows:
[attachimg=2]
In use, I didn't find it useful for sanding narrow pieces - I apparently sand side to side mostly. On large panels, it'll probably help somewhat. I'll have to see if the low voltage cable gets in the way when using other Festool tools or not. I have some largish projects coming up and will give it a shot with them.
I don't have much to add over my previous post here. I've zip-tied the little power cord to my PlugIt cord, so I plug both in at the sander when using it. When using other Festool tools, I just let it dangle and it doesn't get in the way. Having zip-ties, however, makes handling the power cord nasty on my hands. I suppose the fix would be to clip the cords to my dust collection hose, but not all of my tools are Festool. Dutton suggested running the light's (thin) power cord inside the dust collection sock, so I might try that next.Smorgasbord - wondering how you're liking the Dutton light?
Theoretically, it should. Officially, it doesn't. And I suspect there will be some intrepid users who will give it a try and let the world know next Friday.I’m mildly looking to get myself a new sander, been thinking it would be a ETS EC either 150 or 125, leaning towards the 150. The new ETSC 2 is sort of another wrinkle. I don’t care about cordless, as 95% of the time it would have a vac attached. Do we know if a 150 pad will fit on the 125 ETSC 2 or vise versa?
Well, the ETSC2 125 uses the same pad as the ETS EC 125.I’m mildly looking to get myself a new sander, been thinking it would be a ETS EC either 150 or 125, leaning towards the 150. The new ETSC 2 is sort of another wrinkle. I don’t care about cordless, as 95% of the time it would have a vac attached. Do we know if a 150 pad will fit on the 125 ETSC 2 or vise versa?
")
I’m receiving an order consisting of an ETSC 2 125 with a pad and protector for the 150 the coming week.. if you want a confirmation of compatibility, or non compatibility..Well, the ETSC2 125 uses the same pad as the ETS EC 125.
The ETSC2 150 uses the same pad as the ETS EC 150.
So if I connect the dots properly...

AbsolutelyI’m receiving an order consisting of an ETSC 2 125 with a pad and protector for the 150 the coming week.. if you want a confirmation of compatibility, or non compatibility..
 thanks.
I'm listening...I’m receiving an order consisting of an ETSC 2 125 with a pad and protector for the 150 the coming week.. if you want a confirmation of compatibility, or non compatibility..
Picked up the 150 version earlier this month, so definitely interested in the result.I’m receiving an order consisting of an ETSC 2 125 with a pad and protector for the 150 the coming week.. if you want a confirmation of compatibility, or non compatibility..
 Guessing delivery tomorrow or Wednesday..
 .
.Well this should be interesting as the ETSC 125 has a 2mm stroke while the new ETSC 2 125 has a 3.5mm stroke.Nonetheless, thought I’d do a direct comparison with the ETSC vs ETSC 2, same paper, same diameter pad.