New project with acute angles galore, knowledge needed.

boasist

Member
Joined
May 12, 2021
Messages
18
Hello all,

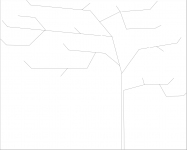
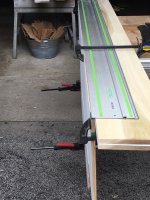
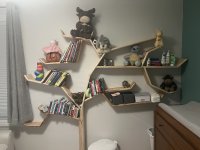
Take a look at the attachment, and you'll see my project layout. The picture is cut off at the bottom to show me only the top angle and measurements. I'm looking for some knowledge on getting these angles out of my shop.

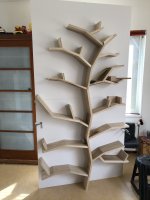
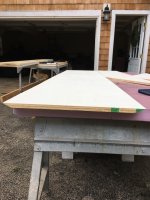
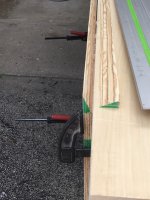
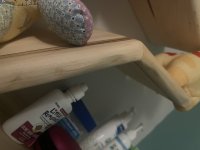
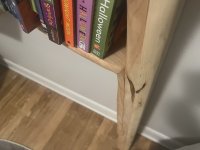
I use my track saw, dashboard cutting table, and various guide rails. The stock is all ambrosia maple that I have squared off on one side to attach to the wall, the other side is raw which I'll be leaving that way and shaping with the kutzall discs once complete. I'll probably domino each "branch/joint" along with some glue for support.

I need the expertise here to help wrap my mind around making these angles on a track saw. I can't stand the wood up and cut obviously so it all must be made laying down.

Thank you.
 

Attachments

  • Tree_2.pdf
    Tree_2.pdf
    1.5 KB · Views: 41
  • Screenshot 2023-08-21 225139.png
    Screenshot 2023-08-21 225139.png
    241.1 KB · Views: 230
  • tree.png
    tree.png
    90.4 KB · Views: 152
Michael Kellough said:
Send a picture without all the dimensions obscuring the view.
Done up above the tree.png for you. Thank you.
WillAdams said:
I take it finding someone w/ a CNC which could cut the whole thing isn't an option?
I have an xcarve pro, but only easel on the software side, so this type of thing is a major workaround with that, but I'm open to the option.
 
Michael Kellough said:
The project is just I incised lines on a big slab?

It's all separate, each line represents a cut board, along with the angle it should be to achieve the desired look. With the boards being mounted by the side to the wall, to stick out like many little shelves on the wall.
 
I guess you could cut acute angles using a track saw using a jig similar to a router tenoning jig but it would be easier using a table saw.
 
This would definitely be easier with a table saw. [member=63192]lwoirhaye[/member] had a good idea with the tenoning jig for some of the angles.

Two issues stand out: there are a lot of angles over 45º for cutting on the flat, which is beyond both a track saw and table saw's reach. You'd have to jig it up with either tool to accomplish the cut of the complementary angle. The jig isn't difficult to build, but would be another project requirement if you don't have a sketchy one laying around like I do.

Second, and likely the deal killer: unless the stock is really thin, the depth of cut needed to cut these angles exceeds the TS-55 and likely TS-60. The TS-75 and HK-85 could easily do it. Which saw do you have?
 
Thank you all, what is this jig you speak of and is there a build thread or photos of it? Given that this is an abstract project, I can get away with a shelf being 1/2" off or something like that, it's for myself, so I have lots of cushion.

This thread seems to be on the track I'm on, but I don't quite get the math to calculate the angles.

Same with the caliper thread, I don't quite get it with the explanation given, and his photos are dead.

I appreciate the help getting up this hill, once I get it, I'll be good.

BTW - I have the TS60, this is the first project for it, stock is all planed to 15/16".
 
Something that clamps your work vertical while the saw is horizontal.  Look at the Leigh FMT for an example of the sort thing.  You'd have to arrange for your saw to move in and out and make it parallel to the  work holding surface of the jig.
 
Looks like some of the techniques already shared will work but, if you have a planer, could you create a sled that allows you to feed boards through at your desired angle? If the shelves won't be very deep, you could choose a few common angles, leave board longs, plane the edge to your angle, then cut into final sizes. The only problem with this approach is that the leading edge of the shelves would then be end grain (if I'm interpreting your drafts correctly).

Just spitballing!

 
Please let us know how you clamp all those joints.  Looks challenging to me!
 
Hi,

I built a similar book tree some years ago. Because I planned all the material by hand and tapered each board a little, I decided to angle both sides of each board to half the actual angle. So none of the angles actually extended over 45 degrees. I do not have any detailed pics anymore of this.

If you do need to make very acute angles I would advise you to take a block of wood, make the angle on this, clamp this to the board and use a chisel to precisely cut the angle. So for a 75 degree angle, you would make 15 degree angle on a block of would, turn it over and you would have the 75 degree template for your chisel.

I used loose biscuits to join the pieces than, but would now use a Domino (yes, just received mine!). I attached the whole tree shelf by shelf to a piece of ply with screw in nuts in each shelf and finally attached the ply to the wall.

anyway, have fun with the construction; I am sure the end result will be great!

mattijs
[attachimg=1]
 

Attachments

  • IMG_0619.JPEG
    IMG_0619.JPEG
    456.2 KB · Views: 5,585
I don't see any lengths that could not be stood on end.

Tom


Attachments

  • IMG_1901 (2).jpeg
    IMG_1901 (2).jpeg
    327.3 KB · Views: 94
  • IMG_1895 (2).jpeg
    IMG_1895 (2).jpeg
    315.9 KB · Views: 92
  • IMG_1893 (2).jpeg
    IMG_1893 (2).jpeg
    376.7 KB · Views: 94
tjbnwi said:
I don't see any lengths that could not be stood on end.

Tom

Thanks Tom, with the forum slowness, I was having trouble breaking down your pics. Now I can see them better.

There isn't, but my workflow was to start with the full boards and cut them down as needed to minimize scrap. But yes, if I cut them all to rough dimension prior, it'd be no issue.

Can you elaborate on the math the calculate the angles with your procedure, Tom?

Thank you.
 
The "math" is not really about calculating, since the most you can do from any one plane is essentially 45 degrees. It's really about figuring out how to hold your part from the adjacent plane and subtracting from the 45 degrees, rather than adding to it on the other plane (which you cannot do in the first place)

An example would be like the track saw pics above. Say that angle is 60 degrees from the face of the board. You then clamp it as shown, so you are referencing the edge of the board. Now if you tilt the saw to 45 degrees, you would get the same cut as from the face of the board, so you subtract 15 degrees and get your 60 degree cut from the face.

There is another way to think about this, but it would be confusing, so I'll leave it alone
 
Well, call me what you would like, despite my shop, I went old school.

Bought This.

Started today and works great, from my design sheet I use the protractor to set the angle, transfer that to the blade holder, lock it in, and slice away.

I wanted to learn a new skill and improve my math here, and I guess I'm still growing, just not as I thought.

Onward with the project!
 
Finally wrapped this up over the new year. Once I got all of the angles dialed in and cut, I dominoed each joint, then went on to a test install to mark the mounting points (pocket holes). I then carved out the whole shelf with a karvex disc on my grinder to soften each edge and give a raw look to the wood. Sanded to 120 and rubio pure to finish. Pretty happy overall and it suits the intent great. Thanks to you all.

View attachment 2
View attachment 1
View attachment 3
 

Attachments

  • IMG_1261.JPEG
    IMG_1261.JPEG
    763.8 KB · Views: 49
  • IMG_1262.JPEG
    IMG_1262.JPEG
    624.6 KB · Views: 34
  • IMG_1263.JPEG
    IMG_1263.JPEG
    669.2 KB · Views: 32
I get acute angles on my chop saw by adding a 90 degree fence and banking the material off the fence.  On my saw that probably limits my cuts to about 6” deep.

For deeper cuts, I could add a 30 or 45 degree fence and cut it on the flat.  It will involve some math.  But doable. 

I would add an auxiliary tall fence to my table saw.  I probably would not consider any of the other methods.  I would through dowel to join.  Much of the strength is based on its attachment to the back panel.  So make sure all the sections have at least two screws to the back panel.  Confirmats are much stronger in this application than construction screws.
 
Back
Top