New workshop build

Ok [member=63059]HAXIT[/member],
where you located? I'd like to bring some sawdust for goodluck.

You like those FAT tables? Best purchase I made. I got rid of
my MFT/3. No more lifting & setting up that beast. You have
the room for it though.

The Festool wall is beginning to look like a store setup.

Great inspiration and it looks incredible for the amount
work put into it.

So when will the Kappa 550 be coming in?

Ok then, have a safe Happy New Years & prosper well
with the new shop!

 
Hi Folks,
It has been great since I got everything the way I wanted and I am spending more time here then upstairs.
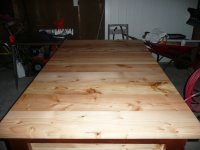
If this is not the craziest, then one of the craziest projects on the planet that I just finished as a first project in the shop. The way I am and grown up, I must say that I hate waste even if I did not pay for and the question always is why if I could use it?
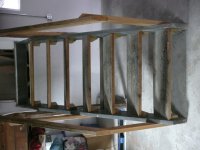
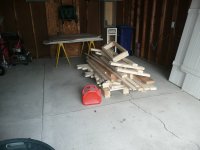
When my hammer machines arrived, they were packed great and I have a lot of scrap left that I did not want to throw away and I had the steps from the old stairs that was just screwed to 2x4 which came out easy without braking them. So I ended up to this project which is useful now because I have no table in the garage anyway.
This project is completed entirely from scraps left over and I just build it as I was thinking. Here we go:
The 50 years old stairs

[attachimg=1]

The hammer shipping skid

[attachimg=2]

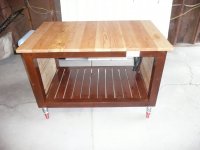
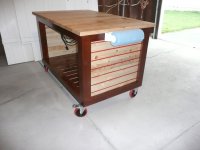
And the result

[attachimg=3]

[attachimg=4]

[attachimg=5]

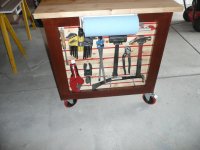
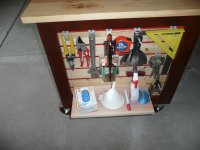
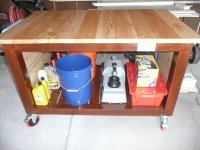
So the table top is made out of the old stairs and finished with festool heavy duty oil and the table itself is the scrap skid. The stain on the table was the left over from a project that I had 3 years ago. The 120v 20amp outlet is the last one left from the shop wiring and the cover came from old bathroom, cable is left over from the spool I bought to wire the machines and the plug is from old tablesaw, wall mount towel dispenser came free with the big box shop towel that I ordered long time ago. The both sides of the table are slatwall to hang tools and was finished with festool heavy duty oil and everything is put together with domino.
 

Attachments

  • P1050912.JPG
    P1050912.JPG
    2.1 MB · Views: 7,588
  • P1060250.JPG
    P1060250.JPG
    2.8 MB · Views: 7,570
  • P1060261.JPG
    P1060261.JPG
    1.8 MB · Views: 7,291
  • P1060264.JPG
    P1060264.JPG
    1.7 MB · Views: 7,221
  • P1060257.JPG
    P1060257.JPG
    2.5 MB · Views: 7,537
More pic from table.

[attachimg=1]

[attachimg=2]

[attachimg=3]
 

Attachments

  • P1060326.JPG
    P1060326.JPG
    3 MB · Views: 7,520
  • P1060325.JPG
    P1060325.JPG
    2.8 MB · Views: 7,751
  • P1060324.JPG
    P1060324.JPG
    2.1 MB · Views: 7,616
Tinker said:
How long did it take for you to build that table? 5 or 10 minutes?
Tinker
I have to say no because I have no choice! If I say yes, then somebody from wood magazines will be knocking on my door for interview. [big grin] [big grin] [big grin]
 
I have the same limited ceiling height and I find it pretty discouraging. It helps having such a clean clinical space to work in though. I am grateful to be starting work on a new ground floor shop with an apartment above which will give me enough workable height downstairs. I've always been in small workshops and found I was never able to get those spaces under such severe control as the images above. More room definitely helps. But organization is obviously not size contingent. Big shops as well as little shops get cluttered. Kudos to you if you can maintain such an efficient space.

 
mcooley said:
I have the same limited ceiling height and I find it pretty discouraging. It helps having such a clean clinical space to work in though. I am grateful to be starting work on a new ground floor shop with an apartment above which will give me enough workable height downstairs. I've always been in small workshops and found I was never able to get those spaces under such severe control as the images above. More room definitely helps. But organization is obviously not size contingent. Big shops as well as little shops get cluttered. Kudos to you if you can maintain such an efficient space.
Thanks, We have to think how to use the space we have in the best way regardless of the size and be happy and productive. [smile]
 
HAXIT said:
Tinker said:
How long did it take for you to build that table? 5 or 10 minutes?
Tinker
I have to say no because I have no choice! If I say yes, then somebody from wood magazines will be knocking on my door for interview. [big grin] [big grin] [big grin]

No matter, you have done a great job on the renovation AND making fine use of the space AND a great use of leftovers and what otherwise might have been thrown away or burned.
Tinker
 
Not sure how I missed this thread until this morning, but the transformation and results are absolutely stunning.  A real inspiration.
 
Folks,
Just wanted to update what is going on now before this thread gets too old. I still have to make some storage area for the hand tools finishing and measuring stuff I have which I would post it here, but I am not able to finish it yet. Most of them are  involve some machining aluminum and welding and if it was up to me, It was done now. I cannot do this in my shop because my boss told me that you do not like small project and every time you start something nobody does his job but they want to watch you. The machine shop that has to do it for me is very busy now and I have no choice but to wait till next month.   
 
I just saw this thread.  I gotta say, beautiful shop.  So cool to see Hammer and Festool stuff on the wall.  That's a lot of woodworking bling right there.  [eek]

I'm in the process of rebuilding my 1 stall garage.  It's too small for my Ford F150 and old enough to be a grandparent if it were a person.  Since I'm rebuilding I might as well expand it slightly to have some woodworking space.  I would love to have a shop like that some day.  Maybe when that one app I write or that long-lost rich uncle somehow pushes money in my direction, I'm stuck with my TS75 and handtools for woodworking.  At the very least my neighbors won't hate me for having too loud of a machine.
 
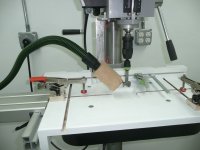
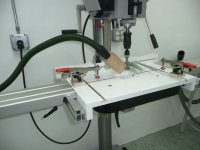
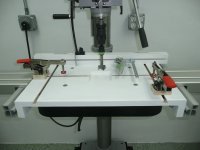
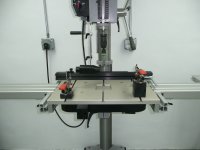
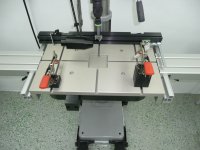
I had a good news from machine shop that I would able to use it very soon. The first thing that I have to make is the table for drill press and then move on. This is the prototype and the white paint was the left over from bathroom paint but will be made completely from aluminum then glassblowing and anodizing. This is the close up picture of the table and as you can see I am using the festool quick clamp on the back fence with the stop flag that comes with mft/3. The back fence moves across the table and can be locked on the back quickly with small adjustable handles. The bessey  auto adjust toggle clamps are mounted on the block and easily can be move or remove completely without any tool. I will add more stuff with pics to this when I start with aluminum. I have 4" square hole in the center and always can be filled with wood if it has to.

[attachimg=1]

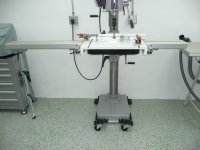
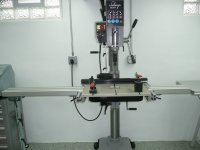
At each end I add the rails from hammer so I can use their table extension on each end. Not only it gives me the total of 6 feet table for drill press, it also can be used for extra outfeed table for cms without moving anything around. I already tried out and it works fantastic.

[attachimg=2]

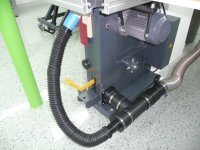
Then the dust control which will be fully adjustable and would work with both, the 35mm and 50mm hoese. More on this wit pics later.

[attachimg=3]

[attachimg=4]       
 

Attachments

  • P1060356.JPG
    P1060356.JPG
    2.6 MB · Views: 5,821
  • P1060355.JPG
    P1060355.JPG
    2.7 MB · Views: 6,162
  • P1060354.JPG
    P1060354.JPG
    2.7 MB · Views: 6,391
  • P1060352.JPG
    P1060352.JPG
    2.5 MB · Views: 6,723
[member=63059]HAXIT[/member] very nice as usual.

For the table consider Alcoa MIC6 cast aluminum plate. Manufactured to tight tolerances and very flat. comes in 1/4 to 4 inch thicknesses. easy to machine. Readily available.
http://www.arconic.com/aap/europe/en/product.asp?parent_cat_id=1847&cat_id=1847&prod_id=619

I have found that for most operations I prefer a lower fence. So i use another piece of mic6 that I had machined straight and flat on the edge. I installed a t track about 1-2 mm off the edge to use with a stop. When I'm doing something that needs a higher fence like a work piece on edge operation, I use the Woodpecker's fence. You can use it with regular clamps to hold the piece.
http://www.woodpeck.com/dp3.html

Consider dropping a couple of threaded holes in the area directly between the quill and the front edge of the table to be able to use a stop to keep the work piece tight against the fence. Doesn't have to be a t track, just put a slot in the long dimension of the stop for adjustment.

Ron
 
[member=3192]rvieceli[/member]
Thanks, I was thinking about cast as well so I am going to try the MIC6. I just sent an e-mail for supplier that I have been dealing with for over 15 years and he will get back to me tomorrow. 
 
I do like the hammer n4400 a lot and I would not ask for more for a long time at least to be said but not too happy about the dust port. I know felder and other machines have two ports but again they located too far from cutting  point. I just changed my setup and add the 2 port myself. I could not sleep last night so I thought about this and did it this morning. I have to tell you that I would not ask more and it works great! Again prototype but will be fixed.

[attachimg=1]
 

Attachments

  • P1060358.JPG
    P1060358.JPG
    2.9 MB · Views: 5,714
Greeting [big grin]
It has been a very busy year for me and I just came back from Vancouver.
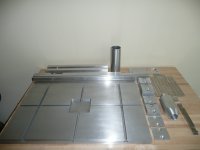
Before anything, I would like to thanks to rvieceli for recommendation on mic6. The T6061 is a stronger material and get nicely anodized but considering flatness and machining and available at any time from my supplier, the mic6 was the material of choice.
Here is the pic from everything I need and has been waiting for me to come back. I am doing some drilling and taping and get it finished and put it together.

[attachimg=1]
 

Attachments

  • P1060409.JPG
    P1060409.JPG
    2.5 MB · Views: 5,225
Finally the forever wanted project is over. I took all the parts from anodizing shop yesterday and was able to put them together this afternoon. As I wrote about this before, I am not going to repeat everything again but feel free to ask anything that I might have missed. The table is mic 6 and the rest are 6061 aluminum. The black square blocks are to connect the bessey toggle clamps on the top and move them quickly and luck them dawn. There are three sizes of thickness, 3/8 1 and 2 inches. I can use one or two or all together to have a capacity of clamping dawn up to 5" thick material. In one picture you can see that I have the 1" at left and all together at right and you also might see that one block is hanging from the drill press cast table at the front. Each block has a magnet at the bottom that let me store them around the drill press's cast iron table so I do not have to look for them when I need them.
Everything get changed within one minute without any tool.
Here are the pics.

[attachimg=1]

[attachimg=2]

[attachimg=3]         
 

Attachments

  • P1060420.JPG
    P1060420.JPG
    2.5 MB · Views: 4,817
  • P1060421.JPG
    P1060421.JPG
    2.5 MB · Views: 4,850
  • P1060422.JPG
    P1060422.JPG
    2.7 MB · Views: 5,000
Back
Top