New workshop build

Hi Harvey,
Sorry for late reply, I was in and out for few days. The folks here answered your first question and it is available all over at hardware stores. You very much got the concept here and the shelves are supported by hardware that I made which I had time otherwise I had to buy and there are a lot of choices. If you need I can post some web sites but if you google hardware for slat wall you will see the few pages would pop up.
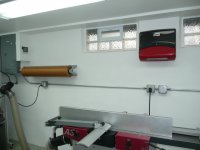
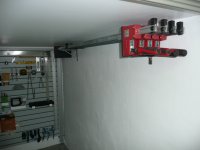
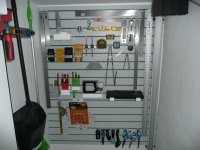
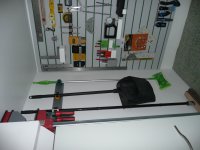
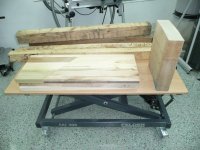
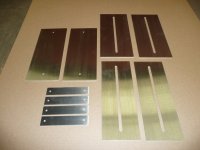
For slat wall grooves I have about 10 different sizes but for this I used the [Freud #52-522] this bit is the best when you want to buy the support and accessories that is already made. The bit is long and can go very deep, so make sure to try it on a scrap to ensure everything are at 90 degree. Dark gray is the deepest rack and I routed it out standard which is 3" from center to center the slat just in case if I want to change something in the future so I do not have to make the rack again. The other two are going to be used only for glue, polish,stain and caulk and it would be waste of time if I would route it out like the dark gray one. I made the location of the shelves based on how this stuff are sold. If it is too short, then some stuff would not fit and if it is too long, that would be waste of space.I used 1gal,1qt paint and caulk to decide the location for shelves.
OK, I going dawn in shop again.
 
This shop looks incredible!!

I have recently purchased a Hammer A3-41 and need to move it into my basement shop as well. Do you have any tips on how to do this safely based on your experience?
 
swhite88 said:
This shop looks incredible!!

I have recently purchased a Hammer A3-41 and need to move it into my basement shop as well. Do you have any tips on how to do this safely based on your experience?
Thanks for the comment. I hired a industrial movers to do the job and did not touch anything. It is not easy to find one for a small job and you call 12 companies and only three of them called back.
Good luck and enjoy your new machine. 
 
OK folks, anything that I ordered is back order and it does not let me to start my next project in hope this is the last year I am working  my way out to finish this shop. I have no choice but to wait and I am going to change my plan right now to do some small projects which I had left them for the end but to stop the anger and get busy it is what it is for now.
I finally got one of this waxed paper and shop towel dispenser for the shop to stop using the paper towels from up stairs and to protect the table from complex gluing the waxed paper works great.

[attachimg=1]

The clamp storage that I made is good for clamps up to 40" long and I do have 50 and 60 inches as well. I bought 4 of each and if I need anything longer I will use the extensions that I have. I would like to keep this longer stuff out of my way and this is what I did.
Here is the 4x60" under the stairs.

[attachimg=2]

When I was working on this just found out the nice place for the 4x50" and also made a hanger for brooms and dust pan and all together came up great and completely out of my way. Also you can see in the picture that the back wall is getting filled up.

[attachimg=3]

[attachimg=4]

Now I am thinking about the shop stool so I do not have to seat on the floor anymore.


Attachments

  • P1060512.JPG
    P1060512.JPG
    2.4 MB · Views: 4,371
  • P1060507.JPG
    P1060507.JPG
    2.5 MB · Views: 4,338
  • P1060509.JPG
    P1060509.JPG
    2.8 MB · Views: 4,239
  • P1060511.JPG
    P1060511.JPG
    2.6 MB · Views: 4,256
How can I turn that picture now?! I never had that problem before.
Thanks.
 
I am not a big fun of sit down and work but I need a stool for shop anyway.
I got this left in the box for almost 3 years now and there is no chance that it will be used.

[attachimg=1]

So I think I will make something identical to MFH 1000 to be more then just a stool and use this black blue foam before it rot in the box.


Attachments

  • P1060514.JPG
    P1060514.JPG
    3.3 MB · Views: 4,078
[attachimg=1]

[attachimg=2]

[attachimg=3]

[attachimg=4]

[attachimg=5]
 

Attachments

  • P1060522.JPG
    P1060522.JPG
    2.7 MB · Views: 3,988
  • P1060520.JPG
    P1060520.JPG
    586.1 KB · Views: 3,630
  • P1060519.JPG
    P1060519.JPG
    3 MB · Views: 4,025
  • P1060517.JPG
    P1060517.JPG
    3 MB · Views: 5,188
  • P1060505.JPG
    P1060505.JPG
    3 MB · Views: 4,015
OK, Here is the tray for the foam the inside and the outside cut. The box is ready as well and I will post a pic before painting I just have to leave the house now.

[attachimg=1]

[attachimg=2]
 

Attachments

  • P1060525.JPG
    P1060525.JPG
    2.8 MB · Views: 3,848
  • P1060526.JPG
    P1060526.JPG
    3.1 MB · Views: 3,901
I am done for today and tomorrow back to work after few days off. The tray and the box is done and will be sanding and painting over the weekend.

[attachimg=1]
 

Attachments

  • P1060528.JPG
    P1060528.JPG
    2.9 MB · Views: 5,376
neilc said:
What are the orange strips you used in post #209?  Looks like they screw down.
Yes it is flexible template and it is not intended to be used like I did. It makes it easier and faster to make the template and use but not to screw it directly into the work piece. However my work piece is only one and will be filled and painted so I just screw down to save time.     
 
I had to cut a slut on each side of the box and round it up for hardware that I made for lifting.

[attachimg=1]

[attachimg=2]

For the table top I was going to use a corian and right before I start asking around for drop offs if someone had anything left over I was in lumberyard for walnut and right when I waked in I saw this beautiful quartersawn mahogany 17" x 43" and just could not resist and I bought it. Here is the pic and the table top that I made.

[attachimg=3]

[attachimg=4]
 

Attachments

  • P1060538.JPG
    P1060538.JPG
    2.9 MB · Views: 5,033
  • P1060524.JPG
    P1060524.JPG
    3.2 MB · Views: 4,965
  • P1060536.JPG
    P1060536.JPG
    3 MB · Views: 4,962
  • P1060534.JPG
    P1060534.JPG
    3 MB · Views: 5,140
lifting hardware that I made.
Laser cut from 304 stainless then time saved.

[attachimg=1]

[attachimg=2]

Formed hardware and weld.

[attachimg=3]
 

Attachments

  • P1060530.JPG
    P1060530.JPG
    2.5 MB · Views: 4,984
  • P1060532.JPG
    P1060532.JPG
    2.7 MB · Views: 4,875
  • P1060537.JPG
    P1060537.JPG
    2.7 MB · Views: 4,885
This will be few things, lifting table, small work station, storage and of course you can sit on it. some pics before I finish it.

[attachimg=1]

[attachimg=2]

Here is how it is looks like when it is a stool. It is exact size as MFH 1000 and because I add a table to it so I just got smaller casters by 25mm not much and I am right on.

[attachimg=3]

And when it is all the way open. You can lock it up from 14" up to 39".

[attachimg=4]


Attachments

  • P1060543.JPG
    P1060543.JPG
    2.8 MB · Views: 4,794
  • P1060541.JPG
    P1060541.JPG
    3 MB · Views: 4,894
  • P1060539.JPG
    P1060539.JPG
    2.6 MB · Views: 4,743
  • P1060540.JPG
    P1060540.JPG
    2.7 MB · Views: 4,759
Finally done after painting every weekends. In first picture as stool next to MFH 1000

[attachimg=1]

In order to remove the green tray, just take out the foam and loose 4 screws and it comes right out and now you got a small workbench.

[attachimg=2]

[attachimg=3]
 

Attachments

  • P1060553.JPG
    P1060553.JPG
    3.3 MB · Views: 4,510
  • P1060554.JPG
    P1060554.JPG
    3.3 MB · Views: 4,527
  • P1060555.JPG
    P1060555.JPG
    3.4 MB · Views: 4,420
Now the table is open up all the way which is 40" and two sys1 is in the box. You can also see the tool tray in the back inside the box in blue black which is hold by a magnet. Three sys1 or one sys4 fits in the box perfect and you can move up to 6 systainers around.

[attachimg=1]

[attachimg=2]

[attachimg=3]
 

Attachments

  • P1060556.JPG
    P1060556.JPG
    613 KB · Views: 4,152
  • P1060557.JPG
    P1060557.JPG
    579.8 KB · Views: 4,037
  • P1060558.JPG
    P1060558.JPG
    3.2 MB · Views: 4,420
Back
Top