Obtaining Unusual Angles with Precision

I see that iGaging has a new digital miter gauge out:https://taytools.com/products/igaging-ez-digital-miter-gauge-18-or-24-new

It's $100, so pretty affordable. However it suffers from the typical digital accuracy flaw:

Resolution: 0.05°
Accuracy: 0.2°

It would be interesting to know real-world performance of these digital angle thingies. For instance, if you calibrate at 90º, is it resolution accurate to return to that 90º mark, and it's just that setting, say, 40º might be off by 0.2º? I've seen digital levels that claim a higher accuracy at 0º and 90º than they have for odd angles in-between.
 
It would be interesting to know real-world performance of these digital angle thingies.
Andrew Klein did a quickie test:


The more expensive one I showed in this post here: https://festoolownersgroup.com/thre...ngles-with-precision.73759/page-3#post-715215

is the one he found was the best. He disqualified the Wixey for going 0.1º over, but not the Klein (no relation) when it was 0.1º under. Obviously, more testing would be needed, especially with regards to sensitivity and small changes versus large changes.

And remember, many of these digital angle gauges are more accurate (or so they claim) near horizontal and vertical than in the middle angles.
 
Typically, I only need angles for a triangle, square, pentagon, hexagon and octagon (60 degree, 45 degree, 54 degrees, etc.). To check the accuracy of any of the listed angles, I cut a broad with the desired angles on both edges. I then slice off pieces about 2” wide.

I lay the pieces on a flat surface with the wider side up. I tape the cut edges together to make a chain and then try to fold it up into the desired shape. If all the miters close up nicely, I’m done. If not, I make an adjustment and repeat the exercise until I get the desired result.

I just use a triangle to set the blade angle. (I’ve only done rectangles and triangles this way.) I usually need just two tries to get all the tight miters.

If you are doing a pentagon, do not cut 5 pieces and then miter the edges. Too many opportunities for errors to creep in. Cut a 10” wide piece of 3/4” stock and put the miters on both edges. Then slice it into 5 pieces. All the trial pieces will be exactly the same length and have exactly the same angles to be joined. If it is just a one-time affair, trial and error is going to be a cheaper method than buying expensive measuring tools.

I like to cut the boards exactly to size first (with 90 degree cuts). I then cut the miters against a sacrificial fence for which I have cut a relief to allow the scrap to float around against the fence. I have never had a kick back because the scrap has plenty of clearance, but I do stand to the side anyway.

It is the most accurate way I have found to cut the miters.

P.S.: I have a couple of Shinwa measuring tools and very “usable” (is that a word?). They seem to work in most situations that I have put them to task with.
 
Andrew Klein did a quickie test:
I guess I should comment on his new bandsaw setup tool. It's a cool idea in concept, but I wonder about its use in real life. If the blade is thin (like 3/16") I think it would have difficulty indexing off of it without hitting the teeth or whatever. And if the blade is wide (like ⅝") then you can just stick a small metal rule behind the teeth and the digital gauge's magnets work through that to the blade.

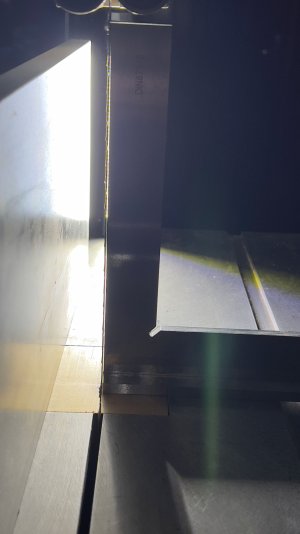
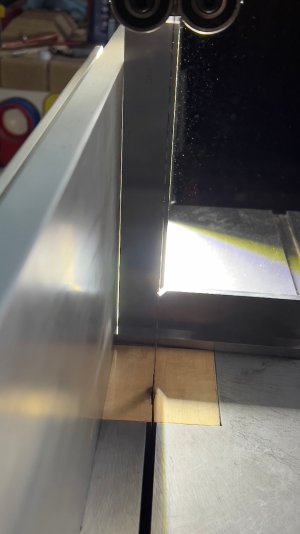
That's what I tried. But, even with the more accurate digital gauge, I got better results the old-fashioned way: A square on the table referencing the blade (not touching it, just an even gap), and then the square on the table referencing the fence. Turn the lights off and use a strong backlight:
BladeSquare.jpg FenceSquare.jpg

In my case, I have the top of the fence slightly more towards the blade since it deflects a tad with pressure. The proof's in the resaw uniformity, which for me is a couple tenths of a mm across 6", which is about the same variation I get just along the board at the same height. I should resaw something taller to really see, though.
 
Precision angle blocks allow you to “build” almost any angle by stacking the blocks. But note, always wipe clean any adjoining surfaces first. Dirt, oil, dust, etc. can affect both accuracy and the ability to join the blocks.

This set (just $50.00) includes these angles: • Set includes: 1°, 2°, 3°, 4°, 5°, 10°, 15°, 20°, 25°, 30°

Machinists’ blocks are machined so flat and smooth that they behave like suction cups when placed against each other. To separate, slide off the adjoining block instead of trying to pull them apart. I have not used the set I linked, but even the Chinese knock offs tend to be very accurate.

You will also need a flat surface to rest the gages on. Glass is typically flat and smooth, and the stone tiles I have checked are similarly flat and smooth. Avoid marble as it is porous, will absorb oils and will lose the suction capabilities. Porcelain tiles are smooth, but not always flat. Check for flatness first. The cast iron base on my table saw is both flat and smooth, but rough enough that suction is not possible.

Our machine shop used a flat granite stone about 4” thick and about 3 feet square. It would require two strong men to lift it. They also had a cast iron flat surface, but it was used mainly as a table top. It was old and replaced by the granite flat stone. (In addition to being heavy, they are quite expensive. So a sheet of double strength glass probably makes sense for occasional use.)

I suspect that this $50.00 set will prove to be more accurate than any adjustable or digital measuring tool.

There is, in my experience, a tendency to accept digital readouts as more accurate than the analog equivalent. I’m fairly certain that is not always the case.

The video is geared towards the machinist, so some re-thinking will be required.

Note: I typically never used these tools. I was the one that the shop manager came to to research and find suitable items to purchase. So, some theoretical knowledge but little first hand use knowledge.


Last edited:
I agree with you about the "it's digital so it must be accurate" mentality. Seeing the video comparison of digital angle gauges should make clear the point that display resolution is not accuracy.

Angle blocks are OK for small set-ups (eg, ok tablesaw blade angles but not cross-cut sled fence angles), but even then most sets are only whole integers. Can't go 22.5º, for instance, or the other angles needed for some polygons, or for most compound angles (angled in two directions). That's what started me down this thread on "unusual angles."
 
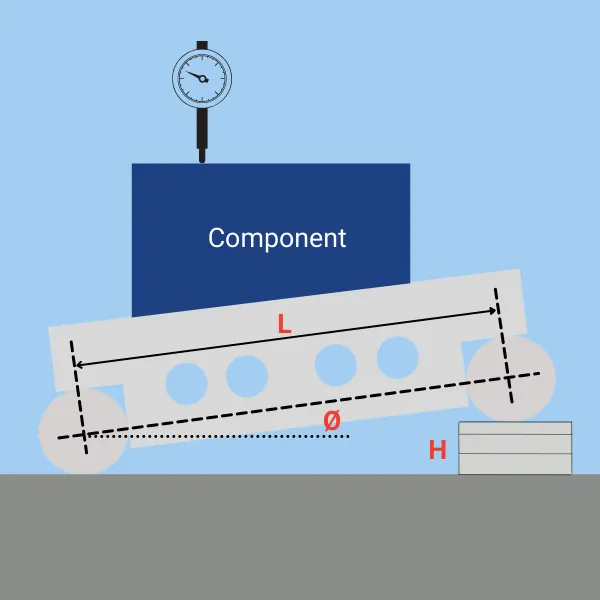
The most accurate way to set an angle is a sine bar. Way more accurate than woodworking usually needs.

The angle blocks are nice for whole angles.

When Packard mentions the gauge blocks will stick together this is called “ringing the blocks”. The blocks are wiped, faces stacked 90º from each other then twisted until the long edges are parallel. The only way to separate them is sliding them apart.


Tom
 
There is, in my experience, a tendency to accept digital readouts as more accurate than the analog equivalent. I’m fairly certain that is not always the case.
Couldn't agree more, I've used numerous digital calipers that wouldn't return to the exact same readout when opened and closed successive times. And some weren't that much cheaper than a Mitutoyo.

Despite the amount of quality accurate digital calipers I own, I always end up using the analog dial caliper I inherited from my father in law.
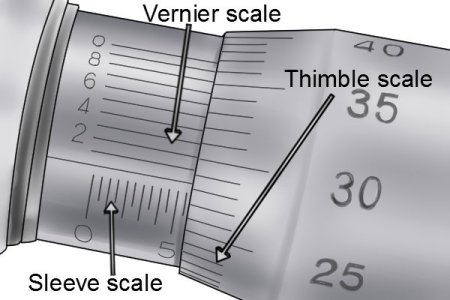
An apprentice tool and die maker where I used to work, bought a (probably) 50 year old hand made machinist’s tool box complete with measuring tools. He learned how to use the vernier scale on his calipers and micrometer and he refused to use even dial-type versions. That was about 30 years ago. If he is still working, I’m sure he would still be using those vernier versions.

I used those same type of micrometer and caliper for many years until I needed glasses. Then I switched to dial indicator versions.

1763412803548.jpg
 
Despite the amount of quality accurate digital calipers I own, I always end up using the analog dial caliper I inherited from my father in law.

My Brother-in-Law is a toolmaker and the only reason he uses a digital vernier is to do quick metric to imperial conversions at the press of a button. I use digital on all my machine fences because they read the same from machine to machine, repeatability is handy, can be calibrated to read the same against a given measuring tape/rule and for WW the resolution issue is good enough.
 
I use digital on all my machine fences because they read the same from machine to machine, repeatability is handy, can be calibrated to read the same against a given measuring tape/rule and for WW the resolution issue is good enough.

That is exactly why I bought a set of M507 digital tape measures for all my machines. I still have to install them. I hope that will happen this winter. First I need to finish my new house. The idea is to use a gauge block to calibrate all of them to the exact same setting and be able to repeat dimensions on all machines with ease. I wanted to do this because when I checked the fences on the machines there were significant discrepancies between them. As an example: I sawed a block to 500 mm on my Felder KF500P. I then went to the band saw and compared that block to the reading on that machine. There was more than a mm difference. Using this setup I can easily set zero points and I have checked the magnetic tapes to make sure they show the same dimensions over their whole lengths. They did.

I was trained to use vernier scales and I often do, so it is not about not being able to use or read them. This just makes life in the workshop much easier for me. Like Mini Me said: repeatability is handy!
 
My Brother-in-Law is a toolmaker and the only reason he uses a digital vernier is to do quick metric to imperial conversions at the press of a button. I use digital on all my machine fences because they read the same from machine to machine, repeatability is handy, can be calibrated to read the same against a given measuring tape/rule and for WW the resolution issue is good enough.
The chief tool and die maker where I used to work, was a Polish immigrant. When we needed additional hires, he advertised in the local Polish-language newspaper. Over the course of 30 years, out tool and die shop migrated from a Spanish/English language shop to an entirely Polish/English shop.

All the tool and die makers originally worked in metric. After a few years of using Imperial measurements, they lost the ability to “think in metric”, and when they got a print in metric they had to convert all the dimensions to Imperial before starting work.

I would have thought that after years and years of using metric dimensions, that the ability to think in metric would have been resident in their mental “operating system”. Apparently not.

All the “imported” help turned out to be capable and hard working. But to talk to some of them required another tool maker to translate.
 
There's Segal's Law:

A man with a watch knows what time it is. A man with two watches is never sure.

FWIW, I'd like to see someone set their bandsaw table to a 31.6º using precision angle blocks or sine bars. At best, you'll end up setting a bevel gauge against them first, and then needing 5 hands to hold the bevel gauge against the blade while you tilt the table and lock it down.
It might actually be possible using magnets but hardly practical and if the finished item was measured I would bet the angle varied through the cut because a BS is not a mill being instead a very crude device in comparison at best.
 
I fail to believe that bandsaws can hold the kind of tolerances required to maintain an angle measured in increments of 1/2 degree.

Our Do-All band saw in the toll shop probably weighed in excess of 5,000 pounds (the smallest Do-All weights 1,100 pounds and the biggest weighs 8,000 pounds). And our tool makers did not depend on the saw to maintain that level of precision. Indeed, the roughness of the cut required surface grinding to even use the cut material.

And our machine had an automatic feed, which likely improved on the precision.

I am finding this discussion more academic that realistic.
 
Last edited:
Back
Top