jonny round boy
Member
- Joined
- Jul 21, 2007
- Messages
- 3,223
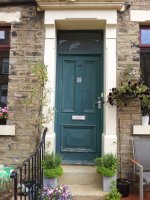
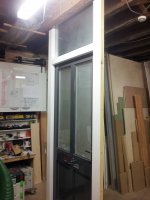
This is the front door on our house. I think it might be original to the house (making it around 120 years old) but I'm not certain of that. We were going to replace the entire door & frame (along with the windows) but we simply can't afford to do that now, so we've decided that we need to renovate it instead, and quite soon (I don't think it would survive another winter). Here's how it is now:
[attachimg=1]
The joints have failed and it has sagged; the paint is flaking & peeling, and water has been getting in in places, but the timber itself is sound, with no rot evident anywhere (which amazes me, frankly!). Additionally, the door is very badly warped, but the door frame has been made to suit so despite this it fits perfectly against the stops all round.
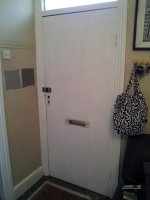
The inside face had been covered with hardboard at some point (probably in the 50's, that was very popular then!):
[attachimg=2]
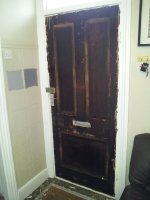
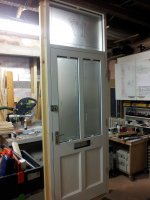
I ripped this off yesterday, to find this:
[attachimg=3]
The large moulding has been removed to allow the hardboard to sit flat. The finish under the hardboard is a horrid sticky brown 'goo' (I think it's called scumble?) which we've found on basically every wooden surface in the entire house, and which I hate. Around the edges are 5 or 6 layers of paint; on the outside, probably 4 layers.
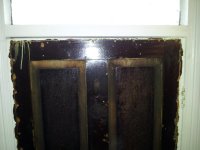
In this picture, you can see how much the door has sagged:
[attachimg=4]
Luckily, no-one has ever trimmed the bottom edge to compensate for this, so it shouldn't cause a problem to square it up again.
What I want to do is take the door apart & re-glue it, replacing the top panels with glazing. I think it would look better with smaller beading to these glazed panels rather than the big (roughly 2 1/2") moulding that's there now. I'll be keeping the big beading to the bottom panel, and using the beading from the top panels to replace the moulding that's missing from the bottom pane on the inside face.
Now to my questions:
I need to strip the old paint/scumble inside & out, and dismantle the door. I think the easiest method would be to have it dipped, as stripping it manually would be very time consuming, plus it's almost certainly got a lot of lead in the paint. Should I do this before dismantling it, or take it apart & then dip the individual components? There is a lot of paint build-up in the gaps, and I'm concerned that dipping it assembled won't get that out. On the other hand I don't know what the implications are of dipping the components individually (if there are any?).
Since the door is warped, and the frame made to suit, is there a danger that pulling it apart & re-gluing it will change the degree of warp?
What would be the best adhesive to use to re-glue it? Exterior PVA? Polyurethane? Something else?
I've never done this before; what other pitfalls are there I need to look out for?
Thanks,
Jonathan
[attachimg=1]
The joints have failed and it has sagged; the paint is flaking & peeling, and water has been getting in in places, but the timber itself is sound, with no rot evident anywhere (which amazes me, frankly!). Additionally, the door is very badly warped, but the door frame has been made to suit so despite this it fits perfectly against the stops all round.
The inside face had been covered with hardboard at some point (probably in the 50's, that was very popular then!):
[attachimg=2]
I ripped this off yesterday, to find this:
[attachimg=3]
The large moulding has been removed to allow the hardboard to sit flat. The finish under the hardboard is a horrid sticky brown 'goo' (I think it's called scumble?) which we've found on basically every wooden surface in the entire house, and which I hate. Around the edges are 5 or 6 layers of paint; on the outside, probably 4 layers.
In this picture, you can see how much the door has sagged:
[attachimg=4]
Luckily, no-one has ever trimmed the bottom edge to compensate for this, so it shouldn't cause a problem to square it up again.
What I want to do is take the door apart & re-glue it, replacing the top panels with glazing. I think it would look better with smaller beading to these glazed panels rather than the big (roughly 2 1/2") moulding that's there now. I'll be keeping the big beading to the bottom panel, and using the beading from the top panels to replace the moulding that's missing from the bottom pane on the inside face.
Now to my questions:
I need to strip the old paint/scumble inside & out, and dismantle the door. I think the easiest method would be to have it dipped, as stripping it manually would be very time consuming, plus it's almost certainly got a lot of lead in the paint. Should I do this before dismantling it, or take it apart & then dip the individual components? There is a lot of paint build-up in the gaps, and I'm concerned that dipping it assembled won't get that out. On the other hand I don't know what the implications are of dipping the components individually (if there are any?).
Since the door is warped, and the frame made to suit, is there a danger that pulling it apart & re-gluing it will change the degree of warp?
What would be the best adhesive to use to re-glue it? Exterior PVA? Polyurethane? Something else?
I've never done this before; what other pitfalls are there I need to look out for?
Thanks,
Jonathan
") The raised panels are simply done either on router table or table saw. The M+T joints are not cope and sticked, so no need to buy a shaper cutter. Other than shop time the only day you really have to have no entry door is during installation.
The raised panels are simply done either on router table or table saw. The M+T joints are not cope and sticked, so no need to buy a shaper cutter. Other than shop time the only day you really have to have no entry door is during installation.
")