[member=4105]tjbnwi[/member] Tom - thanks so much for the suggestion. I've been trying to visualize what you are describing. Does the top of the "U" sit/straddle the top of the beam? If so, when I turn the beam over wouldn't it cause out of square issues since the beam is resting on it? I supposed I could make a second one for the left side of the beam to prop it up. I've been thinking of something roughly similar to what you described. I'll think on it some more and see if I can make it work.
[member=50292]Peter_C[/member] hahahah thanks man. That would be awesome. I'll admit the thought crossed my mind indeed. Nope, never had a miter saw. I've been doing all my breaking down on the TS55/3 MFTs, and the final cross cuts also there or at the miter gauge on table saw depending on how long/big the pieces are. I'd love a miter saw. It's not the cost as much as the space at the moment. I think for it to be useful I'd need a large stand or miter station. Maybe one day. Thanks for the kind words.
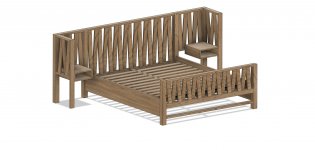
[member=167]neilc[/member] yes definitely I've thought about. The wife wanted the look of 3" square and honestly, I want to build it once and do it right and have it stand up for a long time. I'm typically not one to try to compromise the design of something because it'd be easier. I'd rather designing it the way I want it and then try to build it. But I think you're right, 2" or 2.5" would probably be fine for the legs. I think aesthetically we want the 3" as well. This build won't have any screws in it (like I try to do the majority of my builds). It's just wood and glue. Although I will have some long 6" bed bolts to connect the rails to the footboard and headboard. But the footboard and headboard themself will be pure mortise and tenon and just glue. The collar idea is good. I'll think about that and visualize it. I appreciate you commenting man!
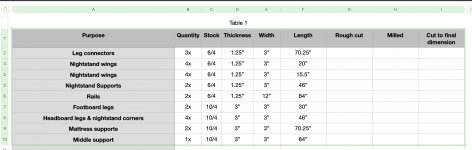
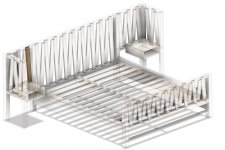
[member=75217]squall_line[/member] hey man! Let me try to paste this below. This'll give you a better idea of the parts involved with the main frame. The 10/4 stock is going towards 6 legs (4 normal posts and then 2 on the night stand corners), 2x horizontal pieces connecting the legs of both headboard and footboard, and then 1 84" long piece that is right in the middle for support.
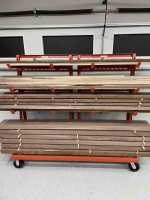
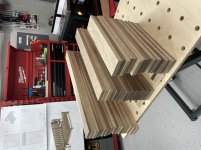
Thanks so much everyone for commenting. I really appreciate the help. I'll sleep on it and try to put your ideas together to form a plan. I still need to mill everything - it's all rough cut now, so I have a day or two until I need to cut to final size.
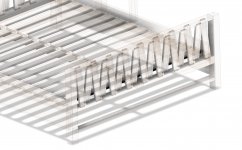
PS - hoping some of these views I just captured from the 3D model show the mortise and tenons.
Matt
[attachimg=1]
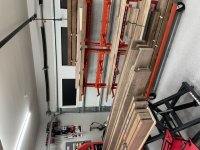
[attachimg=2]
[attachimg=3]