ear3
Member
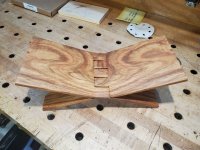
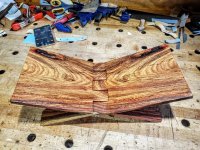
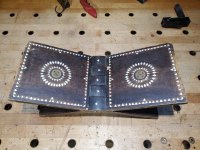
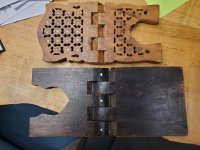
A number of years ago one of my students gave me a rael as a parting gift.
[attachimg=1]
[attachimg=2]
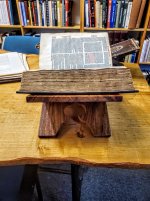
These are traditionally used as a Quran holder, but for me it has been quite useful for dictionaries and reference works, and lives full time on my desk. They typically have carving or inlay in them -- I think mine is a Uigher variant from Xianxiang judging from the Chinese coinage embedded in the face. I've since learned there is also Western version first described by none other than Roubo, but his model supports the book vertically rather than laying flat across both sides of the stand.
Anyway, I decided to do my own version, with the idea of making it a simple, stock Christmas or general purpose gift I could bust out quickly (which turned out to be timely, as the subject of the build below was given away almost immediately).
Since it would be very basic -- without carving or inlay, and decorative elements limited to the legs -- I went with Kosso wood to feature the grain.
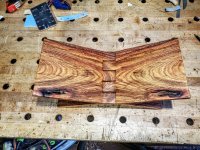
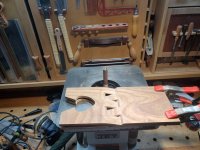
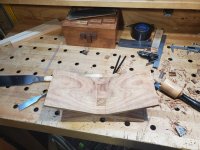
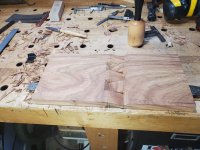
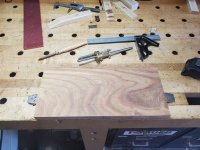
Milled a 7" x 15 1/2" board of (true) 1" thickness, and marked out 5 hinges slightly off the center line, so that the bottom feet would be a bit shorter than the bookholding part.
[attachimg=3]
It might be possible to start with rough 4/4 stock (I started at 1 1/16 thickness, which is why I was able to get a full 1") that would, after planing, get down to 7/8 or even 13/16. But you would need a bandsaw to produce a clean resaw, otherwise there would not be enough slack to do the additional leveling required when working by hand.
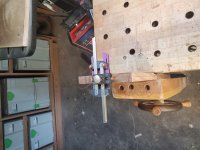
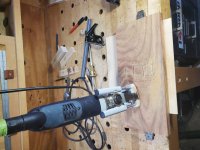
The hinge length is somewhat arbitrary, but I set it at 1 ½" because that corresponded to the cut length of the universal blade on the Vecturo, which I used with the plunge cutting attachment as a short cut to separate the hinges.
[attachimg=4]
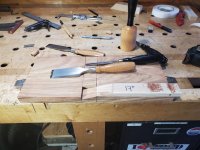
For fully committed hand tool fetishists, you can drill small holes at the end point of the hinge lines, and then do the cut with a fret saw.
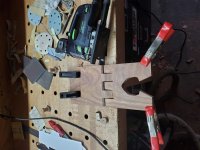
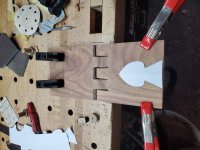
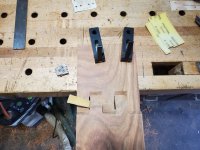
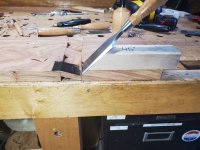
Next was to chisel out the hinges, using a jig set to the angle of the diagonal from the start of the hinge to the center point of the board (in this case 17 degrees, but variable depending upon board thickness and hinge size). I donated some blood to the jig thanks to scraping my knuckles on the square edge, before I realized I should break them with a chamfer.
[attachimg=5]
[attachimg=6]
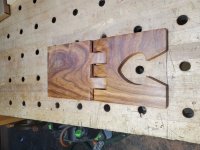
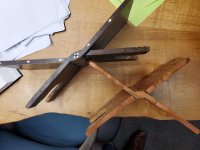
As I was following the model, I fully overlapped the hinges, such that the starting point of one equals the end point of the adjacent hinge. There is another option though that I realized later, which is to alternate their position out from a center line, which you can see from another rael I have in a lighter wood with more elaborate scroll saw work, pictured side by side with the Uigher one.
[attachimg=7]
[attachimg=8]
I'm glad I went with the overlapping design, though, as this creates more room for the spine of the heavier-type books that are usually sitting on this stand. I also think it is the aesthetically preferable option, since it creates a thinner hinge that more or less matches the thickness of the faces once the board is split.
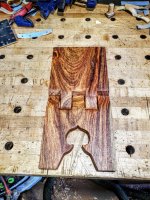
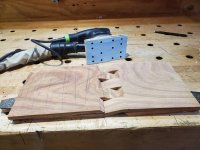
After the hinges were cut, the final step before splitting the board in two was to set back the end of each hinge with a 45 degree bevel, which allows the stand to open at a more obtuse angle. Without that, the stand won't open nearly as wide (as you can see above on the brown, scrolled version), meaning that particularly thick books will have less of the internal margins exposed when displayed on the rael. It helps to lay down dome thick tape on the top of the hinge being beveled, to protect against slips of the chisel that would require more aggressive sanding later on.
[attachimg=9]
[attachimg=10]
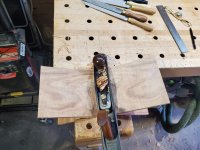
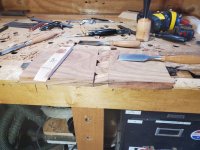
With the prep work complete, I moved next to splitting the board along a line scribed with a center finder.
[attachimg=11]
Since I don't have a bandsaw, I first cut a kerf with the rip side of a ryoba saw, and then did the full cut with a frame saw.
[attachimg=12]
[attachimg=13]
I learned the hard way on an earlier attempt that it's worth it to do the final strokes having switched back to the ryoba, so that you can see the teeth just starting to protrude from the hinge at the end of the cut.
[attachimg=14]
If there isn't full separation, when you try to pry the board apart the hinges can crack, ruining the whole piece. Having learned the lesson, this time the sides separated without issue.
[attachimg=15]
[attachimg=1]
[attachimg=2]
These are traditionally used as a Quran holder, but for me it has been quite useful for dictionaries and reference works, and lives full time on my desk. They typically have carving or inlay in them -- I think mine is a Uigher variant from Xianxiang judging from the Chinese coinage embedded in the face. I've since learned there is also Western version first described by none other than Roubo, but his model supports the book vertically rather than laying flat across both sides of the stand.
Anyway, I decided to do my own version, with the idea of making it a simple, stock Christmas or general purpose gift I could bust out quickly (which turned out to be timely, as the subject of the build below was given away almost immediately).
Since it would be very basic -- without carving or inlay, and decorative elements limited to the legs -- I went with Kosso wood to feature the grain.
Milled a 7" x 15 1/2" board of (true) 1" thickness, and marked out 5 hinges slightly off the center line, so that the bottom feet would be a bit shorter than the bookholding part.
[attachimg=3]
It might be possible to start with rough 4/4 stock (I started at 1 1/16 thickness, which is why I was able to get a full 1") that would, after planing, get down to 7/8 or even 13/16. But you would need a bandsaw to produce a clean resaw, otherwise there would not be enough slack to do the additional leveling required when working by hand.
The hinge length is somewhat arbitrary, but I set it at 1 ½" because that corresponded to the cut length of the universal blade on the Vecturo, which I used with the plunge cutting attachment as a short cut to separate the hinges.
[attachimg=4]
For fully committed hand tool fetishists, you can drill small holes at the end point of the hinge lines, and then do the cut with a fret saw.
Next was to chisel out the hinges, using a jig set to the angle of the diagonal from the start of the hinge to the center point of the board (in this case 17 degrees, but variable depending upon board thickness and hinge size). I donated some blood to the jig thanks to scraping my knuckles on the square edge, before I realized I should break them with a chamfer.
[attachimg=5]
[attachimg=6]
As I was following the model, I fully overlapped the hinges, such that the starting point of one equals the end point of the adjacent hinge. There is another option though that I realized later, which is to alternate their position out from a center line, which you can see from another rael I have in a lighter wood with more elaborate scroll saw work, pictured side by side with the Uigher one.
[attachimg=7]
[attachimg=8]
I'm glad I went with the overlapping design, though, as this creates more room for the spine of the heavier-type books that are usually sitting on this stand. I also think it is the aesthetically preferable option, since it creates a thinner hinge that more or less matches the thickness of the faces once the board is split.
After the hinges were cut, the final step before splitting the board in two was to set back the end of each hinge with a 45 degree bevel, which allows the stand to open at a more obtuse angle. Without that, the stand won't open nearly as wide (as you can see above on the brown, scrolled version), meaning that particularly thick books will have less of the internal margins exposed when displayed on the rael. It helps to lay down dome thick tape on the top of the hinge being beveled, to protect against slips of the chisel that would require more aggressive sanding later on.
[attachimg=9]
[attachimg=10]
With the prep work complete, I moved next to splitting the board along a line scribed with a center finder.
[attachimg=11]
Since I don't have a bandsaw, I first cut a kerf with the rip side of a ryoba saw, and then did the full cut with a frame saw.
[attachimg=12]
[attachimg=13]
I learned the hard way on an earlier attempt that it's worth it to do the final strokes having switched back to the ryoba, so that you can see the teeth just starting to protrude from the hinge at the end of the cut.
[attachimg=14]
If there isn't full separation, when you try to pry the board apart the hinges can crack, ruining the whole piece. Having learned the lesson, this time the sides separated without issue.
[attachimg=15]
Attachments
-
 20240105_105840.jpg281.9 KB · Views: 321
 -
 20240407_192642.jpg241.8 KB · Views: 318
 -
 20240407_192126.jpg143.6 KB · Views: 317
 -
 20240407_190345.jpg204.8 KB · Views: 316
 -
 20240407_185406.jpg191.6 KB · Views: 312
 -
 20240407_185207.jpg196.6 KB · Views: 313
 -
 20240407_184949.jpg255.1 KB · Views: 318
 -
 20240407_180215.jpg208.1 KB · Views: 318
 -
 20231211_160452.jpg156.2 KB · Views: 314
 -
 20240105_105856.jpg266.1 KB · Views: 318
 -
 Board and markings.jpg231.4 KB · Views: 324
 -
 20240407_153556.jpg221.8 KB · Views: 320
 -
 20240407_160947.jpg217.3 KB · Views: 317
 -
 20240407_174058.jpg226.8 KB · Views: 319
 -
 20231211_160623.jpg250.2 KB · Views: 317