Just wanted to post a quick review of the Woodpeckers PGS (not sure it matters, since it was a one time tool - it's not like you can go out and buy it).
But my hopes are that Woodpeckers can use the feedback to improve the next version (if there ever is one).
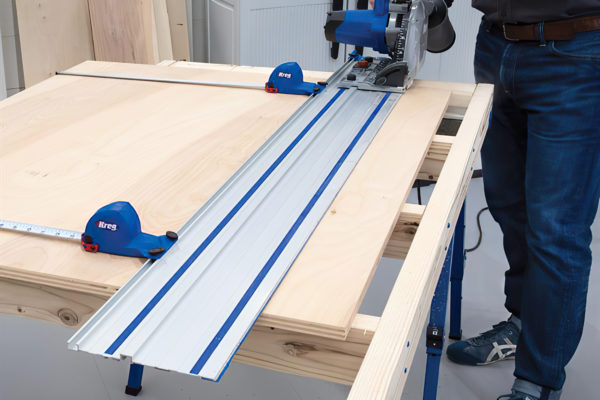
I have used the system twice now, both times for sizing 20 mm MDF sheets for making a vacuum table for my CNC machine. So these are about 4x4.
Overall, I'm happier with the system than with the Festool Parallel guides. They are definitely easier to move around and get positioned on the stock, and I like that they fit into a sustainer.
Setup time: As I've only done it twice, I think it took me about 15 minutes to assemble and calibrate the guides. Definitely slower than the festool guides.
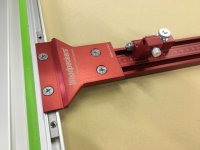
Use: Very easy, once they are setup, I felt much more comfortable positioning them quickly on the stock. I can just pull the rail and be assured that the stops are tight up against the stock. I never got this feeling from the Festool system.
Cons:
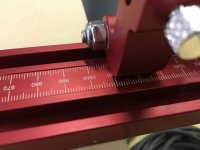
- Calibration marks. I have the metric system. The two arrows printed the top of the rail are difficult to use. The only way to be sure is to flip the stop over on top of the arrow, and carefully check to see that you are positioned at the point. This is not easy to do. I found it helpful to use a flashlight to make the triangle reflect against the flip stop, and treat it as a mirror image test. Still, it's not easy, you have to keep moving it back and forth (like a vision test) to see which is "better" for alignment.
- Setting the stops. Once again, for the same reason as the calibration marks, it is difficult to set the stops at the precise measurement you want. You have to sight down the stop, get the angle just right, and then decide just WHERE on the mark you it positioned. The marks are actually wide enough that you be off from one to the other if not careful.
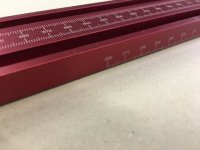
- Measuring marks. There are two sets of marks on the guides, one on top, and one on the side. Unfortunately, the side marks stop after 280 mm. I think this was a mistake. It is MUCH easier to align with the side marks than on the top marks, so the sides should have been calibrated for the entire length.
I think it would have been better if Woodpeckers had provided some sort of hairline calibration, similar to their table saw systems, for aligning the marks. This would have worked for both initial calibration and subsequent cut setups.
But my hopes are that Woodpeckers can use the feedback to improve the next version (if there ever is one).
I have used the system twice now, both times for sizing 20 mm MDF sheets for making a vacuum table for my CNC machine. So these are about 4x4.
Overall, I'm happier with the system than with the Festool Parallel guides. They are definitely easier to move around and get positioned on the stock, and I like that they fit into a sustainer.
Setup time: As I've only done it twice, I think it took me about 15 minutes to assemble and calibrate the guides. Definitely slower than the festool guides.
Use: Very easy, once they are setup, I felt much more comfortable positioning them quickly on the stock. I can just pull the rail and be assured that the stops are tight up against the stock. I never got this feeling from the Festool system.
Cons:
- Calibration marks. I have the metric system. The two arrows printed the top of the rail are difficult to use. The only way to be sure is to flip the stop over on top of the arrow, and carefully check to see that you are positioned at the point. This is not easy to do. I found it helpful to use a flashlight to make the triangle reflect against the flip stop, and treat it as a mirror image test. Still, it's not easy, you have to keep moving it back and forth (like a vision test) to see which is "better" for alignment.
- Setting the stops. Once again, for the same reason as the calibration marks, it is difficult to set the stops at the precise measurement you want. You have to sight down the stop, get the angle just right, and then decide just WHERE on the mark you it positioned. The marks are actually wide enough that you be off from one to the other if not careful.
- Measuring marks. There are two sets of marks on the guides, one on top, and one on the side. Unfortunately, the side marks stop after 280 mm. I think this was a mistake. It is MUCH easier to align with the side marks than on the top marks, so the sides should have been calibrated for the entire length.
I think it would have been better if Woodpeckers had provided some sort of hairline calibration, similar to their table saw systems, for aligning the marks. This would have worked for both initial calibration and subsequent cut setups.