ear3
Member
In an effort to get more organized, my wife asked me to purchase a rolling clothes rack last month. Although it looked good in the pictures, the thing we received in the mail was incredibly flimsy, and I wasn't 5 minutes into the assembly when I decided to scrap the rack and DIY my own version.
After looking at a few ideas online I thought it might be interesting to experiment using reclaimed wood -- I wanted the look to be on the rougher rather than finished side. I thought it would be a simple matter of just going to a supplier and picking out boards like you do at a lumber yard, but with most of them it's a multi-stage process, since the raw material they tend to have on hand are thick joists, and so after factoring in the cost of the denailing and resawing it was not worth the price for the small amount of board footage I would need on this project.
So I decided to go with rustic walnut for the base wood on the casement, which usually gets used for things like flooring or paneling, and which I can get for half the price of the high grade variety. I had to spend a long time going through the stack to find enough boards suitable for furniture -- not so knotty or twisted that I would have to significantly reduce the width or thickness to make them usable.
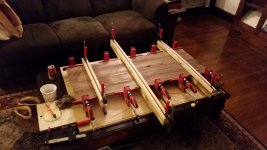
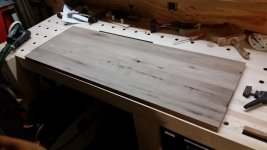
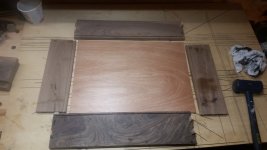
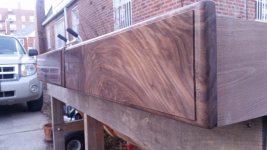
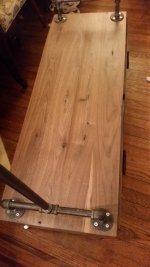
First I made the carcasse that served as the base -- very straightforward box construction with one middle divider. Edge joined the boards (after jointing with tracksaw + table saw) to make panels the full 18" depth needed for the carcasse:
View attachment 1
View attachment 2
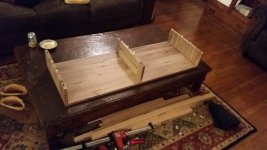
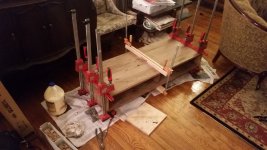
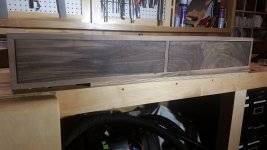
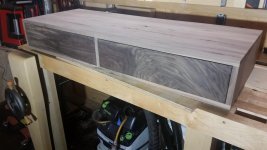
Carcasses construction was simple -- butt joints with 6 mm dominoes. Wasn't concerned about end grain showing just as long as it was flush:
View attachment 3
View attachment 4
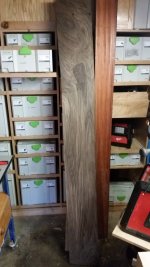
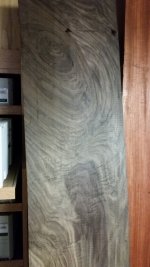
Drawers came next. I decided to splurge a little bit on the drawer faces and used a piece of highly figured 5/4 walnut I recently picked up at Rosenzweig lumber in the Bronx
View attachment 5
View attachment 6
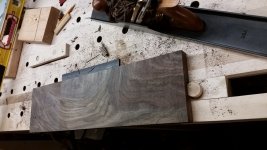
This was the one part of the project I got to hand tool. The board was basically straight -- though I did have to proceed bit by bit cutting it to width since the grain made the board want to curve as it was trimmed -- but it had been planed with a lot of snipe and tearout, so I used hand planes to joint the faces
View attachment 7
View attachment 8
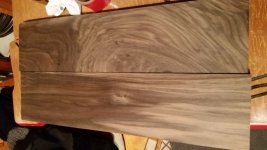
Here's the drawer fronts pre-finished
View attachment 12
View attachment 13
I still ended up with chipping at the edges -- I should have been more careful about chamfering the back end of the cut - -which prompted me to add a round over profile to the drawer fronts, which, as you'll see, makes the look a bit more modern than what I was going for.
Drawer construction is just a butt jointed box (sides and back are rustic walnut) with 5mm dominoes and a dado for the drawer bottom
View attachment 9
I used scrap to make centered drawer runners as opposed to adding drawer slide hardware, positioning the runners on the bottom of the carcasse so that it also serves a drawer stop.
View attachment 10
The back of the carcasse is just a single board attached with pocket hole screws, which I then filled with Kreg's walnut pocket hole plugs:
View attachment 11
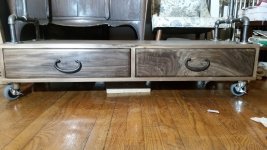
I used two different finishes -- the carcasse and drawer sides/back are sanded to 150 grit and finished with two coats of a cheap water based poly. The drawer front, though, was sanded up to 2000 platin and sealed with several coats of wax. I wanted something that didn't darken the figure too much, but would also be relatively quick and easy to do.
View attachment 14
View attachment 15
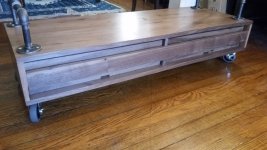
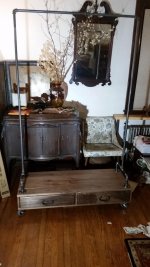
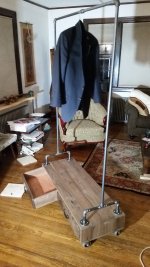
The clothes hanging portion was just 1/2" black pipe + fittings -- I spent a while removing the oil with mineral spirits and then sprayed them with a clear matte finish for rust protection. Locking casters on the bottom. I also added some antique wrought iron Japanese drawer handles I had bought a batch of a few years ago. End result:
View attachment 16
View attachment 17
View attachment 18
View attachment 19
My wife wanted the clothes hanging rail that tall so that it could fit full length dresses. I still think there's a lot of negative space there, so down the road I might modify it by adding a narrow stack of shelves or additional drawers on the right side, shortening the vertical pipe on that side so that it rests on top, and reserving that hanging space for shorter items like shirts or jackets.
After looking at a few ideas online I thought it might be interesting to experiment using reclaimed wood -- I wanted the look to be on the rougher rather than finished side. I thought it would be a simple matter of just going to a supplier and picking out boards like you do at a lumber yard, but with most of them it's a multi-stage process, since the raw material they tend to have on hand are thick joists, and so after factoring in the cost of the denailing and resawing it was not worth the price for the small amount of board footage I would need on this project.
So I decided to go with rustic walnut for the base wood on the casement, which usually gets used for things like flooring or paneling, and which I can get for half the price of the high grade variety. I had to spend a long time going through the stack to find enough boards suitable for furniture -- not so knotty or twisted that I would have to significantly reduce the width or thickness to make them usable.
First I made the carcasse that served as the base -- very straightforward box construction with one middle divider. Edge joined the boards (after jointing with tracksaw + table saw) to make panels the full 18" depth needed for the carcasse:
View attachment 1
View attachment 2
Carcasses construction was simple -- butt joints with 6 mm dominoes. Wasn't concerned about end grain showing just as long as it was flush:
View attachment 3
View attachment 4
Drawers came next. I decided to splurge a little bit on the drawer faces and used a piece of highly figured 5/4 walnut I recently picked up at Rosenzweig lumber in the Bronx
View attachment 5
View attachment 6
This was the one part of the project I got to hand tool. The board was basically straight -- though I did have to proceed bit by bit cutting it to width since the grain made the board want to curve as it was trimmed -- but it had been planed with a lot of snipe and tearout, so I used hand planes to joint the faces
View attachment 7
View attachment 8
Here's the drawer fronts pre-finished
View attachment 12
View attachment 13
I still ended up with chipping at the edges -- I should have been more careful about chamfering the back end of the cut - -which prompted me to add a round over profile to the drawer fronts, which, as you'll see, makes the look a bit more modern than what I was going for.
Drawer construction is just a butt jointed box (sides and back are rustic walnut) with 5mm dominoes and a dado for the drawer bottom
View attachment 9
I used scrap to make centered drawer runners as opposed to adding drawer slide hardware, positioning the runners on the bottom of the carcasse so that it also serves a drawer stop.
View attachment 10
The back of the carcasse is just a single board attached with pocket hole screws, which I then filled with Kreg's walnut pocket hole plugs:
View attachment 11
I used two different finishes -- the carcasse and drawer sides/back are sanded to 150 grit and finished with two coats of a cheap water based poly. The drawer front, though, was sanded up to 2000 platin and sealed with several coats of wax. I wanted something that didn't darken the figure too much, but would also be relatively quick and easy to do.
View attachment 14
View attachment 15
The clothes hanging portion was just 1/2" black pipe + fittings -- I spent a while removing the oil with mineral spirits and then sprayed them with a clear matte finish for rust protection. Locking casters on the bottom. I also added some antique wrought iron Japanese drawer handles I had bought a batch of a few years ago. End result:
View attachment 16
View attachment 17
View attachment 18
View attachment 19
My wife wanted the clothes hanging rail that tall so that it could fit full length dresses. I still think there's a lot of negative space there, so down the road I might modify it by adding a narrow stack of shelves or additional drawers on the right side, shortening the vertical pipe on that side so that it rests on top, and reserving that hanging space for shorter items like shirts or jackets.
Attachments
-
 20170109_202635.jpg780.3 KB · Views: 264
 -
 20170110_113546.jpg630.6 KB · Views: 205
 -
 20170110_201844.jpg770.9 KB · Views: 218
 -
 20170110_220822.jpg890.6 KB · Views: 205
 -
 20170111_161655.jpg777 KB · Views: 254
 -
 20170111_161703.jpg756.9 KB · Views: 156
 -
 20170111_171003.jpg1,001.6 KB · Views: 175
 -
 20170111_195837.jpg672.3 KB · Views: 165
 -
 20170112_164457.jpg671.5 KB · Views: 187
 -
 20170115_100559.jpg622.9 KB · Views: 177
 -
 20170115_100651.jpg887.5 KB · Views: 282
 -
 20170112_235830.jpg752.2 KB · Views: 165
 -
 20170112_235856.jpg210.9 KB · Views: 257
 -
 20170113_153116.jpg1.1 MB · Views: 198
 -
 20170113_153153.jpg752 KB · Views: 210
 -
 20170114_183305.jpg241.6 KB · Views: 360
 -
 20170114_184425.jpg885.7 KB · Views: 370
 -
 20170114_183340.jpg980.7 KB · Views: 208
 -
 20170114_211921.jpg847 KB · Views: 272