Second layer of epoxy after first has dried?

smorgasbord

Member
Joined
Jan 7, 2022
Messages
1,410
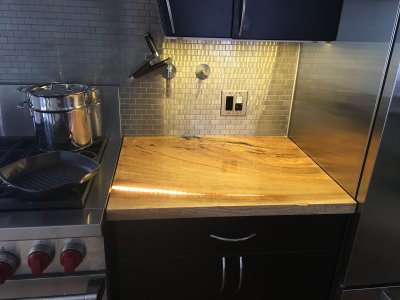
I begrudgingly decided to fill a hole in my cherry slab desk project with epoxy:
1) First used a thin epoxy (Smith's CPES) that I've used many times before for other projects to coat as much of the wood inside the hole as I could reach. It's very thin, so it flows well.
2) Then a few days later (and ago) I poured some TotalBoat ThickSet (½"-2") into the hole, and kept refreshing it as it sunk. Eventually, it seemed to stop sinking and I was running out of working time anyway.
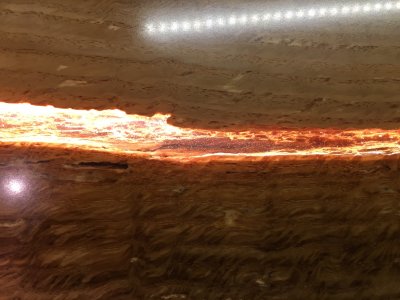
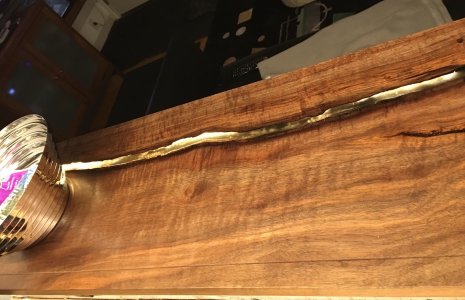
3) So now a few days later, the epoxy is nice and clear and no bubbles, but has apparently sunk below the top. See pictures:
Epoxy1.jpg
Epoxy2.jpg

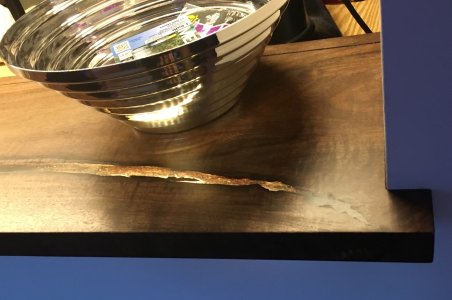
I used hot glue to build a wall so that I could pour above the table top (which you can see I did), but still that close-up area shows a depression of at least ⅛", maybe more.

So, I need to pour another layer.

I'm looking for ideas/suggestions/tips on what to do. For instance:
• Do I just pour another layer?
• Do I need to sand first?
• Should I remove the hot glue, sand to flat, then hand sand the depressed areas, then re-hot glue and re-pout?
• Since I don't have the Fantom version of the epoxy, I think I can pour a pretty thin layer, but not sure if this is too thin.
• Since this is clear, I don't have the benefit of an opaque colored layer hiding what's underneath.
• What else?

TIA
 
I'm also a big fan of Smith's CPES for sealing wood. :)

However, I made a couple of countertops and filled in the large voids using West Epoxy. I also needed to add more epoxy after it had cured as the epoxy shrinks just a little bit. I just mixed up more epoxy and added it to the voids. The voids remained clear and appear to be homogeneous in nature despite the 2 separate pours.

In your case though, I'd consider removing the hot melt and sanding the surface fair as there is already quite a lot of extra epoxy outside of the immediate pour area. That just may make the next clean-up (and hopefully the last) easier.
 

Attachments

  • 5295 oak.JPG
    5295 oak.JPG
    694.2 KB · Views: 11
  • 5298 oak.jpg
    5298 oak.jpg
    680.1 KB · Views: 11
  • 5309_S oak.jpg
    5309_S oak.jpg
    820.4 KB · Views: 9
  • 5056-S walnut.jpg
    5056-S walnut.jpg
    808 KB · Views: 9
  • 5058-S walnut.jpg
    5058-S walnut.jpg
    668.3 KB · Views: 11
OK, turns out clean-up was really easy: heat gun, light scrape, sand with big flat block, then some light acetone on a rag and here's what I've got:
Epoxy3.jpg
Epoxy4.jpg
Epoxy5.jpg
Epoxy6.jpg

Took some measurements, and mostly about 1.25mm deep. Deepest I measured was 2.5mm, some less than a mm.

I'm concerned that if I add more, when I do the final sanding I'll be exposing the line between the two pours and that'll be bad. But, I really don't want to sand another 2.5mm off the top.

Unless you think that the epoxy won't have a witness line between the pours?
 
You could always pour a clear coat to fill the top if you're worried about witness lines. That's what I do for dips in my charcuterie boards.
 
You could always pour a clear coat to fill the top if you're worried about witness lines. That's what I do for dips in my charcuterie boards.
I'm not sure what you're saying here. If I pour another layer I have two issues:
1) Adhesion. Total Boat says it's best to pour the second layer a few/several hours after the first for adhesion. It's been 4 days now.
2) Sanding down to expose some of the first layer, and seeing witness lines.

For issue #1, I suppose I could rough up the dried first layer. But that might make issue #2 even worse.
Whenever I pour resin for boards, any leftovers go into a bunch of cups for tealight holders to turn on the lathe. I've found so long as you don't mix different resin types, the adhesion is as though it was all done in one pour.

You could certainly scuff the surface though for better adhesion, and the great thing about clear (or any resin coating really) resin is that while it will highlight every scratch in timber below, it will actually fill any scratches in lower resin surfaces because it bonds, so no scratches will show at all.

I don't normally do them, but when I have done a flood coat, if I've needed to sand the existing resin surface, I use a 60 grit pad and it looks rough as anything until the flood coat goes on, then it looks like a mirror surface.

You do though need to ensure there is no debris or dust whatsoever on the surface.

As a side note, I did actually recently try some UV resin to fill in some small divots on some epoxy resin pours, and on a test piece found I could peel the cured resin off the prior surface, so there was extremely little adhesion. But these were two totally different products so while surprising it came off so easily, it wasn't a shock it didn't bond well.
 
Google A.I. agrees with luvmytoolz.

I drilled a bunch of small, shallow holes when I used Bondo to fix some damage to exterior woodwork. It was a pretty deep patch so I thought the holes would aid adhesion. The Bondo never failed. But it is opaque, so I don’t know if the holes would show through the clear and I don’t know if it actually helped.


Yes, new epoxy will stick to cured epoxy, but only if the cured surface is properly prepared by lightly sanding it to create a textured, dull finish and then cleaning off any dust before applying the next layer. Without this mechanical keying of the new epoxy into the old surface, the bond will be weak, and the layers could separate later.
 
Google A.I. agrees with luvmytoolz.

I drilled a bunch of small, shallow holes when I used Bondo to fix some damage to exterior woodwork. It was a pretty deep patch so I thought the holes would aid adhesion. The Bondo never failed. But it is opaque, so I don’t know if the holes would show through the clear and I don’t know if it actually helped.
Little dimples you can get away with just fine, but actual holes with a sharply defined edge are the one thing that will show up if coated with clear resin over the top.
 
OK, going to do a light sanding, clean, and then pour a second layer. Wish me luck...

I guess the worst thing would be having to take the top down 2.5mm afterwards.Which might open up some other area but...
 
OK, going to do a light sanding, clean, and then pour a second layer. Wish me luck...

I guess the worst thing would be having to take the top down 2.5mm afterwards.Which might open up some other area but...
Don't be afraid to use a very low grit disc, just up and down strokes. The top coat will make it invisible!
 
Don't be afraid to use a very low grit disc, just up and down strokes. The top coat will make it invisible!
I started with 80 grit, but then switched to a higher grit so I could fold the sandpaper to reach the crevices left by the shrinking epoxy in the narrower sections.

Overfill, you don’t want to have the same thing happen again.
As you can see in my first post, I did overfill the initial pour. But, I was overfilling just enough to be confident that I had filled the opening enough, not to compensate for epoxy shrinkage.

My second pour is more overfilled, but I suspect that wasn't really necessary. The first pour probably had sections that were 40mm-45mm deep, so getting 5% shrinkage would result in the 2+mm dips. Now filling only 1-3mm of dishing, I don't expect any noticeable shrinkage - but having been burned, I probably went overboard and will now have lots more clean-up to do.

secondpour.jpg
 
I have never had problems with 80 or even 60 grit scratches showing in epoxy pours. As luvmytools said above, be careful to not scratch the wood.
 
Back
Top