Setting My New Shop Up (Formerly Shop Build Progress)

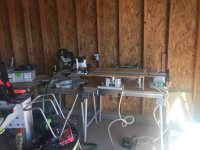
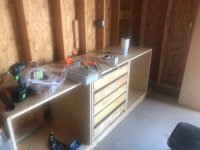
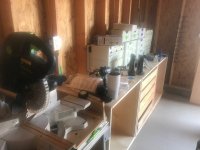
Clever, bench space is vital... even at temporary placement.
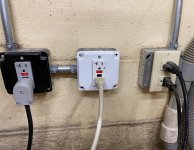
You’ll have the opportunity to try out different configurations where you can move about too, settle on a solution with a work flow that works for you and your equipment. Outlets follow.

How are you doing the ceiling? Understand you have severe heat to deal with. Are you going to isolate the loft from the work space with ceiling on the cross beams, so the attic area can be ventilated?
 
Hey Ron [member=10147]jobsworth[/member]

consider putting at least the the finished ceiling in before you get too far along loading in. I put up the ceiling and the walls in my shop with stuff inside and it is NOT something that I would EVER do again. Just a royal pain.

Ron
 
[member=71478]FestitaMakool[/member]
[member=3192]rvieceli[/member]

Yea it does get hot here.
But this summer we set a record , over 50 days straight above 110 degrees.

It was brutal but still managed to work for a few hours a day till the heat got to me. So Im going to discuss the best options with the contractor. Id like to have him spray foam the ceiling. But it might be cot prohibitive and not give me what I want.

Funds are tight for me right now as this build wasn't exactly inexpensive.

If I can swing it later on in the year maybe May Ill do it then.

When the time comes to insulate Ill make the decision which is the best way.

Right now though I know its a real PITA to insulate with stuff in the shop, Im going to press fwd fingure out the lay out run some more electrical outlets and a couple of 220v outlets once I figure where Ill need them.

Because the electrical also has to be done before I can insulate as well.
 
So heres a photo (not very good one) of how I use my STM. I just backed the truck up tail gate down, slide a sheet of ply off onto the STM ripped to width and repeat. Next with the ripped ply (3 sheets) still on the STM I rolled it over to my MFTs where I have the sysvacs and will pick up the ply set it on the vacs using the conturo to edge band trim and set aside for cross cutting to length. Heres the truck to STM photo, the STM to vac sys along with ege banding will be tomorrow


Attachments

  • IMG_4489.jpg
    IMG_4489.jpg
    160.7 KB · Views: 483
Hi Ron [member=10147]jobsworth[/member]

Going back to what someone above said about installing your insulation etc before your machinery was brought in...

We moved house just over a year ago and I had to convert a double garage into a new workshop. It had to be sound proofed and dry lined. I had to do the first fix (cabling and new consumer unit) before the contractors came to do that work. So, I did an accurate drawing of the workshop and had drawings of all of my machines and cabinets which I could move around until I was happy with the layout. From that I did my wiring plan and knew exactly where my sockets should go. I also was able to place the LED strip lights in the optimum places as well.

FYI my layout is below.

[attachimg=1]

Peter
 

Attachments

[member=11196]Peter Parfitt[/member]

Thank you Peter.

Maybe theres one thing I should have mentioned. I have a complete Festool workshop. There is littarlly nothing I cant easily move about., 3 MFTs for work benches, MFT CMS for a router table, CMS GE w a TS 75 module for a table saw. Only DC I have other than my 2 FT CTs is a small wall mountable DC to use with my Maktia planer and Jet jointer (thats on a wheeled base.)

I stil have some electric to run maybe 4 or 5 additional outlets and a couple 220V outlets. Here is Az we are the opposite of the rest of the country and UK. Our winters are mild and warn, today its in the low 70s.It will be nice until prolly Mid June when it starts heating up.

Im going to try to get the insulation in before June. But if not I survived working in my uninsultated garage this past summer and we set records for heat. We had 50 days above 110 degrees.
Hopefully Ill get it done before then.

Ill have a look at your lay out. What size is your shop, so Ill have somethng to compare mine to.

Thank you very much for it.

Did I mention I found a place here that sells killer hotdogs [thumbs up] [thumbs up] [thumbs up] [thumbs up]
Oh yah, Im living the dream now [big grin]

Well out to the shop going to play with my conturo, got a lot of edge banding to do.

 
Started building cabinets, got 3 of them cut to width and length. Tomorrow, Ill be using the LR 32 for the system holes and the contour for edge banding, then the TID 18 to screw and assemble the cabinets.

I got one outlet to add before install of these cabinets.
 
Using the LR 32 I drilled the system holes and used my conturo for edge banding tomorrow Ill be using the MFK700 for trimming and assembling the cabinets. Before I do a temp install of the cabinets, i have to run some cable and add another outlet maybe 2.
Heres a photos of my LR 32 set up.

I didnt say good photo [blink]
 

Attachments

  • IMG_4492.jpg
    IMG_4492.jpg
    379.3 KB · Views: 425
If you need help with a plan to ridiculously overdo your electrical layout just let me know. I have taken electrical excesses to new heights in my shop.
 
Hehehehehehe,

Thanks Alan for the offer Alan.

Thats one reason Im building the cabinets before I insulate . I want to determine work flow and where to place electrical outlets. After I trim and assemble the 3 I built, Ill run to the Home toy and pick up a few boxes and add them . Then temp install the cabinets. temp install cuz I know Im going to be moving either the 2 MFTs or the MFT CMS I use for my router table. Im going to move the CMS first. See how that goes.

Oh BTW the ankles feeling great better than before Im happy I got the surgery I can walk painlessly now stand up as long as I want no pain... Bet I can wear sandals in the summer now to [thumbs up]
 
So glad to hear that you are getting into dancing shape, especially now that your shop is ready for you! Personally I did not need to test layouts to influence my electrical plan. I just installed metal quad boxes every four feet all around the perimeter with three more boxes on the ceiling. I put two circuits in each quad boxes and then alternated them around the room. So box one has circuits one and three in it and box two has circuits two and four in it. Box three is back to circuits one and three and so it goes around the room. I think I added 22 receptacles (with two plugs in each) in what amounts to a two car garage. All are 20 amp and all are GFI protected and they are on six separate circuits. To say that I will never have to worry about 110 V receptacles again is an understatement. Don’t say it! I know!
 
Alan, I just love to hear from other neurotically capable people.
 
[member=25351]rst[/member]  It’s possible that I may take the cry once thing to new heights. In my defense I had the electrical work done twelve years ago and have not to change or add one thing and I have never popped a breaker.
 
I did about the same and went ahead and added a 20 amp home run 240 volt outlet between each 4 outlet 110 boxes. Dropped a 50 amp 240 in the wall under the panel and a couple 30 amp circuits throw in just because. I put them up high enough so you could lean a 4 foot sheet of ply on the wall and still access them. They cleared everything that I have put against the wall, bench, tool cabinets etc.

I hate crawling around in attics and having to fish wire.

Ron

 
I have open stud bays, so its nothing more than drilling and pulling wire through the holes to the boxes. I do have a couple I have to run to the ceiling joist but no biggie.

Since I run mainly all festools I need the boxes conveintly placed where I can plug in my CTs and a couple of other tools like my small wall mountable dust collector to use when I run my jointer or planer.
 
As others have chimed in...the original circuit in the basement was light tan. I then added a separate gray & a separate white circuit and identified them by using different color GFCI outlets.
In the areas where there is drywall installed the tan, white & gray outlets are also surrounded by the correct colored faceplate. Makes it super simple to identify the electrical run and prevent overloading a single circuit.

[attachimg=1]
 

Attachments

  • 9922.jpg
    9922.jpg
    513 KB · Views: 1,264
Started building the miter saw station ad added a few more electrical outlets with more to add, gonna add another 110V circuit and a 220V circuit.

Just a temp install not even screwed to the wall as I will move/ and adj them and when Im done and satisfied with the layout Ill get the shop Insulated. So the temp install will make it easier to remove and insulate and replace....

Today going to find a spot for my wall hung Dust Collector that Ill use for my Makita planer and Jet jointer. Every thing else Ill use my CTs

Coming along nicely still lots more to do and to come


Attachments

  • IMG_4504.jpg
    IMG_4504.jpg
    132 KB · Views: 475
  • IMG_4505.jpg
    IMG_4505.jpg
    257.3 KB · Views: 457
Hi Ron

Forgive me, I know nothing of the way you build things in the US....

What goes on the other side of the Sterling board? Do you have insulation and then brick or block work?
Also, how many amps is the supply to the workshop? Do you have any 240 volt supply available as I used to have in our house in Canada?

Peter
 
Back
Top