You are using an out of date browser. It may not display this or other websites correctly.
You should upgrade or use an alternative browser.
You should upgrade or use an alternative browser.
Setting My New Shop Up (Formerly Shop Build Progress)
- Thread starter sancho57
- Start date
RustE
Member
jobsworth said:...
One is all spray in foam, the other is a combo bat on the walls spray for the roof rafters /trusses.
...
No ceiling batts?
Do you not have vented roofs down there?
sancho57
Member
- Joined
- Jan 13, 2011
- Messages
- 6,903
[member=63201]RustE[/member]
"Do you not have vented roofs down there?"
yes.
my first bid for all spray foam included the rafters.
No ceiling batts?
that was the second bid. It was bats on the walls and spray foam on the ceiling not the rafters.
I really wanted the rafters open for storage.
Un like you we dont have cold weather here.
We deal with heat.
Only during the summer months.
Last summer which was record heat (50 straight days above 110)
I still manged to get shop time in and built a complete set of cabinets for my laundry room and spray finished them.
Thus the spray foam on the roof
I dont know what code is.
Im going to call them this morning to see if its required or not.
Im guess it is required by code.
But I will verify
RustE
Member
jobsworth said:...
I really wanted the rafters open for storage.
...
Un like you we dont have cold weather here.
We deal with heat.
...
Thus the spray foam on the roof
I dont know what code is.
...
Hot weather is why I thought about airflow from the soffits to the ridges. Perhaps your tile roof doesn’t need this airflow?
Otherwise, the only “question mark” I can think of about exposed spray foam is fire related.
If you insulate the ceiling(bottom of the rafter framing) you will have less area to keep cool on those super hot days.
I saw your comment about using rafters for storage - you could make an access hatch/flap for hucking things up there.
Or, if your ceilings are high enough you can buy/build storage racks that mount to the ceiling.
Another benefit of insulating the ceiling is that you can sheetrock the lid and provide fire-blocking.
Also, if you sheetrock(plus mud and tape) the ceiling and paint you will get a much brighter workspace. It's amazing the difference going from bare drywall/wood to a painted surface.
Drywall is super easy to install - especially for a woodworker - if you want to save money and DIY. However, make friends with a taper... that's the PITA step.
sancho57
Member
- Joined
- Jan 13, 2011
- Messages
- 6,903
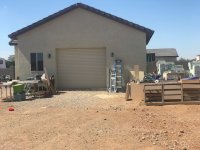
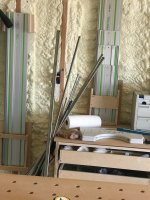
Since insulators coming Thursday So i thought Id move the stuff out. Since I had help today I thought get her done. Im leaving the stuff outside by the shop Its pretty secure as Im in the middle of no where and my property is surround by a 6' block wall fence.
The insulators will be in and out same day.
Someone mentioned that I should do away with the systainers and leave the tools out. At first I thought Nah.
But last night or early this morning I thought that is a pretty good idea. Maybe not for all my tools but the ones I use frequently and dont have alot of small accessories stored in the sustainers. So Im going to do that when things start going back in on Friday.
Now ya can understand why I built cabinets and set the shop up before insulation. Everything will be in place and set up for installation when I move back in.
There was a method to my madness
Attachments


rvieceli
Member
Looking good Ron, can’t even see the laser guided machine guns and the trip wires. [wink]
Decided what you’re putting on the walls?
Ron
Decided what you’re putting on the walls?
Ron
sancho57
Member
- Joined
- Jan 13, 2011
- Messages
- 6,903
@rvcieceli
[member=66185]Alanbach[/member]
Im going with full fill spray. The contractor whose doing it was the one who the builder used when he built my house. He has a good rep and good prices. His spray insulation quote was less then a quote I got for bat. Spray foam is all this guy does.
Im getting excited now.
I can permenently install everything then get some projects done while thinking of whats next for the shop.
Still got lots to do
RustE
Member
Interesting. Wonder if the size of your shop uses a complete batch or two of the spray foam mix? That is, little to no wasted product.
rvieceli
Member
Super on the spray foam. But i was wondering about what you are covering that up with. Drywall, OSB, plywood. metal. etc?
Ron
Ron
sancho57
Member
- Joined
- Jan 13, 2011
- Messages
- 6,903
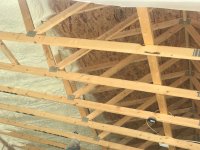
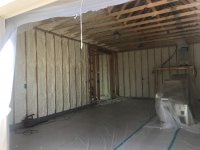
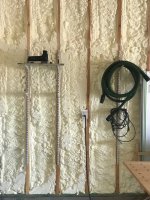
well the insulators came and went knocked out the shop in about 4 hours heres some photos bare in mind that the photos were taken before they finished. But it will give ya a idea how it came out. They said i should wait 24-48 hours before I put the stuff back in the shop. Ill keep the roll up door open and the windows and it should be good to go by tomorrow
coming along, not sure what to put on the walls. Im thinking maybe a combo of T1-11 and dry wall or some paneling..... Ill have to think about it think about how it would look and price it out
coming along, not sure what to put on the walls. Im thinking maybe a combo of T1-11 and dry wall or some paneling..... Ill have to think about it think about how it would look and price it out
Attachments

RustE
Member
Is there a fire-retardant in the foam?
I haven’t seen a French Cleat system mentioned yet.
I haven’t seen a French Cleat system mentioned yet.
sancho57
Member
- Joined
- Jan 13, 2011
- Messages
- 6,903
[member=63201]RustE[/member]
They did it to code. The contractor is very well respected and been around for a very long time. Spray foam is all they do.
they used the same foam they used on my house same contractor the builder used that did the shop did the house
No you haven't heard the french cleat system bc more than likely wont use it.
I havent decided whether Ill have wall cabinets or not.
sancho57
Member
- Joined
- Jan 13, 2011
- Messages
- 6,903
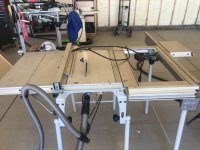
So almost done resetting the shop up.
I did not put a MFT in the middle with my CMS MFT attached to it like before.
Instead, i put the MFT against the wall.
I do most of my cutting using the TSO GRS with the PGs using the STM. Plus with the STM assy top I made I cant see me using it much for cutting and setting stuff on.
The CMS VL, I attached to the CMS GE with my TS 75 mounted in it.
Opens up all sorts of space.
Makes for a nice milling center to
Attachments

nclemmons
Member
[member=10147]jobsworth[/member]- take a look at https://power-loc.com/
I ordered two sets of them and they are really nicely made. Might give you a simple way of connecting the two halves and keeping them co-planer by using short sticks under the top and chamfering the holes and using some of these connectors.
I ran across them in a Ron Paulk video a few weeks back.
Nice progress on the shop!
sancho57
Member
- Joined
- Jan 13, 2011
- Messages
- 6,903
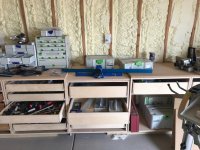
So now with the shop pretty much together I start with the organization/ stowing things away. So I used the Fast Cap rail hangers to hang my 3000 and 1900 rails on the wall horizontally. I made some things to hang all my other rails on the walls vertically, basically 3 1400 rails (2 are holy rails) 2 1080 rails, 1 800 rail and I make a couple small rails from damaged ones a roughly 400 and 300. so heres some photos of those.
I used the spur shelving to hold the modules for my CMS. I have 3 modules the jig saw, router and TS 75. Right now I only have the jig saw module hung in it, but soon Ill make some plywood inserts to use the CMS tables with my bench top tools., I also got my pocket hole station about done.
One of the spur hangers i used to store my hoses and misc plug it cables and my extension cord (If I can Find it)
Im going to be making a clamp rack soon using the LR 32 system/ holy rail to drill holes and the jig saw to cut the slots to hang the clamps.
Excuse the mess in the photos thats what im trying to sort right now
Attachments
Similar threads
- Replies
- 1
- Views
- 767
- Replies
- 18
- Views
- 2K
- Replies
- 16
- Views
- 759