Shelix helical head on DW735 expectations

DynaGlide

Member
Joined
May 16, 2017
Messages
1,697
First time planer user, new DW735 w/ Shelix head.

I'm reading about scalloping after the fact, because mine is doing that to the boards I plane. On a 7" wide board I get about 3-4 slight lines down the length. If I run the machine on the faster feed setting I can just catch them with my fingernail. I know [member=44099]Cheese[/member] mic'ed these in an old thread and found them to be on the order of a few thousandths.

The material is hard maple, and I want to set some expectations. It takes about 4 passes with the ETS EC 125 and 120 grit to get rid of them. I'm guessing I can attribute that to the hardness of the wood. When I'm done, my straight edges don't show any gaps. But if I turn the lights out, and put a flashlight behind the straightedge, I can see the light.

Hopefully someone will come along and tell me I have unrealistic expectations out of the machines.

Thanks,
Matt
 
[member=65062]DynaGlide[/member]  I did this mod many years ago when these heads just surfaced. I had the same thing happen on initial trial. It was suggested to remove all the insert cutters, clean them and the head, and reinstall them making sure they are seated well in the pocket. You will need a small torque wrench. As I recall you still see faint lines but one pass of 150 grit got rid of them in red oak.

Mike
 
I have the same issues on mine and it really through me at first since I wasn't aware of it.  I think it is a disappointment at the very least.  I have reseated all of my cutter heads and did my best to go slow and watch each and every one of them seat properly as I hand tightened.  I don't like having to do the extra sanding as it was not an issue with the blades.  The biggest reason this seems design related is that I have a bench top Rikon jointer.  It has the same type of replaceable cutter heads and not nearly the same amount (less).  I never, never see any scalloping or ruts or whatever they are called, so I think this shelix head is most likely the issue.  Very frustrating.  If I could put in my old head and get my money back, I think I would do that.  Full disclosure: I have not talked to Byrd yet as I have not had the time, but I plan on calling them.
 
I have had the Byrd head on my 735 for 6 years or so and have never had the problem you describe. Hope you get yours fixed.

Jack
 
Matt, there was another thread here that detailed this issue, everybody weighed in and it was pretty much a consensus that no matter the manufacturer, every segmented cutter head left a scalloped finish to a greater or lesser degree. There were a lot of photos if I remember correctly.

While it is a nuisance, I do find it easier to determine when sanding is no longer needed because you can feel that with your hand. The straight blades left a glazed finish and that could only be seen with a raking light.

This is the results of a DW 735 with a Shelix head. I expect yours looks similar?

[attachimg=1]

[attachimg=2]

[attachimg=3]


Attachments

  • 5101_s.jpg
    5101_s.jpg
    222.2 KB · Views: 466
  • 5102_s.JPG
    5102_s.JPG
    196 KB · Views: 451
  • 5103_s.JPG
    5103_s.JPG
    188.5 KB · Views: 440
Cheese said:
Matt, there was another thread here that detailed this issue, everybody weighed in and it was pretty much a consensus that no matter the manufacturer, every segmented cutter head left a scalloped finish to a greater or lesser degree. There were a lot of photos if I remember correctly.

While it is a nuisance, I do find it easier to determine when sanding is no longer needed because you can feel that with your hand. The straight blades left a glazed finish and that could only be seen with a raking light.

This is the results of a DW 735 with a Shelix head. I expect yours looks similar?

[attachimg=1]

[attachimg=2]

[attachimg=3]

[member=44099]Cheese[/member] The scalloping I was getting was visible down the length of the board and able to catch my fingernail ever so slightly. After thinking about it this could only really be caused by one of the inserts having a nick in it. Nicked insert = line down the board that isn't being cut. It took me a while but I did find one of my inserts had two very tiny nicks that were enough to catch my finger nail when I ran it across the cutting surface of the insert.

 
DynaGlide said:
[member=44099]Cheese[/member] The scalloping I was getting was visible down the length of the board and able to catch my fingernail ever so slightly. After thinking about it this could only really be caused by one of the inserts having a nick in it. Nicked insert = line down the board that isn't being cut. It took me a while but I did find one of my inserts had two very tiny nicks that were enough to catch my finger nail when I ran it across the cutting surface of the insert.

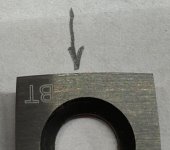
Matt if there's one issue I have with the Shelix is the fragility of the inserts.  [mad]  The edges are very susceptible to incredibly small chips that are then revealed as ridges on the board surface. The inserts are Tigra and made in Germany, I've done a lot of research and the inserts appear correct for the application but the chipping can still be an issue. I contacted Byrd twice with photos and after all the discussion they said the inserts were fine and there were no problems from a metallurgical perspective. I even sent in my inserts for them to check.

[attachimg=1]
 

Attachments

  • 9334.jpg
    9334.jpg
    361.4 KB · Views: 451
Cheese said:
DynaGlide said:
[member=44099]Cheese[/member] The scalloping I was getting was visible down the length of the board and able to catch my fingernail ever so slightly. After thinking about it this could only really be caused by one of the inserts having a nick in it. Nicked insert = line down the board that isn't being cut. It took me a while but I did find one of my inserts had two very tiny nicks that were enough to catch my finger nail when I ran it across the cutting surface of the insert.

Matt if there's one issue I have with the Shelix is the fragility of the inserts.  [mad]  The edges are very susceptible to incredibly small chips that are then revealed as ridges on the board surface. The inserts are Tigra and made in Germany, I've done a lot of research and the inserts appear correct for the application but the chipping can still be an issue. I contacted Byrd twice with photos and after all the discussion they said the inserts were fine and there were no problems from a metallurgical perspective. I even sent in my inserts for them to check.

[attachimg=1]

That looks like the two nicks I had on one of my inserts. If that's the cause of the ridges then I'll just rotate it, accept the limitations, and move on.
 
The scallops are an inevitable result of the geometry of the cutterhead but there are techniques that can help minimize them.  First it helps if your final pass is at the sloer feed rate and shallow...I usually do a clean-up pass removing 0.005" to 0.01" (0.1-0.2mm).  Then if you run the piece back through a second pass at the same thickness setting but offsetting the board by about 1/2 the width of the cutters or about 0.3" (7.5mm) that also helps to achieve a more level field.  Honestly, I only routinely do the first and the scallops sand away quickly and easily.
 
I did some exploring/testing on a scrap board. Ideally you'd want one the full width of the planer. Rotating that one cutter seems to have fixed those ridges I was getting before. I found two very, very slight 'grooves' now that at first I thought were more ridges. I checked and the width of the grooves are approximately equal to the width of one of the inserts. That just means those inserts are raised by something on the order of a thousandth of an inch. Nothing sanding can't take care of. I'll probably re-seat the inserts in the areas of the cutterhead corresponding to where the groove was created when I ran the board through and re-check. Simple enough to do.

Even with how it is now I'm pretty pleased with how it's performing. I expect to sand a little after machining anyway.
 
Cheese said:
DynaGlide said:
[member=44099]Cheese[/member] The scalloping I was getting was visible down the length of the board and able to catch my fingernail ever so slightly. After thinking about it this could only really be caused by one of the inserts having a nick in it. Nicked insert = line down the board that isn't being cut. It took me a while but I did find one of my inserts had two very tiny nicks that were enough to catch my finger nail when I ran it across the cutting surface of the insert.

Matt if there's one issue I have with the Shelix is the fragility of the inserts.  [mad]  The edges are very susceptible to incredibly small chips that are then revealed as ridges on the board surface. The inserts are Tigra and made in Germany, I've done a lot of research and the inserts appear correct for the application but the chipping can still be an issue. I contacted Byrd twice with photos and after all the discussion they said the inserts were fine and there were no problems from a metallurgical perspective. I even sent in my inserts for them to check.

[attachimg=1]

This reminds me of an issue I had with my Shelix head inserts. I was one of the first to purchase one of these for the DeWalt. After I installed it I did some test cuts and it sat for a few weeks. I went to use it and before turning it on I noticed some debris under the head - it was small pieces of the cutting inserts! They replaced the head and never had an issue.

Although, I didn't use the DeWalt very long. I bought the Dewalt and Shelix in prep for our kitchen remodel. Then Grizzly had a sale on their floorstanding planers and replaced the Dewalt with it. After designing all the panels I discovered a 15" planer could handle almost all of my panels in one piece whereas the 13" needed many more split in two. The Grizzly really didn't take up much more floor space and is much quieter.
 
I know my input is a little off topic, but I wanted to volunteer the info.

I have a large Powermatic helical head planer. I get a nearly perfect surface even on very hard wood. Sanding at 220 is all I need.
 
I have two little strips left that are bugging me.

i-hPDSfW5-X3.jpg


After chatting with the guy who does all the Dw735 videos he gave some awesome advice. Run a wide board through and turn off the machine after the board starts coming through. Then you can raise the cutter and mark exactly where the ridges are and match it to the inserts that are causing problems. I'll get to test it tomorrow, too late to fire it up. But I did find some packing material beneath the screw holding one of the inserts in question.

 
[member=65062]DynaGlide[/member] - This is probably already apparent to you but if you have a high knife (not properly seated or junk under it) that should result in a relatively wide (1/4” - 1/2”) slight trough in the surface. If you have a slight nick in a knife there should be a very narrow line like these that are raised from the rest of the surface. A raking light can help you find them on the knives but a very carefully applied fingernail works the best for me.
 
Sounds like the packing material accounts for the wider ridge Matt but what
about that ridge that is only a couple mm wide. Any idea on it's origin?
 
The packing material was actually in the threaded bore corresponding to the narrow ridge
 
Ok, I was thinking that wider ridge looks to be about the width of a cutter. I think mine are about 10/11mm but that's a guess, I never measured them.

It will be interesting to see what you find. When you installed your new cutter head did you have to remove all the bits?

Back when I bought mine many years ago only the smaller diameter version was available I believe and I did not have to remove the bits. I put off installing the Shelix head for years and it sat in the box unopened until last year when I finally decided I needed to either use it or sell it. I had been holding off in part because I had a number of spare DeWalt blade sets and though I would use those up before I made the change over. But I went through a couple sets of blades and still had 3 sets left which I ended up selling after I did the upgrade.
 
Bob D. said:
Ok, I was thinking that wider ridge looks to be about the width of a cutter. I think mine are about 10/11mm but that's a guess, I never measured them.

It will be interesting to see what you find. When you installed your new cutter head did you have to remove all the bits?

Back when I bought mine many years ago only the smaller diameter version was available I believe and I did not have to remove the bits. I put off installing the Shelix head for years and it sat in the box unopened until last year when I finally decided I needed to either use it or sell it. I had been holding off in part because I had a number of spare DeWalt blade sets and though I would use those up before I made the change over. But I went through a couple sets of blades and still had 3 sets left which I ended up selling after I did the upgrade.

They're 15mm x 15mm inserts but I believe the way they angle causes them to not have full contact along the 15mm. By running a board through and stopping it while still under the cutter head you can really see which cutters are causing any issues and mark them with a grease pen. To do this I just raise the DW735 almost all the way, and rub pencil over the grooves/problem areas then lower the cutter back down and rotate the cutterhead by hand until it lines up. It removes all the guess work.

Like I said I couldn't see anything wrong with the inserts for that wide ridge. Maybe they just weren't seated properly.
 
DynaGlide said:
Run a wide board through and turn off the machine after the board starts coming through. Then you can raise the cutter and mark exactly where the ridges are and match it to the inserts that are causing problems.

I've done the same thing by placing painters tape on the in-feed and out-feed tables and then run a board along the blue tape strips. That way I can move the board at any time and replace it in the same position, just make sure to mark the board for feed direction.  [smile]

That wide track is a bit disconcerting.  [sad]  Is that wide track 11 mm wide? The inserts are 15 x 15 mm.
 
Back
Top