Richard/RMW
Member
- Joined
- Jul 11, 2010
- Messages
- 3,063
I am getting geared up for my winter project, planned to be the renovation of my little workshop. Since I expect to be buried in this particular backyard, this seems to finally be the time to “do it right”. Doing it right is what I am trying to define, plan and execute; the purpose for starting this thread is to brainstorm and get suggestions from fellow FOG’ers. Let’s start by describing the current situation, then outline some general concepts.
I live on Brigantine Beach NJ, just north of Atlantic City. Lots on the island are small, it having been developed in the 1920’s as a summer resort. In our case the lot is 50’ wide, and 125’ deep. Total impervious coverage is limited to 40% for the house footprint and another 20% for driveways, etc. After we built the house and other hard surfaces I ended up with about 200 SF of excess allowable impervious coverage for the shop and anything else I may want to build in the future. The existing shed on the property was already 120SF and we decided not to expand the footprint.
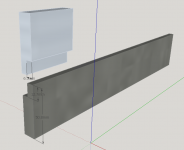
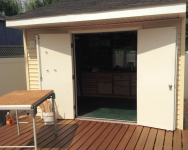
The structure was decent construction; stick-built (2 by 4’s and plywood, 8’ to the underside of the collar tie) so all we did was drag it to one side and install 5’0” double doors to ease access. Later we added a deck of sorts, 1 by 6 PT on a 2 by 8 structural frame, resting on concrete pavers. This deck is about 17’ wide by 20’ and when the weather permits I can setup outside for stuff like cutting plywood, etc. This is the outside:
[attachthumb=1]
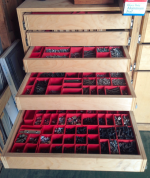
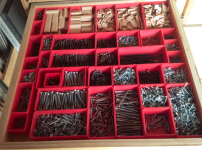
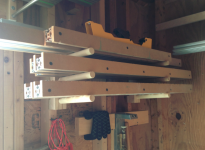
Inside I have ~ 11’6” by 9’6” of space to work with. I decided to run 24” base cabinets along the rear wall, this give me tool and hardware storage + the surface for bench machines. There are 12” overhead cabinets above this area. Here are some of the drawers. I bought gobs of these red bins and they really helped bring order to the chaos in the drawers:
[attachthumb=14]
[attachthumb=15]
[attachthumb=16]
[attachthumb=17]
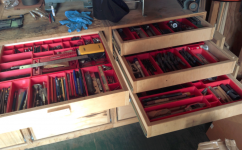
I also have big stuff, including this 14” + deep drawer with a 2 tons arbor press, tapping gadget, bench vise and extra 14” blades:
[attachthumb=18]
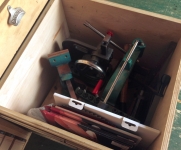
Lastly typical tools/supplies:
[attachthumb=19]
[attachthumb=20]
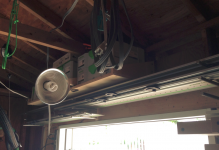
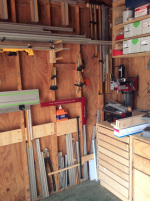
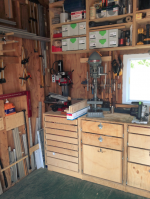
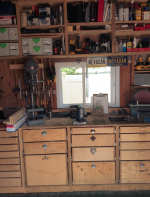
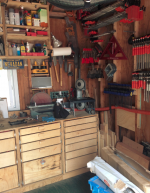
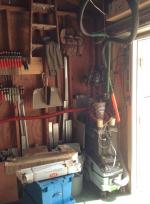
Overall the cabinets hold a lot of stuff with very little wasted space. This leaves me about 7’6” by 11’6” for everything else. My MFT/3 and CT26 sit on either side of the door opening and this leaves a “T” shaped open floor area where I can move from the door to the cabinets and to either side. My challenge is to maximize the use of the available space and gain better access to tools. Here are 360 degree photos of the current setup:
[attachthumb=2]
[attachthumb=3]
[attachthumb=4]
[attachthumb=5]
[attachthumb=6]
[attachthumb=7]
[attachthumb=8]
[attachthumb=9]
[attachthumb=10]
I do woodworking as well as fiddling with metal and plastics, machining small parts by hand and CNC. So far the woodworking has been mostly related to finishing off construction, i.e. shelves and cabinets, but in the future I want to do furniture and even boats. The shed also provides me the only place I have to sit out of the weather and enjoy a cigar, often while smoking/cooking on the grills. I don’t want to cram it full of stuff; my strong preference is to have open space and benches/tools that can be configured for the project du jure.
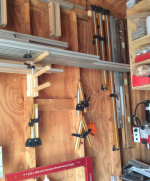
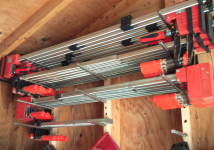
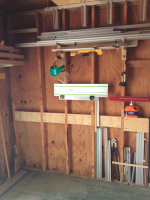
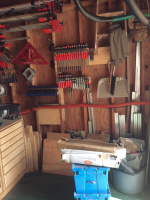
I have been experimenting with French cleats and wall racks with stainless and wooden dowels, the idea being to come up with a modular system for hanging clamps, guide rails, etc. I also have a gob of the 80/20 “extension arms” that are posted elsewhere on the FOG hanging on the wall. I suspect my final setup is going to rely heavily on these arms in lieu of fixed/solid topped workbenches. Wall racks:
[attachthumb=11]
[attachthumb=12]
[attachthumb=13]
This year I finally got power to it, 60A of 220V in a small subpanel. When I wire up the rest of it I expect to have (2) 20A/110V circuits and (1) 30A/220V circuit. This will let me run electric heat while still using my largest tools.
To complete this intro, here are some of my guiding principles (for lack of a better word):
[list type=decimal]
[*]If it is not used in the shop, it is not stored in the shop. This includes excess material, more on this in a later post.
[*]Everything that touches the floor, where practical, will be on casters.
[*]Everything stored in shop cabinets will be behind doors/in drawers to reduce clutter. The exception will be things hanging on the wall racks.
[*]Nothing will be stored on the floor.
[*]My to-be-built work surfaces will be modular, to allow different configurations as needs change. This is going to rely heavily on 80/20.
[/list]
Once completed I will post some Sketchup plans of the shop as it stands today.
As this thread develops I am looking for input and ideas. I expect to post progress reports for each phase, and hope to brainstorm different problems as they arise.
That’s it for now.
RMW
I live on Brigantine Beach NJ, just north of Atlantic City. Lots on the island are small, it having been developed in the 1920’s as a summer resort. In our case the lot is 50’ wide, and 125’ deep. Total impervious coverage is limited to 40% for the house footprint and another 20% for driveways, etc. After we built the house and other hard surfaces I ended up with about 200 SF of excess allowable impervious coverage for the shop and anything else I may want to build in the future. The existing shed on the property was already 120SF and we decided not to expand the footprint.
The structure was decent construction; stick-built (2 by 4’s and plywood, 8’ to the underside of the collar tie) so all we did was drag it to one side and install 5’0” double doors to ease access. Later we added a deck of sorts, 1 by 6 PT on a 2 by 8 structural frame, resting on concrete pavers. This deck is about 17’ wide by 20’ and when the weather permits I can setup outside for stuff like cutting plywood, etc. This is the outside:
[attachthumb=1]
Inside I have ~ 11’6” by 9’6” of space to work with. I decided to run 24” base cabinets along the rear wall, this give me tool and hardware storage + the surface for bench machines. There are 12” overhead cabinets above this area. Here are some of the drawers. I bought gobs of these red bins and they really helped bring order to the chaos in the drawers:
[attachthumb=14]
[attachthumb=15]
[attachthumb=16]
[attachthumb=17]
I also have big stuff, including this 14” + deep drawer with a 2 tons arbor press, tapping gadget, bench vise and extra 14” blades:
[attachthumb=18]
Lastly typical tools/supplies:
[attachthumb=19]
[attachthumb=20]
Overall the cabinets hold a lot of stuff with very little wasted space. This leaves me about 7’6” by 11’6” for everything else. My MFT/3 and CT26 sit on either side of the door opening and this leaves a “T” shaped open floor area where I can move from the door to the cabinets and to either side. My challenge is to maximize the use of the available space and gain better access to tools. Here are 360 degree photos of the current setup:
[attachthumb=2]
[attachthumb=3]
[attachthumb=4]
[attachthumb=5]
[attachthumb=6]
[attachthumb=7]
[attachthumb=8]
[attachthumb=9]
[attachthumb=10]
I do woodworking as well as fiddling with metal and plastics, machining small parts by hand and CNC. So far the woodworking has been mostly related to finishing off construction, i.e. shelves and cabinets, but in the future I want to do furniture and even boats. The shed also provides me the only place I have to sit out of the weather and enjoy a cigar, often while smoking/cooking on the grills. I don’t want to cram it full of stuff; my strong preference is to have open space and benches/tools that can be configured for the project du jure.
I have been experimenting with French cleats and wall racks with stainless and wooden dowels, the idea being to come up with a modular system for hanging clamps, guide rails, etc. I also have a gob of the 80/20 “extension arms” that are posted elsewhere on the FOG hanging on the wall. I suspect my final setup is going to rely heavily on these arms in lieu of fixed/solid topped workbenches. Wall racks:
[attachthumb=11]
[attachthumb=12]
[attachthumb=13]
This year I finally got power to it, 60A of 220V in a small subpanel. When I wire up the rest of it I expect to have (2) 20A/110V circuits and (1) 30A/220V circuit. This will let me run electric heat while still using my largest tools.
To complete this intro, here are some of my guiding principles (for lack of a better word):
[list type=decimal]
[*]If it is not used in the shop, it is not stored in the shop. This includes excess material, more on this in a later post.
[*]Everything that touches the floor, where practical, will be on casters.
[*]Everything stored in shop cabinets will be behind doors/in drawers to reduce clutter. The exception will be things hanging on the wall racks.
[*]Nothing will be stored on the floor.
[*]My to-be-built work surfaces will be modular, to allow different configurations as needs change. This is going to rely heavily on 80/20.
[/list]
Once completed I will post some Sketchup plans of the shop as it stands today.
As this thread develops I am looking for input and ideas. I expect to post progress reports for each phase, and hope to brainstorm different problems as they arise.
That’s it for now.
RMW
Attachments
-
 Shop Outside.png1.2 MB · Views: 2,503
 -
 Wall Guides.png1.1 MB · Views: 2,188
 -
 Drawer 1.png943.5 KB · Views: 3,878
 -
 Drawer 2.png1.8 MB · Views: 2,327
 -
 Drawer 3.png1.2 MB · Views: 2,109
 -
 Drawer 4.png1,020.5 KB · Views: 2,021
 -
 Drawer 5.png1.5 MB · Views: 2,214
 -
 Drawer 6.png1.4 MB · Views: 1,855
 -
 Drawer 7.png974.2 KB · Views: 1,966
 -
 Wall Clamps.png938.9 KB · Views: 2,221
 -
 Wall Arms.png1.3 MB · Views: 1,914
 -
 360-9.png1.3 MB · Views: 1,546
 -
 360-1.png903.3 KB · Views: 2,291
 -
 360-2.png1 MB · Views: 2,025
 -
 360-3.png1.1 MB · Views: 2,136
 -
 360-4.png742.6 KB · Views: 2,367
 -
 360-5.png1,011.3 KB · Views: 2,109
 -
 360-6.png1.1 MB · Views: 2,670
 -
 360-7.png1.1 MB · Views: 1,907
 -
 360-8.png1,003.8 KB · Views: 1,916