Split Top Roubo Bench Build

iamnothim said:
Tinker said:
Great work on those tennons, Luke.

Whenever I try making cuts with my Ryobi saw, I end up anything but straight.  I have an ancient set of carpenter saws that I end up going to every time I want to be anywhere near accurate with a cut.  Very frustrating.  Next time, i will try your advice.  I don't know which end i have concentrated on, but i end up with a pretty good start on making a big circle. 
Tinker

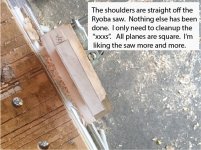
Gene Davis gave me this tip.  I was using a marking gauge then pencil for my cut lines.  I added the step of going over the marks with a "Marking Knife"  ($7.50 at Rockler)  It made a big difference in how the Japanese saw tracked.  The blade is much thinner than a carpenter saw.  Thus the marking knife groove is actually deep enough for the thin blade to track.

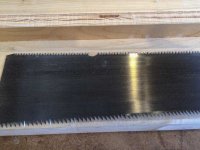
Until yesterday, I was looking forward at the blade.  This is useless because I was looking at where I had been.  Like driving and only looking in the mirror.  Now when I looked at the back of the blade I see where it's tracking in both planes.  I will also use the two hand grip at times.  This seems to stabilize the tracking more.  It's a real advantage of the Ryoba / Dozuki because it reduces arm fatigue and cuts considerably faster.  I'm still taking slow deliberate strokes.

[attachimg=1]

No matter what hand saw i use, i have difficulties with close tracking.  I am left handed but right eye dominant and double vision to boot.  I have always had difficulties with all types of handsaws.  Other cutting tools do not seem to be a problem.  Most tools i can use with either hand.  When i was learning the trades, i was working with three brothers who were quite opinionated, to put it VERY mildly.  The youngest would really get upset whenever i switched hands with a hammer because I could get a better angle to swing.  One day, as we were shingling, he caught me using a hatchet with either hand. He got really upset until i very explicitly explained, motions and all, that I could swing a hatchet with either, or even both hands. He quieted down quite suddenly while his two brothers about filled their britches laughing so hard.  But I could go onandonandon about that crew. 

Tinker
 
One more end to make and I'll be able to see if the two legs join in the right dimensions and in the right plains.  That will be cool.
I need the "Exact Leg Spacing" for the leg wedge tenons to fit into the slab mortise.

[attachimg=1]


Attachments

  • SetA-2.jpg
    SetA-2.jpg
    105.2 KB · Views: 1,118
This project is far more than I bargained for.  I have to pace myself because there are a lot of details left and it will be hard to recover from mistakes.  In no particular order.

Route the bottom face of the slab for the sliding deadman.
Cut the Deadman so it's fits vertically between the rail and the face of the slab.
Plane the back half of the slab.
Make the draw-bore dowels.
Cut 8 tenons more tenons that will align the legs.  (I have front to back fudge room because I can plane down the "gap stop".)
Route the lower rail for the shelf planks.
Cut the shelf ledger and planks.
Make the Chop and install the Crisscross hardware. (That's a dilly)
Assemble
Flatten the top
Sand and coat (wax or urethane) 

[attachimg=1]

[attachimg=2]

[attachimg=3]


Attachments

  • Setb-2.jpg
    Setb-2.jpg
    216 KB · Views: 1,032
  • Setb-3.jpg
    Setb-3.jpg
    213.5 KB · Views: 1,025
  • Setb-4.jpg
    Setb-4.jpg
    153.9 KB · Views: 1,026
Luke, I get exhausted just following the thread! Why, sometimes I have to walk away from the FOG and go have a cigar and beer in my shop to to recover from all your hard work.  [poke]

On a serious note, awesome job documenting and keeping the thread and keeping focused on the project. You are really going to enjoy using that bench when completed.

RMW
 
I really like the chamfered edges, looks real clean.  Awesome thread by the way.  I've enjoyed your journey.
 
Justin Michael said:
I really like the chamfered edges, looks real clean.  Awesome thread by the way.  I've enjoyed your journey.

And they do a great job of hiding a poor fit...
 
I have to say, if it wasn't for the encouragement from ya'll, (and the fact that my rep would be seriously tarnished if I didn't keep going) this project could very easily have been one that gets stacked in the corner of the garage.....AND...  "I think I'll work on it.... next weekend...

Presenting..... a picture that doesn't look like a pile of wood  [smile]

[attachimg=1]

I have to doctor the top tenons so the stretchers are flush with the bottom of the slab.  No too big a deal since the dowels will hold it tight.

[attachimg=2]
 

Attachments

  • Pho-4.jpg
    Pho-4.jpg
    98.8 KB · Views: 1,014
  • Pho-3.jpg
    Pho-3.jpg
    94.1 KB · Views: 1,034
I must be living right.
They are square, level, and the width's are within 1/2mm.
Now I have to decide what to do next.

[attachimg=1]
 

Attachments

  • Phodual-1.jpg
    Phodual-1.jpg
    101.7 KB · Views: 959
Hey Luke,
Back in reply #465 you had a picture of how you like to use a stack of systainers on a sys-cart as a rolling worktop.  Well, here's an idea.  Go to Ben's thread on 3D printed T-Loc face plates.  Scroll down to reply #42 and #48.  He has a picture of some cleats he designed to be screwed to a panel that can then be locked in to the top of a systainer.  It makes for a nice flat work top and you can cut it as large as you need.

Ben has an Etsy account and I think I saw them on eBay, too.

Mike A.
 
Tenons are pared with chisels, as Paul Sellars shows.  And yeah, you can band saw 'em, to get close to the cheeks you want, but I still like to do the finish paring with chisels.  My new-old Stanley #71 router plane might get some use now that I have it, for this task.

Master Paul, bless his primitive heart, only uses that new fangled electricity thing for lighting, thus the tenon saw and the splitting.

But it is a shoulder plane that is the tool for getting that array of four shoulders precisely all in the same plane so that your tenon member seats tight to its mortise member's face.  Whether the Clifton, the Stanley 92 or 93, the Veritas or Lie Nielsen, or even a nice wood-body ECE, the shoulder rebate plane (I like the Brit way of saying it) is the tool for the shoulder work.  REE-bait.

Ridiculous sharpness, so you can do a half a thou at a pass, if needed.  And then, when done and fitted well, a little tiny bit of undercut work with your scary sharp chisel, to not only ensure precise seating, but for a little glue relief.

Oh, and that knife thing.  Sellars goes deep as he can with the knife, straight down, and then, the very important step, chisels in on the waste side of the knifed line to create his "knife wall."  You do not want the saw to ride into a knife cut, you want the saw to track precisely with its set teeth smack adjacent that cut, 100 percent into the waste, right along that line.  The knife wall gives you this.

Take the time to watch his whole sequence of YouTube videos as he makes his split-top pine workbench.  Enjoy the show.  Watch his techniques for sawing, planing, chiseling, and listen to him describe his techniques.  You'll like what he does to make a router plane with a piece of board and a chisel.
 
mike_aa said:
Hey Luke,
Back in reply #465 you had a picture of how you like to use a stack of systainers on a sys-cart as a rolling worktop.  Well, here's an idea.  Go to Ben's thread on 3D printed T-Loc face plates.  Scroll down to reply #42 and #48.  He has a picture of some cleats he designed to be screwed to a panel that can then be locked in to the top of a systainer.  It makes for a nice flat work top and you can cut it as large as you need.

Ben has an Etsy account and I think I saw them on eBay, too.

Mike A.

That's nifty.
When the garage is finished I'll probably pick up a set.  Right now I need to stay on plan.
 
Gene Davis said:
Tenons are pared with chisels, as Paul Sellars shows.  And yeah, you can band saw 'em, to get close to the cheeks you want, but I still like to do the finish paring with chisels.  My new-old Stanley #71 router plane might get some use now that I have it, for this task.

Master Paul, bless his primitive heart, only uses that new fangled electricity thing for lighting, thus the tenon saw and the splitting.

But it is a shoulder plane that is the tool for getting that array of four shoulders precisely all in the same plane so that your tenon member seats tight to its mortise member's face.  Whether the Clifton, the Stanley 92 or 93, the Veritas or Lie Nielsen, or even a nice wood-body ECE, the shoulder rebate plane (I like the Brit way of saying it) is the tool for the shoulder work.  REE-bait.

Ridiculous sharpness, so you can do a half a thou at a pass, if needed.  And then, when done and fitted well, a little tiny bit of undercut work with your scary sharp chisel, to not only ensure precise seating, but for a little glue relief.

Oh, and that knife thing.  Sellars goes deep as he can with the knife, straight down, and then, the very important step, chisels in on the waste side of the knifed line to create his "knife wall."  You do not want the saw to ride into a knife cut, you want the saw to track precisely with its set teeth smack adjacent that cut, 100 percent into the waste, right along that line.  The knife wall gives you this.

Take the time to watch his whole sequence of YouTube videos as he makes his split-top pine workbench.  Enjoy the show.  Watch his techniques for sawing, planing, chiseling, and listen to him describe his techniques.  You'll like what he does to make a router plane with a piece of board and a chisel.

[member=2952]Gene Davis[/member]
Gene,
You are correct.  That's the way to do it and I have copied your post into a reference note so I can work on those techniques.
Right now I have two tenons to finish then two more to make from scratch.  Then I'm done with the bench tenons.  As such I'm
sticking to my technique because it's working.

I need a lot of practice paring end grain with a chisel.  I consider it an essential skill for making furniture.  I kept the mortices on the bench round from the router and chose to round the tenon tops to fit the oblong mortise.  I'm using Paul's splitting method to pare down the edges before I shape them with a rasp.  I need a lot of help reading grain.  That said, it's a great place to start learning.

Latest photo....

[attachimg=1]
 

Attachments

  • all4.jpg
    all4.jpg
    142 KB · Views: 822
Gene Davis said:
You'll like what he does to make a router plane with a piece of board and a chisel.

I also likes the episode where he buys a 7£ set of bench chisels and makes them "Scary Sharp"
He saved my budget by scraping a stupidly expensive set of Japanese chisels.  Guess my Sorby's are just fine thank you.
 
That's really starting to look like a bench, Luke! But I think that last image must be inverted... Or did you move Down Under?

Tom
 
Tom Bellemare said:
That's really starting to look like a bench, Luke! But I think that last image must be inverted... Or did you move Down Under?

Tom

Where did I put the Vegemite ??
 
The Major stopped by this morning and we planed the back slab.  [smile]

I finished the back rail and it's pretty good.  I detected the lower small rails are a about 2mm higher off the floor than
the long back rail.  That would mean I'd have to trim the top of the tenon and then shim the bottom.  Since the legs are in the corners I'm not sure it will be visible anyway.  I will work that (and any other kinks) out with the final dry fit.

I also moved it front and center in the shop so I can move around it better.

[attachimg=1]


Attachments

  • tod-2.jpg
    tod-2.jpg
    107.1 KB · Views: 786
Luke,
Did you realize your thread is fast approaching 500 posts?

Even while it's upside down, it looks great so far!  Nice job.

Do you plan on finishing the legs and the top before it's all assembled?

Thanks for sharing all that you've done to make this bench a reality!

Mike A.
 
mike_aa said:
Did you realize your thread is fast approaching 500 posts?
Nope.
mike_aa said:
Do you plan on finishing the legs and the top before it's all assembled?
I'll sand it to 600+ and probably wax it.  I might spray some water based urethane on the base.  Not really sure.
Once the base is done (very close) I'll clamp everything up and check the alignment.  Then I'll drop a slab on.
If it lines up, I will glue and peg the base.

[attachimg=1]
 

Attachments

  • Subs-1.jpg
    Subs-1.jpg
    114.4 KB · Views: 1,576
I learned a couple things today.
1) Don't cut plywood with a Ryoba saw.  Even if it's only a 1" x 3/4" strip.
2) LeeValley Tools is an amazing company.  They replaced a saw I purchased 33 days ago including return postage.  And yes, I told the gentleman I tried to cut off a piece of plywood strip.

[attachimg=1]
 

Attachments

  • J-Saw-1.jpg
    J-Saw-1.jpg
    76.2 KB · Views: 1,471
This is looking great.

I am jealous as a bench a proper bench has been high on my builds list.

Sadly i am about three entry doors and jams, twelve plantation shutters and one massive pergola away.

Till then i live vicariously through you.

 
Back
Top