You are using an out of date browser. It may not display this or other websites correctly.
You should upgrade or use an alternative browser.
You should upgrade or use an alternative browser.
Split Top Roubo Bench Build
- Thread starter iamnothim
- Start date
iamnothim
Member
- Joined
- Feb 5, 2014
- Messages
- 1,435
Billedis said:[member=28483]iamnothim[/member] Got my set today as well and the paolini rule yesterday. Things are looking up. Bill
That square is SICK!
Just in time to mark the ends of the slab for trimming.
iamnothim
Member
- Joined
- Feb 5, 2014
- Messages
- 1,435
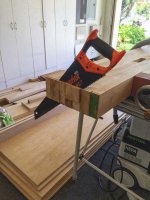
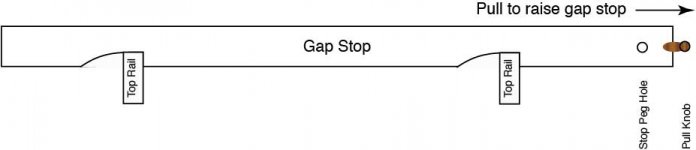
Finished putting the top coat on the base. Also trimmed the slab and the gap stop.
I came up with a design for raising and lowering the gap stop without too much effort.
I think it's slab time.
[attachimg=1]
[attachimg=2]
[attachimg=3]
I came up with a design for raising and lowering the gap stop without too much effort.
I think it's slab time.
[attachimg=1]
[attachimg=2]
[attachimg=3]
Attachments
iamnothim
Member
- Joined
- Feb 5, 2014
- Messages
- 1,435
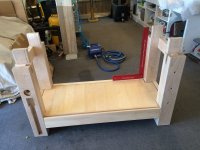
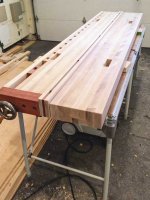
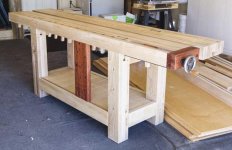
Made some good progress today and she looks like a workbench. Finally.
A couple things to keep in mind.
Lumber selection is critical. You have to think ahead about the color and grain variation of the stock you select. This is on top of looking for bows, cups, and twists. Sometimes in the hardwood aisle you have to make tradeoffs. This is very hard for me because I'm impatient and I want to grab the wood and get home. Take your time. The color of my stock is a bit of a hodge podge.
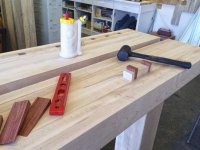
I bought a huge batch of felt squares for another use on Amazon for a few dollars. I was totally gassed when I decided to put some "TreWax" on. I wished I had a buffer pad for my ETS 150/3. Guess what, I did. The felt squares work great.
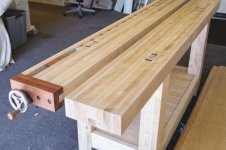
It was a chore flush cutting the tenons. Wow. I used the Ryoba saw. To start the saw I placed a card scraper between the bade and the table. This worked pretty well although I still managed to bungle it here and there. The RO90 took care of the cosmetics but the top is a bit of a rollercoaster track. This is also because one plank in the back slab was too low and I couldn't plane past 102mm. I planed it so it wasn't obvious. This should all get fixed when I flatten the top. I expect a lot of material will be removed.
I really love the wedge tenons. I added glue but I'm not sure why. When I was pounding in the wedges there were some loud sounds that would raise the hair on any woodworker. Just keep going. I could see no visible split. Like the CA Redwoods it will survive a forrest fire.
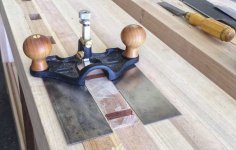
After the tenons are somewhat flush I grabbed the LN router plane. I love this tool. I thought I could just put it on the top and plane. Wrong. The plane bed must be higher than the material to be removed. Again the card scrapers were very handy.
Soldier on to the leg vise!
[attachimg=1]
[attachimg=2]
[attachimg=3]
[attachimg=4]
[attachimg=5]
A couple things to keep in mind.
Lumber selection is critical. You have to think ahead about the color and grain variation of the stock you select. This is on top of looking for bows, cups, and twists. Sometimes in the hardwood aisle you have to make tradeoffs. This is very hard for me because I'm impatient and I want to grab the wood and get home. Take your time. The color of my stock is a bit of a hodge podge.
I bought a huge batch of felt squares for another use on Amazon for a few dollars. I was totally gassed when I decided to put some "TreWax" on. I wished I had a buffer pad for my ETS 150/3. Guess what, I did. The felt squares work great.
It was a chore flush cutting the tenons. Wow. I used the Ryoba saw. To start the saw I placed a card scraper between the bade and the table. This worked pretty well although I still managed to bungle it here and there. The RO90 took care of the cosmetics but the top is a bit of a rollercoaster track. This is also because one plank in the back slab was too low and I couldn't plane past 102mm. I planed it so it wasn't obvious. This should all get fixed when I flatten the top. I expect a lot of material will be removed.
I really love the wedge tenons. I added glue but I'm not sure why. When I was pounding in the wedges there were some loud sounds that would raise the hair on any woodworker. Just keep going. I could see no visible split. Like the CA Redwoods it will survive a forrest fire.
After the tenons are somewhat flush I grabbed the LN router plane. I love this tool. I thought I could just put it on the top and plane. Wrong. The plane bed must be higher than the material to be removed. Again the card scrapers were very handy.
Soldier on to the leg vise!
[attachimg=1]
[attachimg=2]
[attachimg=3]
[attachimg=4]
[attachimg=5]
Attachments

Wooden Skye
Member
- Joined
- Mar 6, 2012
- Messages
- 1,145
Luke,
The bench is looking great! [thumbs up]. I really appreciate all the time you have spent documenting the build. If I ever get the chance or the room, this will be great to fall back on. So thank you.
The bench is looking great! [thumbs up]. I really appreciate all the time you have spent documenting the build. If I ever get the chance or the room, this will be great to fall back on. So thank you.
bkharman
Member
- Joined
- Jul 1, 2013
- Messages
- 2,019
Luke. That thing looks amazing!!
I know you knocked yourself down every once and a while during this build, but you can be very proud of what you have done. It looks awesome.
I bet two thirds of the people on this forum wouldn't attempt a project like this... Myself included at the moment.
Like others have said, documenting this and sharing with us all is an incredible feat.
Enjoy it and I raise my Maple Bacon bourbon to you my friend.
Cheers. Bryan.
mike_aa
Member
Luke,
Aren't you done yet! [poke] LOL, good buddy! Just kidding!
Since April 5, when you started this thread, it has been one of my favorite places to be on FOG. I'm sad to see it ending.
I know if I ever attempted to start a build like this, it would take me more than twice as long and end up looking only half as good. That is if I ever actually finished it!
I am in total awe of your accomplishment! It looks amazing. Can't wait to see it with the vise.
Mike A.
iamnothim
Member
- Joined
- Feb 5, 2014
- Messages
- 1,435
bkharman said:Luke. That thing looks amazing!!
I know you knocked yourself down every once and a while during this build, but you can be very proud of what you have done. It looks awesome.
I bet two thirds of the people on this forum wouldn't attempt a project like this... Myself included at the moment.
Like others have said, documenting this and sharing with us all is an incredible feat.
Enjoy it and I raise my Maple Bacon bourbon to you my friend.
Cheers. Bryan.
The first of two posts.
BK
If you and the 2/3’s want to have a bench, I sure hope that ya’ll give it a go. Before starting I never built anything with a mortise and tenon. I tried to make a morris chair 10 years ago but gave up on the M&T. (I got the curved arms)
Now, with all the materials and how to videos, if I can do it so can ya’ll. I consider the Mark, The W Whisperererer, Spagnolo’s plans and videos as important as wood in the build. Benchcrafted sends you a nice roll of schematics, but they do no show you how to build the bench. Just have the schematic for the shop wall. For $100 The WW Guild package is a steal.
Time. To date the build has taken 10 weeks. I have the luxury that most do not have, working every day. This and cost can be significantly shortened.
Materials/Time. Look at photos of builds that use lumber yard 2x6 lumber. Planed and finished it looks Great! I think David Barron’s (wedge tenon video) is built from modest, but very stout lumber. You can achieve a very functional tail vise without buying an expensive wheel, and making a dog hole strip and dogs. Instead purchase an ordinary tail vise that has a dog hole, drill 3/4” dog holes in the slab and there you go. A fraction of the time and expense. There are similar choices for the leg vise. Combined, they should trim at least $500 and one week off the build. I believe scaling the bench down to six feet will also speed up the build.
Skills. If you are reading this, you got skills. It’s not “DOG” (DeWalt Owners Group). You are serious about your craft and your hobby. You can do this.
Tools. Here are the tools that I believe are essential to the build.
MFT/3 or equivalent.
Band Saw. You can almost get away with a Carvex except for the tenons. If you have the hand skills and don’t get fatigued a good Ryoba saw will certainly do the job.
I don’t have a table saw, I used a Festool TS. You need one or the other to rip stock.
Drill press.
Surface planer. If you go with 2x6 make sure it has the capacity.
Good measuring tools. If you are good with Imperial stick, If you find yourself doing a lot of calculations switch to metric. Combination square and protractor. I estimate I used my Starrett every 5 minutes.
Sander.
Domino. Not 100% necessary but I used mine a lot for lining up reference edges during glue up. I also bonded some sitcks.
Chisels
Block plane
Small shoulder plane.
A Router Plane is dope.
iamnothim
Member
- Joined
- Feb 5, 2014
- Messages
- 1,435
#2
Flattening the top. This is another daunting task. I find it scary running a router over the whole thing. That said, having a flat, almost reference, surface is a very big feature. Many times after planing an edge I go hunting for something flat to check it. I gotta do it.
The chop. Thank God I finally read the directions, I could have been a disaster. On the cover of the direction is very large bold print begging to read the directions. Somehow I missed that.
Me being me and a non-conformist the design of the chop will be "different". I don't think there will be much middle ground. Stay tuned.
[attachimg=1]
Attachments
mike_aa
Member
Now that you have this wonderful massive bench, have you thought of flattening the top the old way by using a long plane and some winding sticks?iamnothim said:#2
Flattening the top. This is another daunting task. I find it scary running a router over the whole thing. That said, having a flat, almost reference, surface is a very big feature. Many times after planing an edge I go hunting for something flat to check it. I gotta do it....
Mike A.
iamnothim
Member
- Joined
- Feb 5, 2014
- Messages
- 1,435
mike_aa said:Now that you have this wonderful massive bench, have you thought of flattening the top the old way by using a long plane and some winding sticks?
Mike A.
next question.
[thumbs up] [thumbs up] [thumbs up] [thumbs up]iamnothim said:mike_aa said:Now that you have this wonderful massive bench, have you thought of flattening the top the old way by using a long plane and some winding sticks?
Mike A.
next question.
Cheese
Member
Luke, the bench looks terrific. It came out really nice. [thumbs up]
Now that you've wrestled with it, how much do you think it weighs?
Now that you've wrestled with it, how much do you think it weighs?
mike_aa
Member
Gee, I thought you might want some exercise as sort a breather after all that figuring out and intense measuring. [doh]iamnothim said:mike_aa said:Now that you have this wonderful massive bench, have you thought of flattening the top the old way by using a long plane and some winding sticks?
Mike A.
next question.
No doubt you've already seen Marc's video.
For more fun, here's a video with Nick Offerman talking about his router sled jig.
http://www.youtube.com/watch?v=zIA2Xl8P7Es
Maybe you can use some ideas from his video. The explanation starts at 1:49.
The article Fine Woodworking Magazine did on the jig is here.
Mike A.
iamnothim
Member
- Joined
- Feb 5, 2014
- Messages
- 1,435
Cheese said:Luke, the bench looks terrific. It came out really nice. [thumbs up]
Now that you've wrestled with it, how much do you think it weighs?
A bunch
Similar threads
- Replies
- 33
- Views
- 3K