Enormicon
Member
- Joined
- Jan 28, 2019
- Messages
- 55
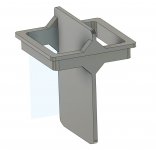
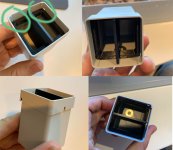
They should line up exactly with the top of the existing Festool bins if I measured correctly. I need to print the vertical dividers to confirm if the chamfers at the bottom are correct though... I left a tiny bit of leeway so maybe ultrathin washers wouldn't be ideal for these, but once I get one tested I'll throw up the .STL file.edwarmr said:BK Makes said:Some divider ideas for the existing Festool bins. Utilizes the "collar" portion at the top... will print a few tomorrow.
Starting with the smallest 50x50 bin to speed up the print time.
Cool ideas! If they stick up that high will they hit the grid on the lid?
While printing the 83.3x175's I ran into an issue (forgot to slice it WITH supports) and botched the print, so stay tuned on that front...
The Domino systainer divider idea is GOLD though, thanks Ed'! I'll pull out my Domino systainer, make some measurements and see about trying to use the existing dividers/notches in some fashion (though they may be taller than the SYS3 ORG's 68mm?). Or at least trying to use the similar mechanism/measurements so that people can reuse what they already have..

")