SYS3 Bins - 3D Files for printing your own

The new and improved 100x150 Nesting Tray (and the tweaking of my printer settings) came out beautifully.
Cheers!
EDIT: as of Feb.27, 2021: The rim of the tray was lowered from being flush with the top to allow the SYS3 ORG lid to close. If you printed this prior to Feb.27th 2021, my sincere apologies. The updated file and pictures are now below. It fits like a glove!

New SYS3 ORG 100x150 Nested Tray .STL file
(getting that 83.3x175 Middle bin on the printer now ed!)
 

Attachments

  • Nesting Tray V2b.jpg
    Nesting Tray V2b.jpg
    279.4 KB · Views: 708
  • Nesting Tray V2.jpg
    Nesting Tray V2.jpg
    281.1 KB · Views: 760
This thread inspired me to finally pick up a 3d printer. My Artillery X1 arrives tomorrow. Your bins will be some of the first things I try. Any advise or resources to point me to for getting started with my 3d printer? What slicer are you using?
 
FYI: I printed the 83.3x175 Middle bin last night and made a miscalculation in the placement of its feet (it doesn't fit)...

..but it does now! I fixed the file, ran it through Netfabb and modified the original links.
So both the 83.3 MIDDLEs for the 175 and the 350 are now accurate. Enjoy!

 
simnick said:
This thread inspired me to finally pick up a 3d printer. My Artillery X1 arrives tomorrow. Your bins will be some of the first things I try. Any advise or resources to point me to for getting started with my 3d printer? What slicer are you using?
Oh man, that's awesome! I've seen prints from the X1 in person and they are fantastic!

My advice to anyone getting started in 3D printing:
1. Free files to print and search are available on Thingiverse There are a lot of other sites like this too these days; Cults, Yeggi, and paid sites like CGTrader, Do3D....
2. Learn Fusion360 early, its free! and you now need a login from its parent company Autodesk to check your files to ensure they are manifold (watertight) using the free Netfabb service. There are a lot of paid Fusion360 courses available, some tailored to woodworking, etc., but Kevin Kennedy on YouTube has a Learn Fusion 360 in 30 Days for Beginners YouTube playlist that is completely free and where I learned it. Google Lars Christensen for additional free resources; he works for Autodesk
3. Slicer. I use the PRUSA Slicer that came with my printer, but it works with all printers (as far as I know, you can configure it to show the Artillery build plate, etc). Its very easy to use (and free!), though it is not the only good one around these days.
4. Check out Angus Deveson at Makers Muse for advice, reviews, tests, neat stuff, etc. He is an OG 3D printer and still going strong with great content.
5. Run any file you pull off a free site (and even the ones you've created) through the free Netfabb service referenced above. This repairs any file found to be non-manifold. There's nothing worse than coming back to a 24-hour print and finding a giant spaghetti mess of hardened plastic caked all over your printhead and print bed because your model wasn't manifold and the printer was trying to print in mid-air.
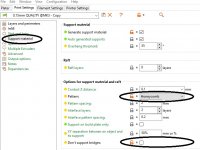
6. Have supports enabled via your slicer for anything that overhangs at greater than a 45-degree angle (most slicers have an automatic support option). You can change all sorts of parameters here, using stronger honeycomb supports, rectilinear, etc.. over time you will know when you need and don't need supports.. and you can "paint" them in manually as well
7. You don't need to use high infill percentages. 15% is very common and saves you filament. More infill = stronger prints though, and I use the gyroid infill pattern, as it saves plastic and is still strong.. you can find videos of strength tests from CNC Kitchen
8. There are a pile of filaments out there; PLA being the most common. Its also corn-based and actually smells alright, ha ha. ABS, Nylon, Carbon-fibre reinforced stuff, flexible stuff (NinjaFlex).. and all kinds of variants. Your slicer will likely automatically adjust your settings when you input what brand/type you're using but the roll of filament or the box will also have suggested settings. The highest quality prints I've ever achieved were from a roll of PRUSAment filament that came with my printer, but I usually use generic 2kg rolls of PLA because its cheap and still has great print quality. If you're in Canada you can use the code 52021FDC to get 5% off at Filaments.ca. I told them earlier this week I was making a 3D printing video on YouTube and asked if they would share a discount code, and they did! 5% not huge, but its a start :) (I'm sure Seth will let me know if this is allowed on the forum... I get no money from them and have no affiliation.. I just asked and and they gave it [laughing])
9. Setting up a print for the first time, calibrating your bed, your first layer height, etc. is a trial and error process, but once dialed in you should be good. Try not to get too frustrated during this process.
10. Be safe. Your hot end is typically melting the plastic at 215C or higher, there have been fires from controllers and hotends.. a smoke detector would be great. You can also connect a webcam to almost any printer these days (free plans online) and watch your prints from your phone with Octoprint... you can do timelapses, etc, too.. I've printed PLA indoors, but typically do it in my garage on a steel benchtop (and have NEVER had any problems with the smell or fires). I've seen an Artillery (printer brand) operating on a dining room table for hours on end with no issues and no bad smells; but to each their own.
11. Failed prints happen, for a variety of reasons. Software and printers these days are much better at detecting and correcting these, but be prepared for occasional frustration. Such is life.

Good luck! ;D

12. Oh, forgot this one. You can use a conventional mouse for everything in Fusion360 and your slicer program, BUT a Space Mouse from 3DConnexion is AMAZING for improving your workflow and "flying around" your model and the screen. I have the SpaceMouse Wireless so I can use it on my desktop or laptop. It gets used by my left hand, while my right uses the conventional mouse. It comes with its own "training" app to get you fluent quickly, which was a nice touch too.

EDIT: 13. If you come back to your printer and find a failed print and a huge blob of hardened plastic encasing your hotend, don't just try and pry/cut it off. Heat up the hotend first ("Load filament" setting on your printer) and then just pull it off slowly. The first time this happened to me I accidently ripped off the wires connecting to my hotend. Oh, and depending on your printer, almost every tiny little part is available for purchase separately and very inexpensively. You can also print your own parts in many instances, or have a friend print them if yours is out of commission.

EDIT: 14: 3D Printer recommendations: ALL3DP Best Printers (as of Feb.2021)
I've owned or been in close contact with three of their top choices (across different price categories) so in my opinion, its a credible source. ;)
 
The 25x150 Streamliner bin
SYS3 25x150 Streamliner Bin .STL file
I'd note that the 25mm bins are meant to be paired together as one side wall is vertical and the other sloped. They would still work alone, but better together. I've added some extra "feet" to give this one some more stability and have a set going on my printer as we speak.

P.S. I have been 3D printing for a while, but am NOT a Fusion360 expert. After creating the original (with a lot of measurements from a $40 pair of digital calipers) all the other modified versions have been very easily modified. Anyone can do this!
 
Thanks for the tips. My first prints of basic stuff went great, but once I got to your bins I had issues with supports. What do you recommend for these bins to adhere and support, given that so little actually touches the base? The supports that I first did were way too hard to remove.
 
simnick said:
Thanks for the tips. My first prints of basic stuff went great, but once I got to your bins I had issues with supports. What do you recommend for these bins to adhere and support, given that so little actually touches the base? The supports that I first did were way too hard to remove.
I've printed most of the bins with the standard rectilinear supports everywhere and they came off like a dream; I recently switched to honeycomb supports (Print Settings>Support Material> "Pattern: Honeycomb"). They provide a much more stable base, and while they are "stuck" to the model a bit better, they still came off as one unit quite easily. I've yet to use a pair of pliers.
I'm using generic PLA too.

If you're using PRUSA slicer there is a new "experimental" feature that they automatically leave on that you have to turn off.
If you go to Print Settings>Support Material>and uncheck the "Don't Support Bridges" box you will get supports under all of the base. You can also confirm this by putting your file on the print bed in the slicer application, Pressing the "Slice Now" button and then rotating the object on screen to see underneath and ensure that the supports are going across the whole bottom, not just the rim.

[attachimg=1]
 

Attachments

  • PRUSA Slicer Settings.jpg
    PRUSA Slicer Settings.jpg
    96 KB · Views: 2,066
The 25x150 Bins came out great.
[attachimg=1]
In the top right I'd note that the nesting tray, with its newly "improved" rim that goes straight to the top, no longer allows the lid of the SYS3 ORG to close! I've edited the original post on this tray.
 

Attachments

  • 25x150 Bins.jpg
    25x150 Bins.jpg
    562.9 KB · Views: 2,230
BK Makes, have you tried using string trimmer line as filament?

Also, any thoughts on the Snapmaker 2.0 A350 ?

I'm looking at the Snapmaker because I would like to have a laser in addition to 3d printing.
 
Bob D. said:
BK Makes, have you tried using string trimmer line as filament?

Also, any thoughts on the Snapmaker 2.0 A350 ?

I'm looking at the Snapmaker because I would like to have a laser in addition to 3d printing.


I have never heard of using string trimmer line as filament! Ha, I'll have to do some googling.

Funny you should mention something capable of laser engraving as I've been looking at laser cutters, I want a higher wattage unit capable of cutting through 1/4" MDF and was considering a Chinese K40, and upgrading it (lots of info on this on the internet, though not without risk) as I don't think a GlowForge would have enough "oomph"/and is pricey for what you get.

That Snapmaker looks pretty clever, though I'd be curious how each function compares to dedicated machines. The price certainly looks good for what you get. A dedicated 3D printer is very inexpensive these days.. a laser engraver, not so much.. so I see where you're coming from..

Just had a read of this, as well: Snapmaker 2.0 Review
 
Thanks for that link to the Snapmaker 2.0 review. Makes me want to hold off for a bit and see if they make any improvements.

Since this would be my first with any of these three I thought the Snapmaker might be a good entry level machine. I had been thinking of a dedicated 3d printer and also a X-Carve Pro 2x4 that I add a 6 watt laser to until I saw the Snapmaker A350.
More money (x3) but better all around and much larger user area for the CNC and laser operations.

Here is a YT video by CNC Kitchen on using trimmer line for 3d printing.
 
Thanks Mino. I've been looking further into the SnapMaker and there is a lot to not like. Biggest worry is lack of support and promises that keep coming but over a year later nothing has materialized. Problems with the bed warping, poor cable connections, and other issues have taken it off my list.

So still looking. I'm focusing on the Avid CNC or X-Carve Pro, both in a 2x4 size I think. Big difference in the price of these two. Just getting started at the details of these two. But that is the topic for another thread, and stop taking this one off course. Sorry.
 
Having fun printing these and other things on my new printer, and just started learning Fusion based on your recommendation.
Any reason why you streamlined the sides, but did not make the bottom simpler? Given that you need to print supports anyways, why not build them into the design? The 25*100 bins would be a lot more stable if more of the wall went all the way to the bottom.
The Boat/Tanos/Festool design is optimized for least plastic when injection molding, but for FDM printing, I think it might want to look a bit different.
Once I make some more progress with F360 I'll give my idea a try, but I'd think it should look more like the negative of the floor puzzle.
Also, you could make the bases wider for a tiny bit more capacity.
 
Since there is lots of bin measuring in this topic I figured I'd ask here .....................

      Festool gives the height of the bins as 68mm. Is that inside the bin, outside the bin, including feet excluding feet? I want to know the actual usable height of the inside of the M/L89 Organizer Sys.  Trying to figure if it will work for something else.

Seth
 
SRSemenza said:
Since there is lots of bin measuring in this topic I figured I'd ask here .....................

      Festool gives the height of the bins as 68mm. Is that inside the bin, outside the bin, including feet excluding feet? I want to know the actual usable height of the inside of the M/L89 Organizer Sys.  Trying to figure if it will work for something else.

Seth

Are you looking for the usable height of the interior in the case that you were to load something large and flat inside of it that was resting on and/or impinged by the bottom and top grids?
 
squall_line said:
SRSemenza said:
Since there is lots of bin measuring in this topic I figured I'd ask here .....................

      Festool gives the height of the bins as 68mm. Is that inside the bin, outside the bin, including feet excluding feet? I want to know the actual usable height of the inside of the M/L89 Organizer Sys.  Trying to figure if it will work for something else.

Seth

Are you looking for the usable height of the interior in the case that you were to load something large and flat inside of it that was resting on and/or impinged by the bottom and top grids?

    Yes. 

Seth
 
SRSemenza said:
squall_line said:
SRSemenza said:
Since there is lots of bin measuring in this topic I figured I'd ask here .....................

      Festool gives the height of the bins as 68mm. Is that inside the bin, outside the bin, including feet excluding feet? I want to know the actual usable height of the inside of the M/L89 Organizer Sys.  Trying to figure if it will work for something else.

Seth

Are you looking for the usable height of the interior in the case that you were to load something large and flat inside of it that was resting on and/or impinged by the bottom and top grids?

    Yes. 

Seth

The bin's exterior is 68mm high.
But the squares on the bottom of the organizer stick up 5mm, and the retaining squares on the lid stick down 2.5mm
Doing the math, you should be able to stick a large item 60.5mm tall inside the organizer.
I can only tell from inference, because it is really hard to measure the container when it is closed!
 
Back
Top