You are using an out of date browser. It may not display this or other websites correctly.
You should upgrade or use an alternative browser.
You should upgrade or use an alternative browser.
Underbench cabinet
- Thread starter derekcohen
- Start date
derekcohen
Member
- Joined
- Jun 22, 2008
- Messages
- 1,060
These are final pictures of Stage One. "Stage One" - what does that mean? Well, the first step is to build the cabinet under the bench. The second stage will be to fit out the drawers for the tools. I plan to do some of the latter shortly, and some later. I will post these as they are done. For now, here is the underbench cabinet ...
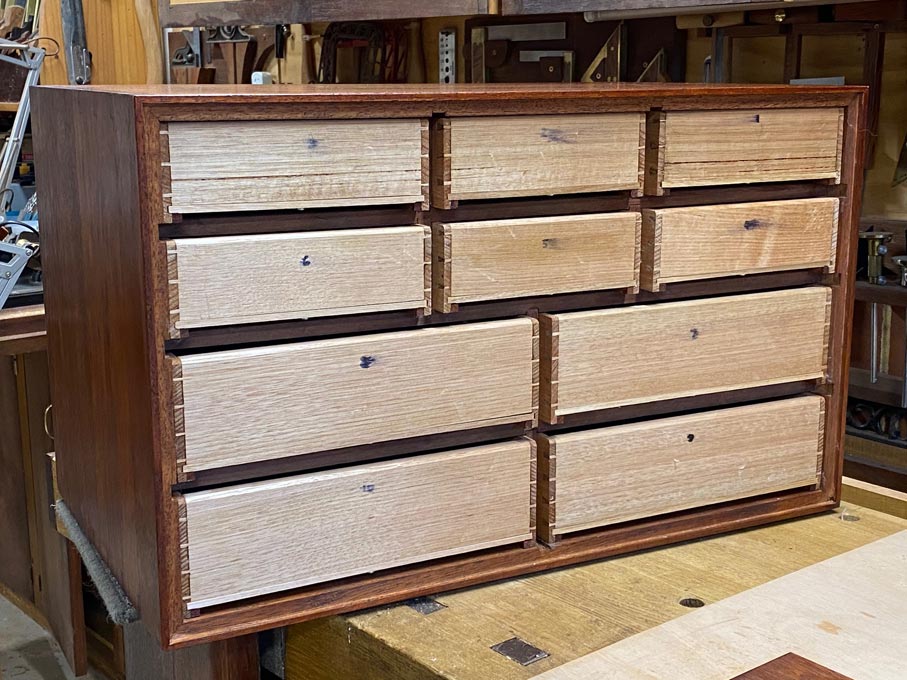
The rear, before the back was installed ...
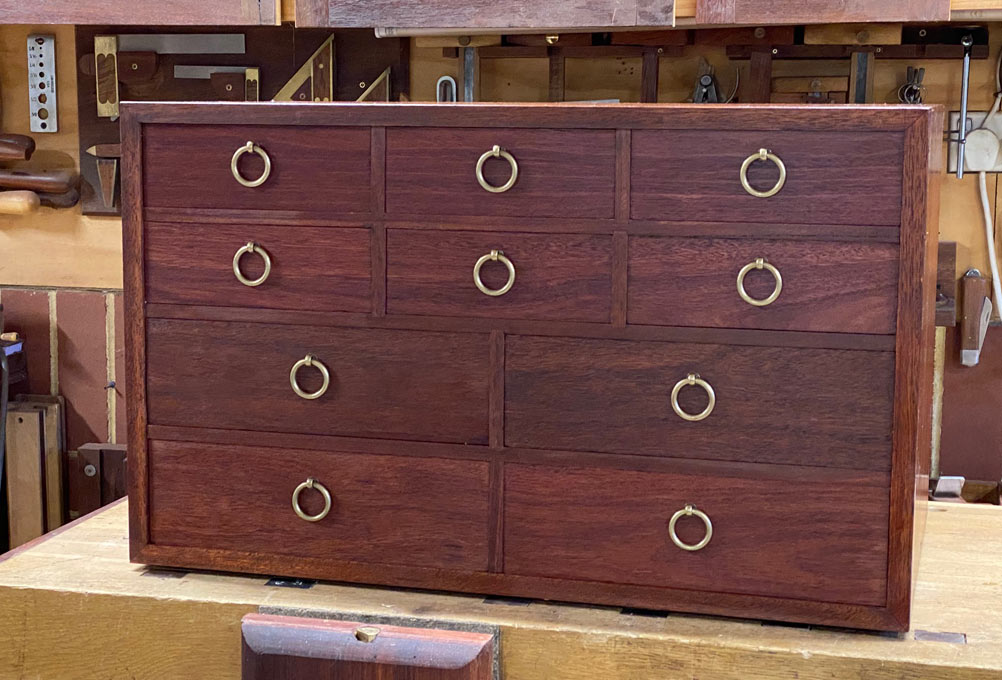
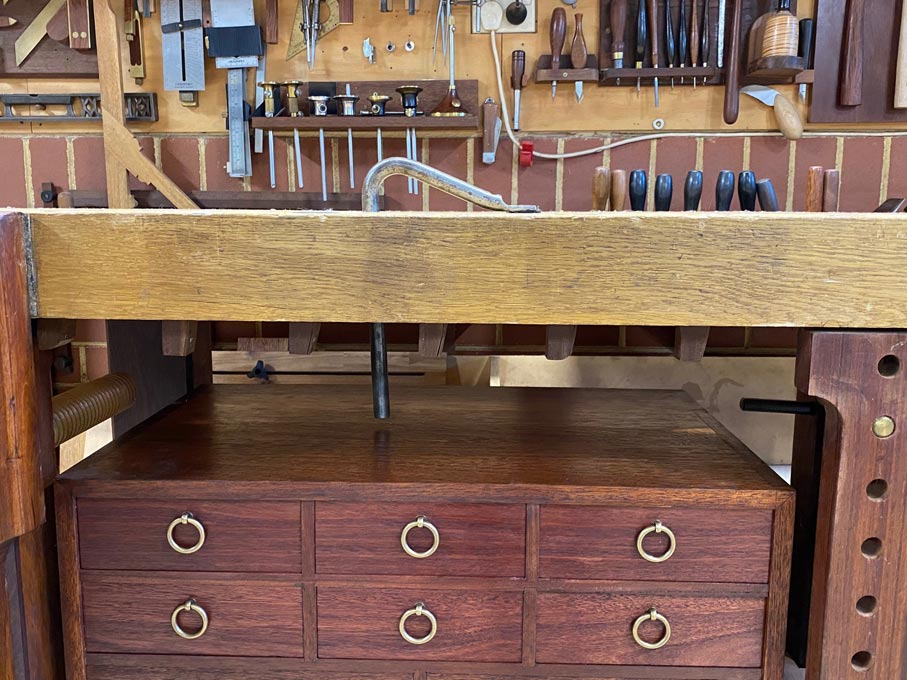
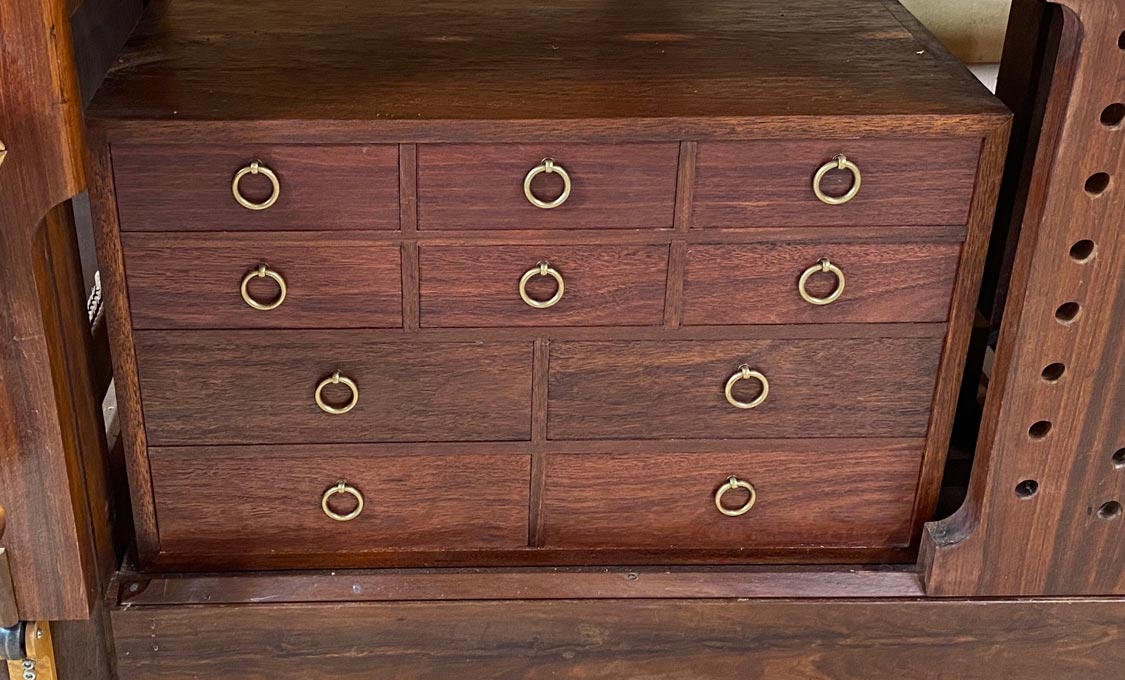
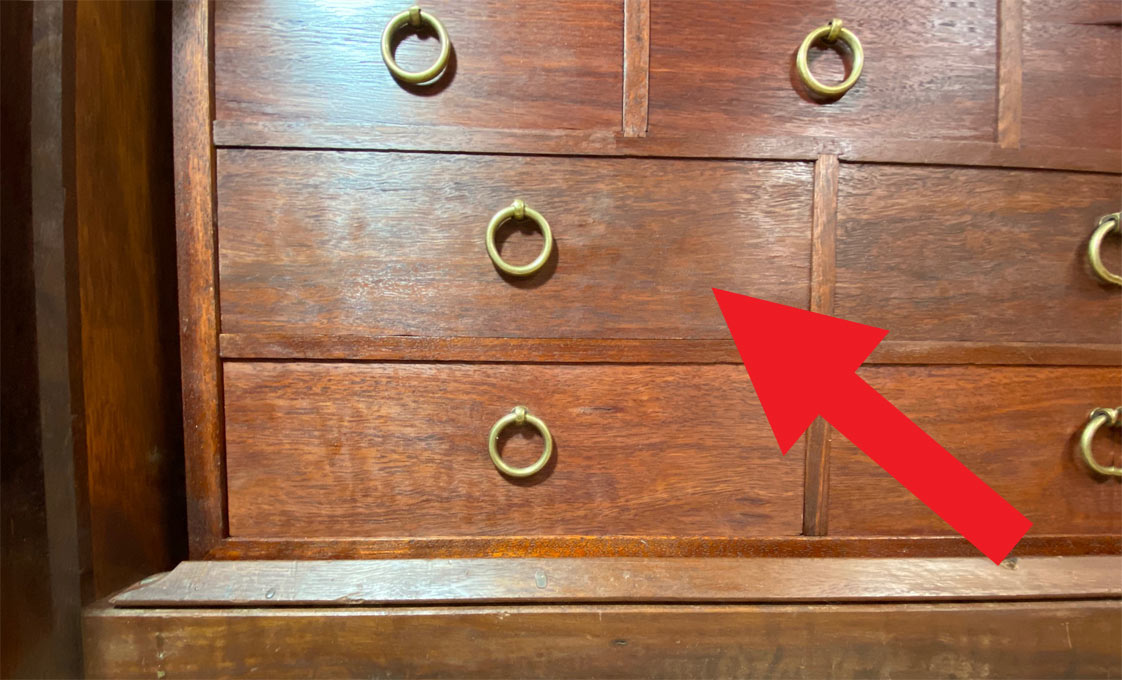
The front. The ring pulls are antiqued brass (they are not shiny). I need to work them a little more to remove the still-new look. These were chosen as they drop down and do not project out from the front of the cabinet ...
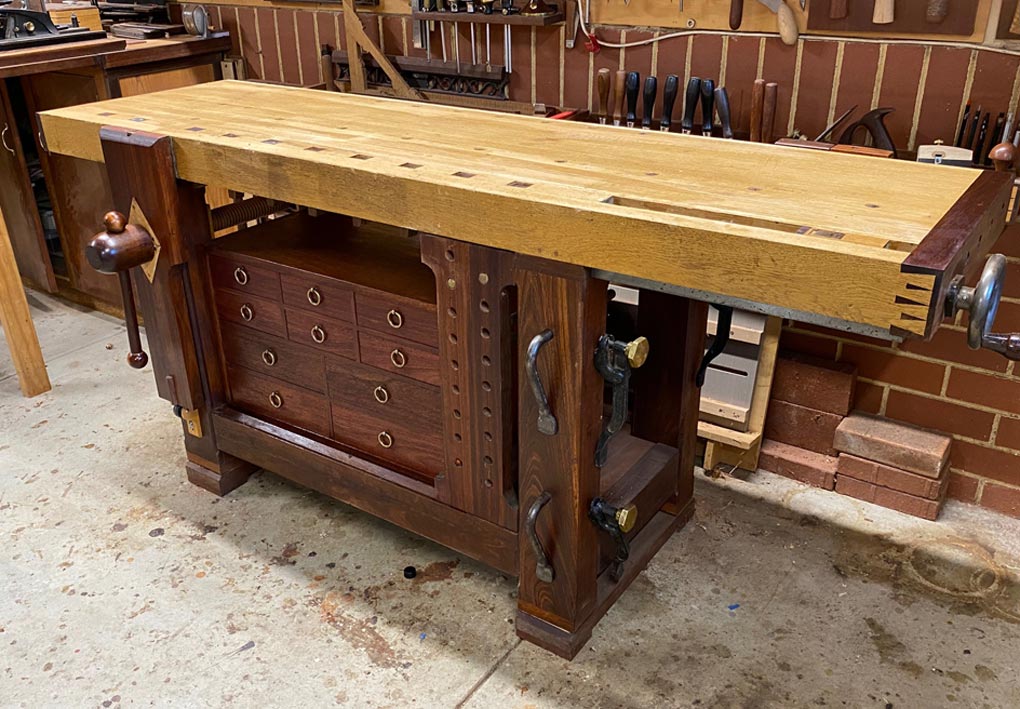
Under the bench ...
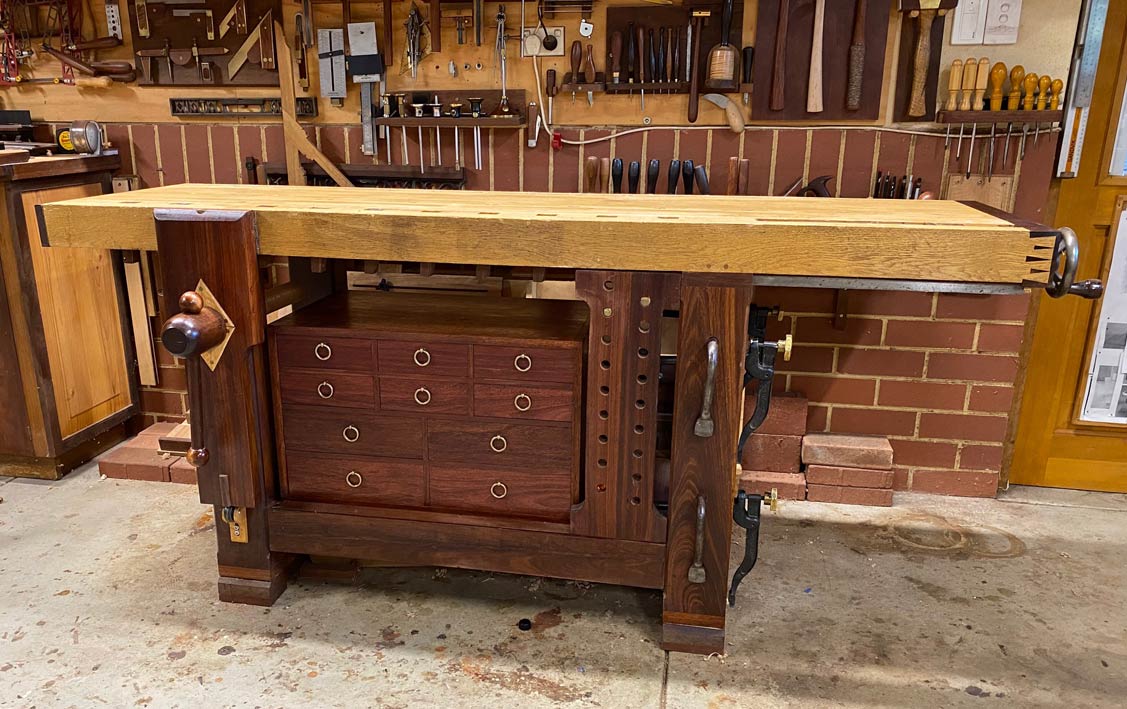
The bench top received a little flattening, and a single coat of danish oil ...
Someone is sure to ask why the cabinet is low. The answer is that there needs to be space for hold downs ...
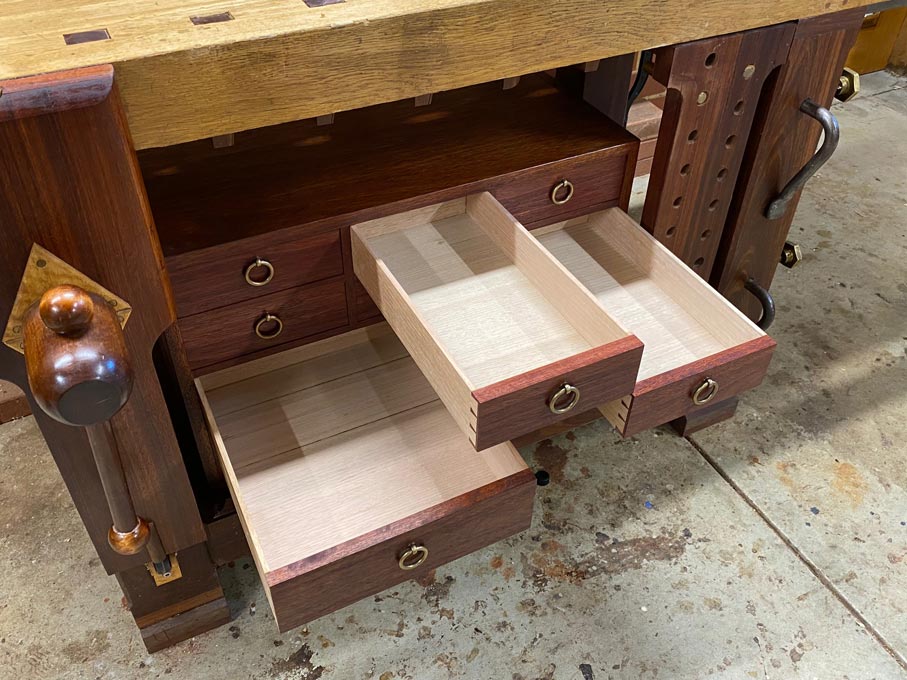
The drawers manage about 90% extension ...
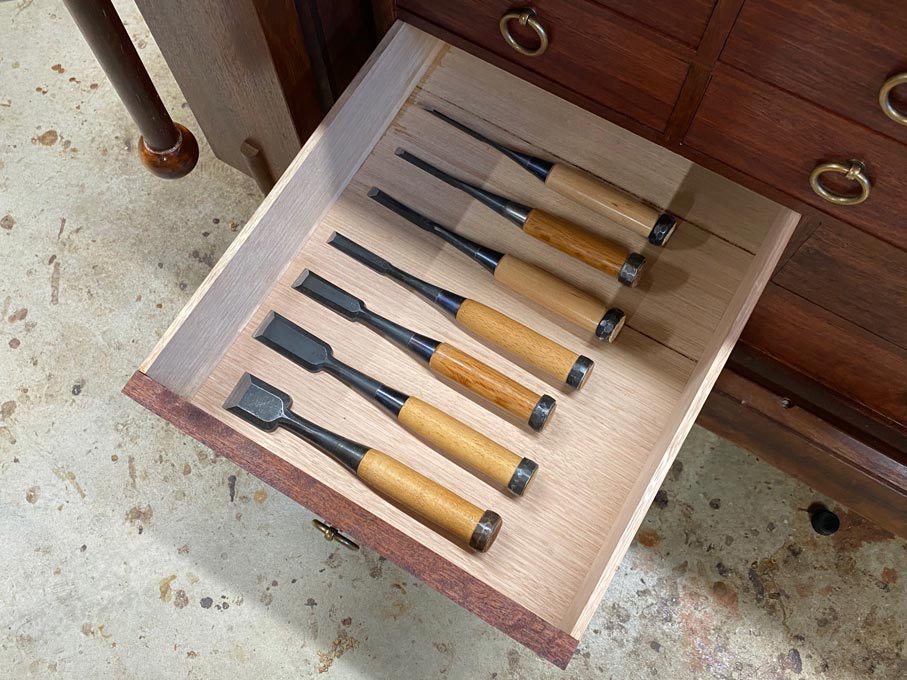
One of the first fit outs will involve this set of Kiyohisa bench chisels I have been collecting one-by-one (these are no longer available) ...
And here is one of the small drawers ...
Thanks for supporting the build to date. Hopefully there were some aspects that will prove helpful.
Regards from Perth
Derek
The rear, before the back was installed ...
The front. The ring pulls are antiqued brass (they are not shiny). I need to work them a little more to remove the still-new look. These were chosen as they drop down and do not project out from the front of the cabinet ...
Under the bench ...
The bench top received a little flattening, and a single coat of danish oil ...
Someone is sure to ask why the cabinet is low. The answer is that there needs to be space for hold downs ...
The drawers manage about 90% extension ...
One of the first fit outs will involve this set of Kiyohisa bench chisels I have been collecting one-by-one (these are no longer available) ...
And here is one of the small drawers ...
Thanks for supporting the build to date. Hopefully there were some aspects that will prove helpful.
Regards from Perth
Derek
nclemmons
Member
Very nice work, Derek! Appreciate the level of detail and your time in sharing it!
Michael Kellough
Member
This must be one of the finest utility cabinets ever made. Unobtrusive yet superb.
Thanks for sharing the process.
Thanks for sharing the process.
derekcohen
Member
- Joined
- Jun 22, 2008
- Messages
- 1,060
What lies behind drawer #1?
The underbench cabinet is done ....
... and now the drawers are being filled, starting with the centre drawer in the top row.
There are 10 drawers in all, and the aim is to use the space as efficiently as possible. Into this cabinet will be those tools I want close at hand, and to access readily.
The centre drawers in the top two rows are for marking tools. The top drawer will be for squares I use all the time.
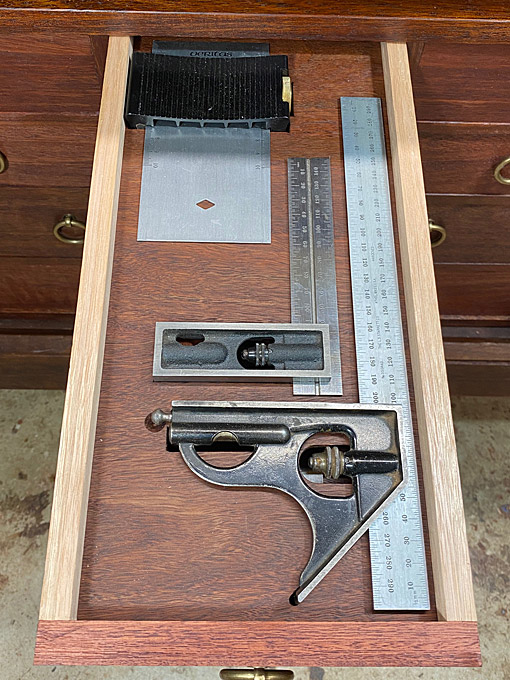
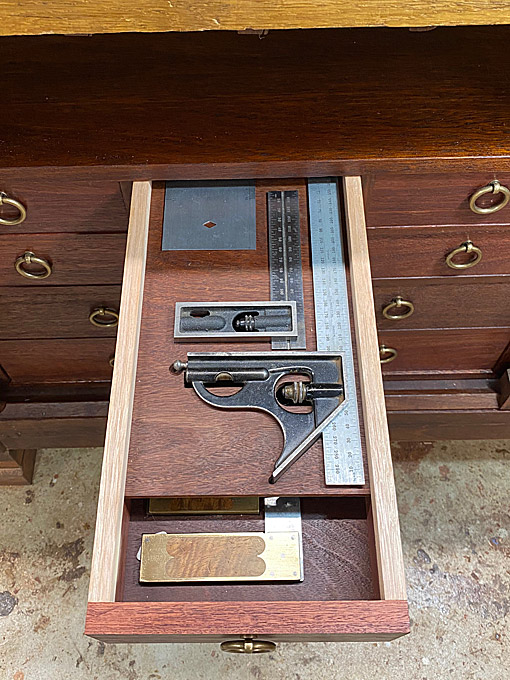
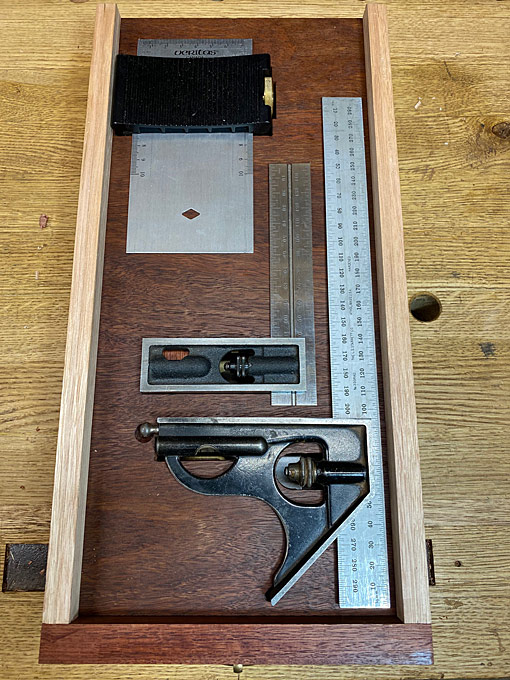
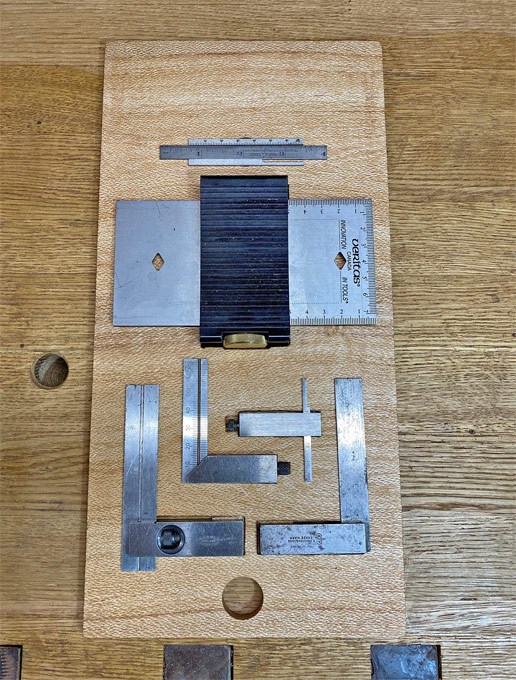
Opening the drawer produces a 300mm Starrett combination square, a 150mm Starrett double square, and a Veritas Sliding Square. these are french fitted into a Jarrah panel (more on the french fitting shortly). ...
Now you know how I like secret drawers") - well, if you slide this panel back ...
- well, if you slide this panel back ...
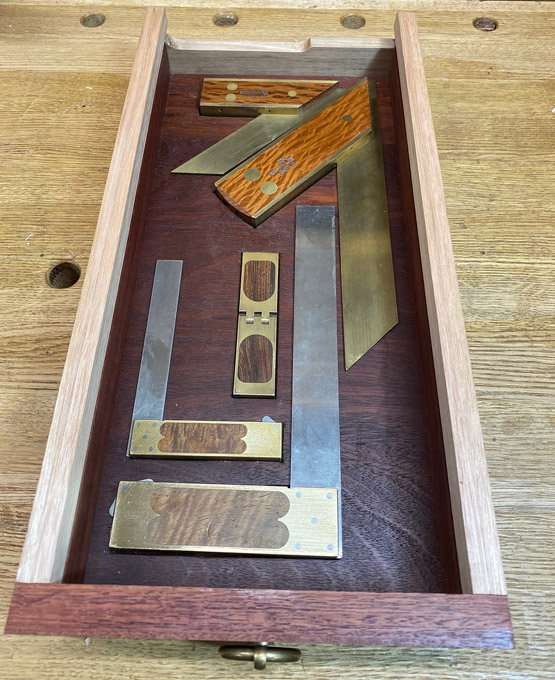
... you find the treasure drawer with a pair of Colen Clenton mitre squares infilled in Sheoak, and pair of Chris Vesper 4" and 7" squares infilled in Tasmanian Blackwood, and a 2x2" Bridge City saddle square ...
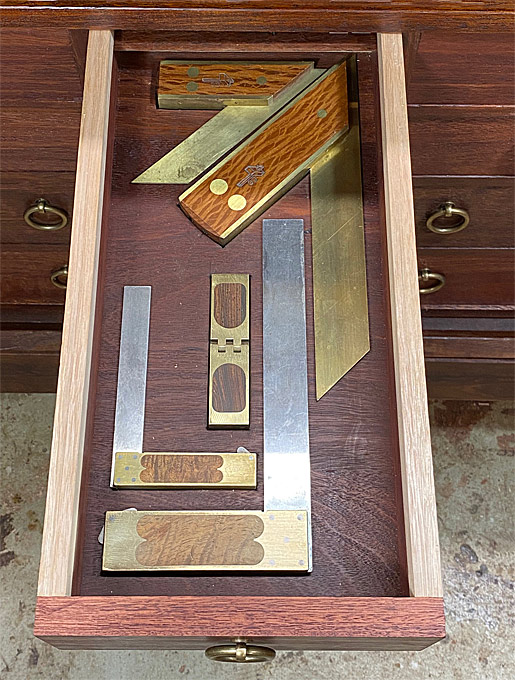
The Jarrah panel for the latter squares is a loose fit, snug at the sides and about 5mm of expansion space at the end. At the right side of the photo are the rails, which were glued to the sides (but not the loose panel)
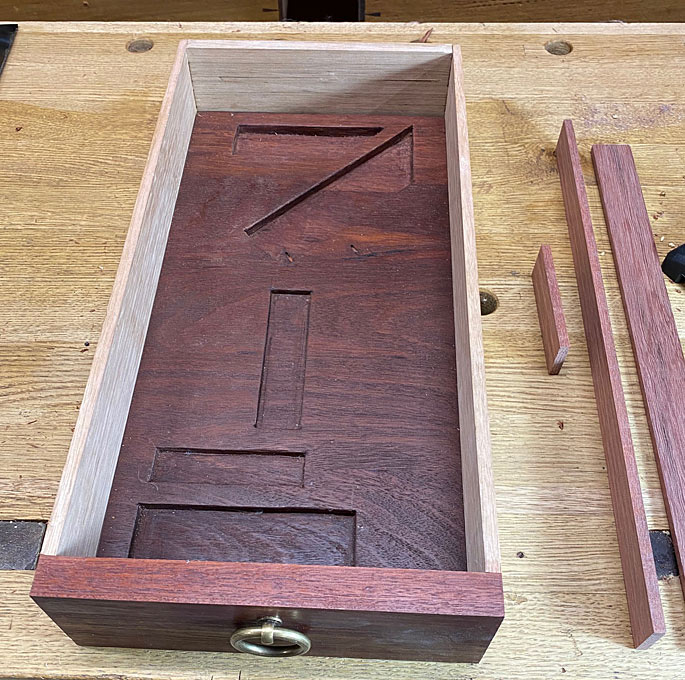
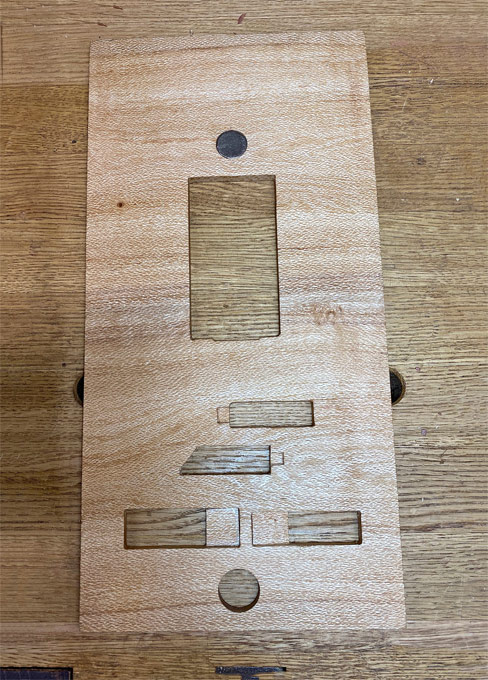
Below is the upper panel for the Starretts and Veritas squares. The panel needed to be thin - it is 6mm thick - and cut outs made rather than french fitted. This was to save space by having the tools handing down rather than sticking up.
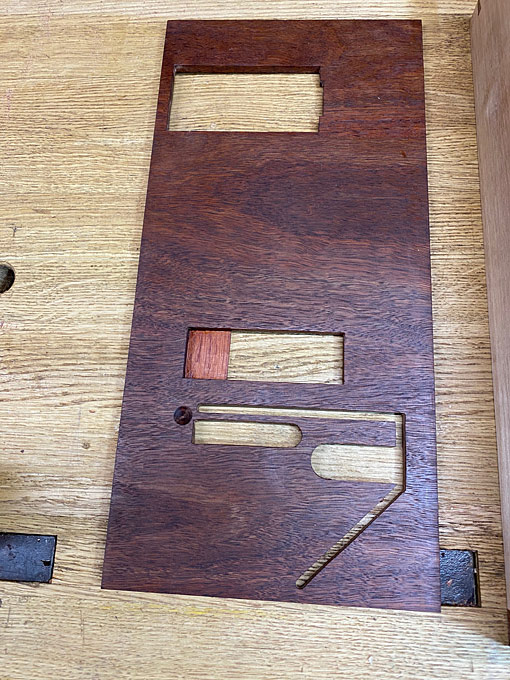
The eagle eyed will have noticed that the rear of the drawer was cut away. This was to allow for the upper tray to slide past the drawer back, which takes advantage of the space behind the drawer when it is opened.
There was a little extra shaping as the body of the Veritas hung down lower than the other squares.
The upper tray runs on the Jarrah rails attached to the inside of the drawer sides. Finally, there is a rail added above the tray to prevent it tipping as it is slid back. This is in the same Tasmanian Oak as the drawer sides.
The drawer manages about 90% extension without any support.
Regards from Perth
Derek
The underbench cabinet is done ....
... and now the drawers are being filled, starting with the centre drawer in the top row.
There are 10 drawers in all, and the aim is to use the space as efficiently as possible. Into this cabinet will be those tools I want close at hand, and to access readily.
The centre drawers in the top two rows are for marking tools. The top drawer will be for squares I use all the time.
Opening the drawer produces a 300mm Starrett combination square, a 150mm Starrett double square, and a Veritas Sliding Square. these are french fitted into a Jarrah panel (more on the french fitting shortly). ...
Now you know how I like secret drawers
- well, if you slide this panel back ...
... you find the treasure drawer with a pair of Colen Clenton mitre squares infilled in Sheoak, and pair of Chris Vesper 4" and 7" squares infilled in Tasmanian Blackwood, and a 2x2" Bridge City saddle square ...
The Jarrah panel for the latter squares is a loose fit, snug at the sides and about 5mm of expansion space at the end. At the right side of the photo are the rails, which were glued to the sides (but not the loose panel)
Below is the upper panel for the Starretts and Veritas squares. The panel needed to be thin - it is 6mm thick - and cut outs made rather than french fitted. This was to save space by having the tools handing down rather than sticking up.
The eagle eyed will have noticed that the rear of the drawer was cut away. This was to allow for the upper tray to slide past the drawer back, which takes advantage of the space behind the drawer when it is opened.
There was a little extra shaping as the body of the Veritas hung down lower than the other squares.
The upper tray runs on the Jarrah rails attached to the inside of the drawer sides. Finally, there is a rail added above the tray to prevent it tipping as it is slid back. This is in the same Tasmanian Oak as the drawer sides.
The drawer manages about 90% extension without any support.
Regards from Perth
Derek
AlexThePalex
Member
- Joined
- Nov 12, 2008
- Messages
- 7,757
Truly amazing work, Derek, you're a regular old-fashioned master carpenter.
derekcohen
Member
- Joined
- Jun 22, 2008
- Messages
- 1,060
Drawer #2 - the skeleton drawer [eek]

Here is the second drawer to be filled ...
Why "Skeleton Drawer"? Well, it does not contain dark secrets, buried bodies, or other clandestine material
It is just the name I have given to the drawer design since, unlike Drawer #1, which hid a jewellery layer, this discloses all from the outset.
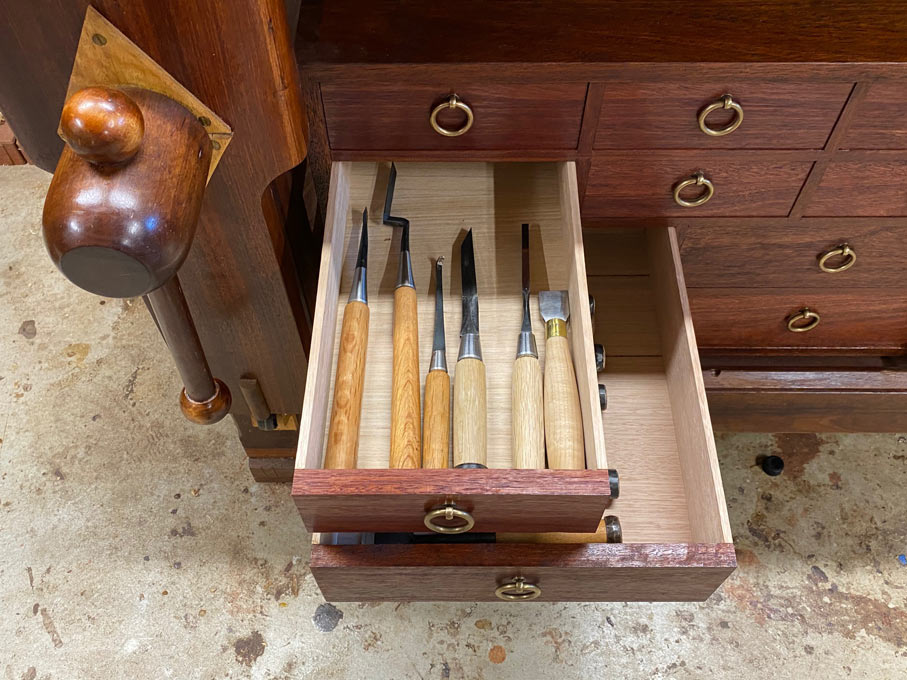
The drawer holds my Kiyohisa chisels: paring slicks and bench oire nomi. It is important to be able to find, and extract them easily when working at the bench.
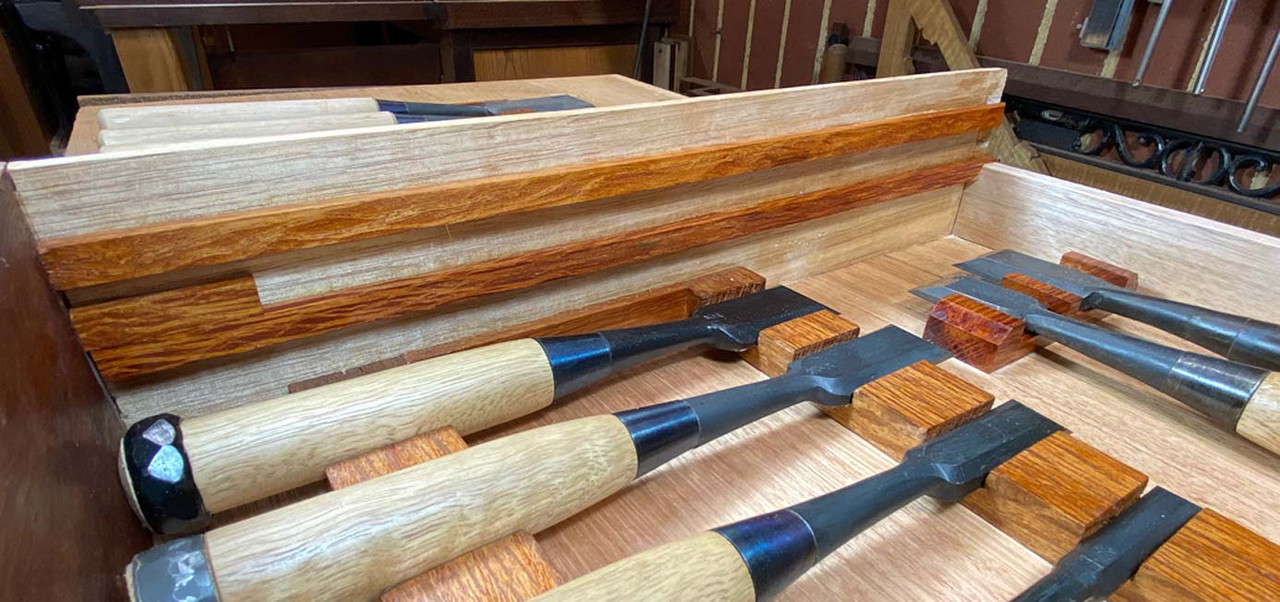
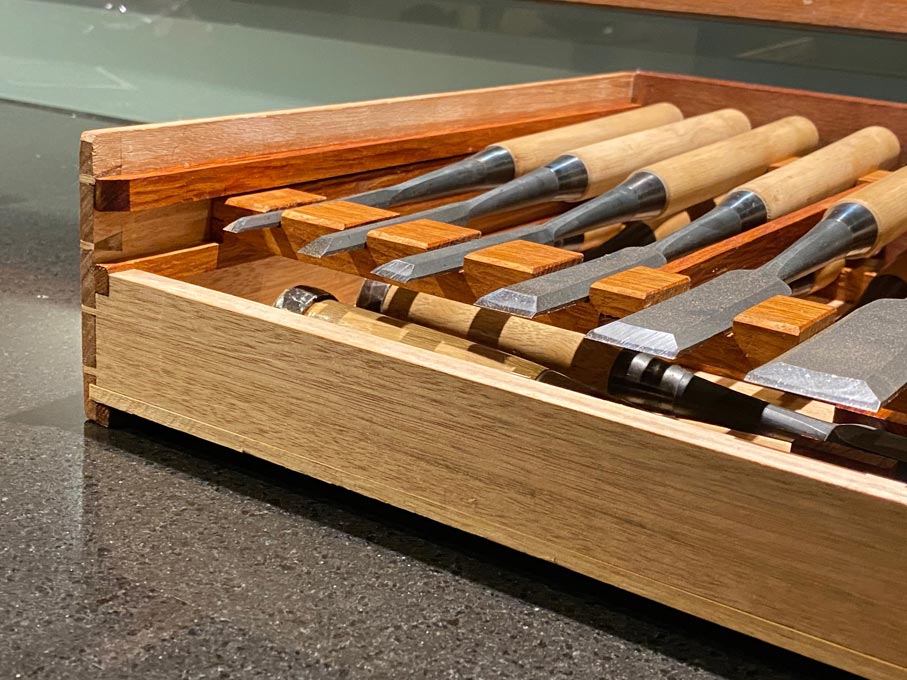
The paring chisels lie in the upper level ...

These slide into the cabinet and, below, are the oire nomi (3mm through 30mm) ...
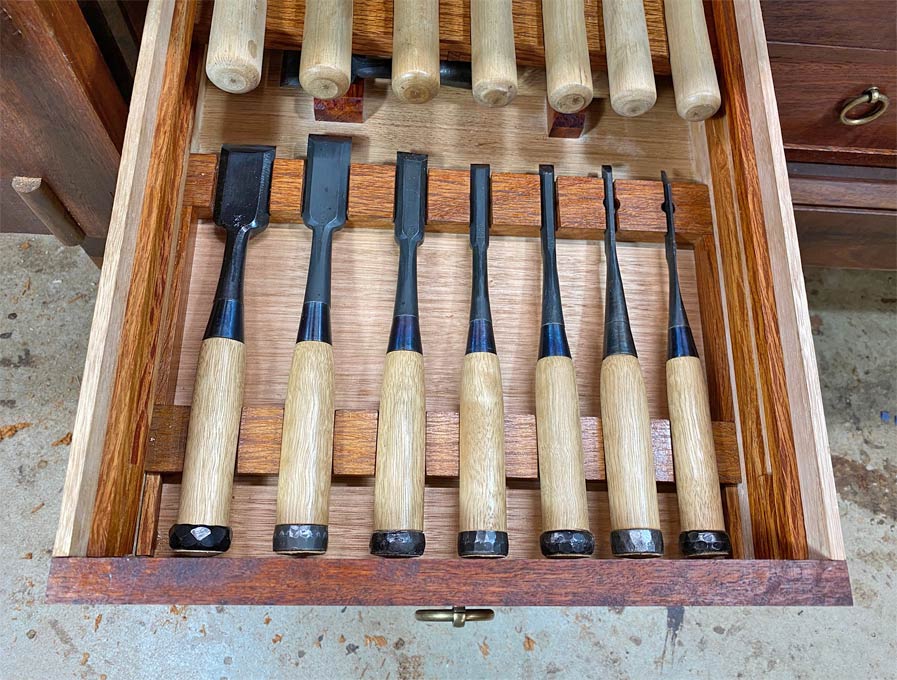
There are two others at the rear, a second 30mm and a 36mm ...
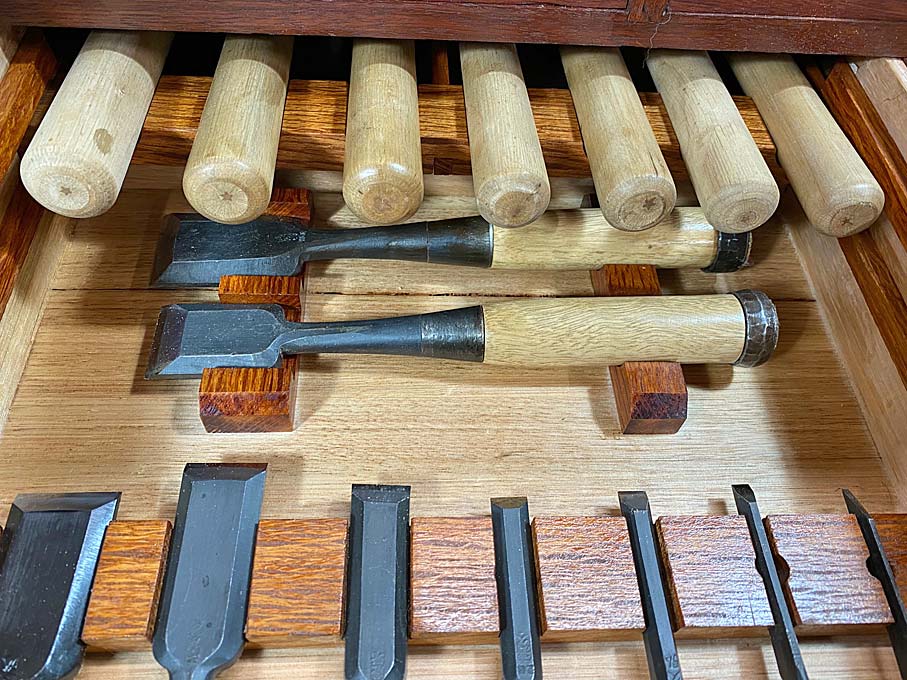
This is a clearer presentation ...
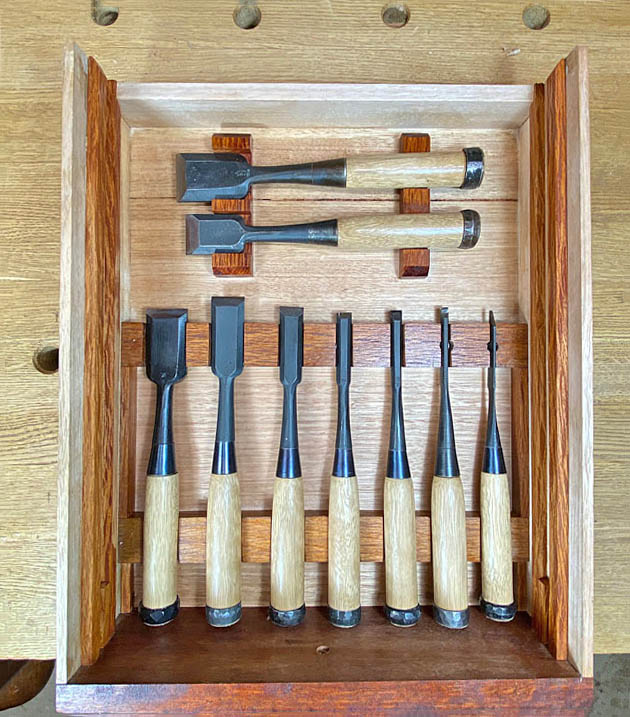
The chisels lie on shaped rests. The blades lie on rare earth magnets, which prevent them moving from the rests when the drawer is opened and shut, or the top layer extended into the cabinet ...
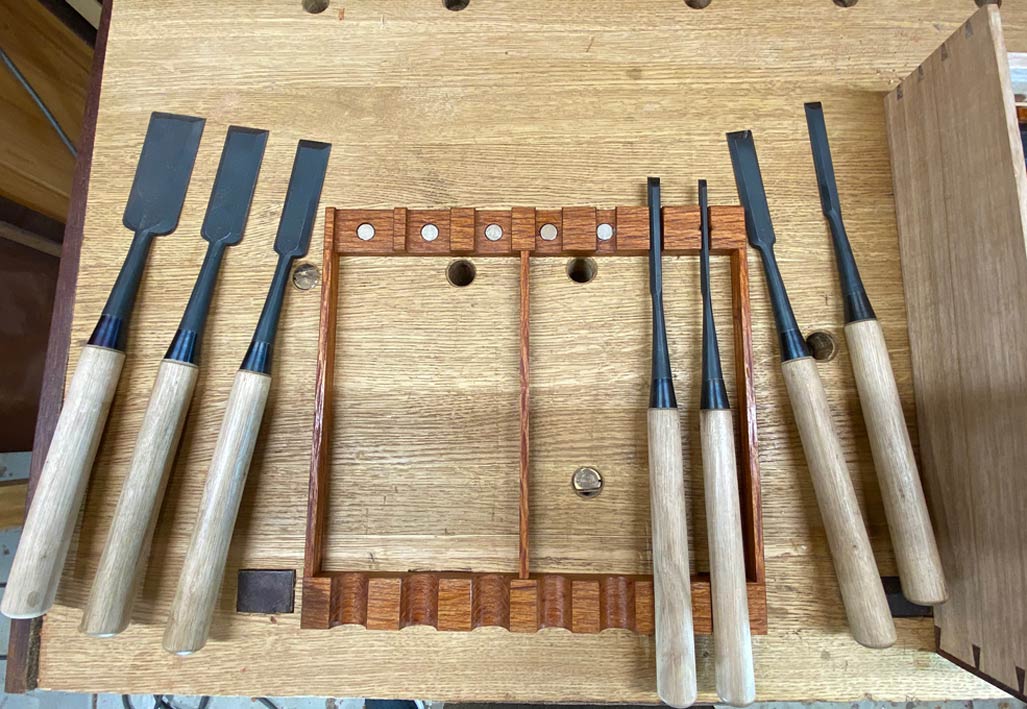
The wood used for the rests and the slide is West Australian Sheoak ...
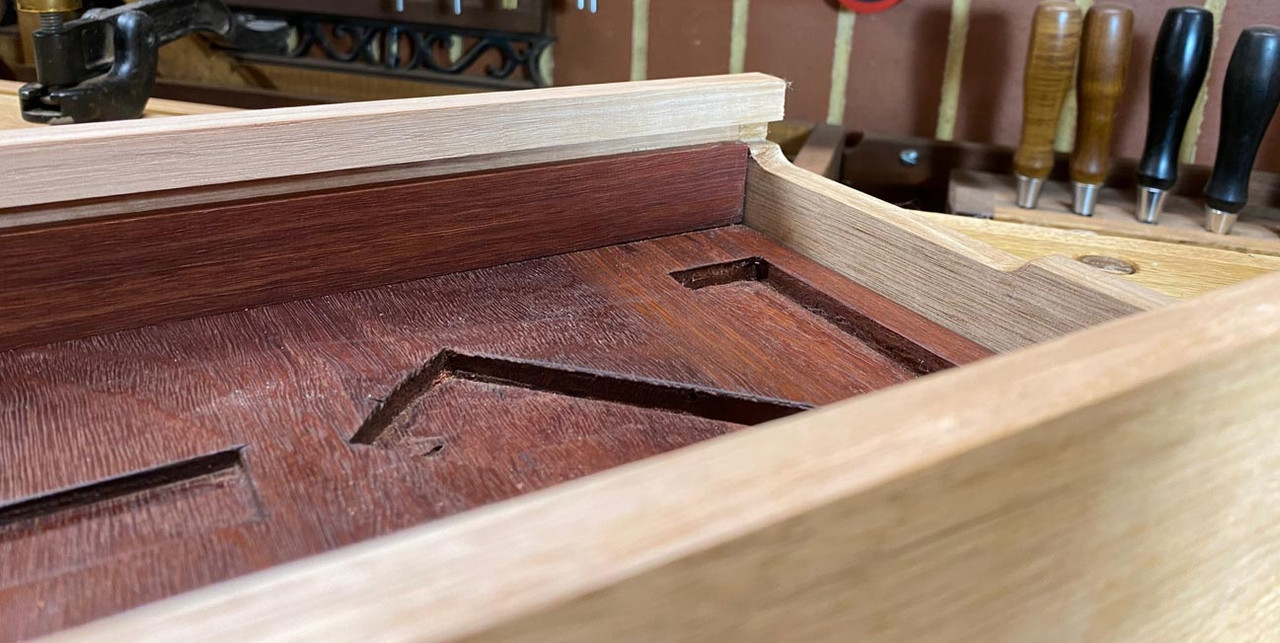
The rear of the drawer, the drawer back, has been cut away above the second dovetail. This is how the the top layer slides into the cabinet ...
I trust you are finding this fun as well
Regards from Perth
Derek
Here is the second drawer to be filled ...
Why "Skeleton Drawer"? Well, it does not contain dark secrets, buried bodies, or other clandestine material
It is just the name I have given to the drawer design since, unlike Drawer #1, which hid a jewellery layer, this discloses all from the outset.
The drawer holds my Kiyohisa chisels: paring slicks and bench oire nomi. It is important to be able to find, and extract them easily when working at the bench.
The paring chisels lie in the upper level ...
These slide into the cabinet and, below, are the oire nomi (3mm through 30mm) ...
There are two others at the rear, a second 30mm and a 36mm ...
This is a clearer presentation ...
The chisels lie on shaped rests. The blades lie on rare earth magnets, which prevent them moving from the rests when the drawer is opened and shut, or the top layer extended into the cabinet ...
The wood used for the rests and the slide is West Australian Sheoak ...
The rear of the drawer, the drawer back, has been cut away above the second dovetail. This is how the the top layer slides into the cabinet ...
I trust you are finding this fun as well
Regards from Perth
Derek
hdv
Member
This thread is pure entertainment to me! Plus part education (thanks for showing in detail how you approach your projects) and part envy (both for the beautiful chisels and the workmanship). No telly show that even comes close!
And for all of the explanations THANK YOUhdv said:This thread is pure entertainment to me! Plus part education (thanks for showing in detail how you approach your projects) and part envy (both for the beautiful chisels and the workmanship). No telly show that even comes close!
Tinker
Vondawg
Member
Yes! We are fortunate to be able to look over your shoulder, thanks to your master workmanship and you documenting it....thank you!
derekcohen
Member
- Joined
- Jun 22, 2008
- Messages
- 1,060
Drawers 3 and 4
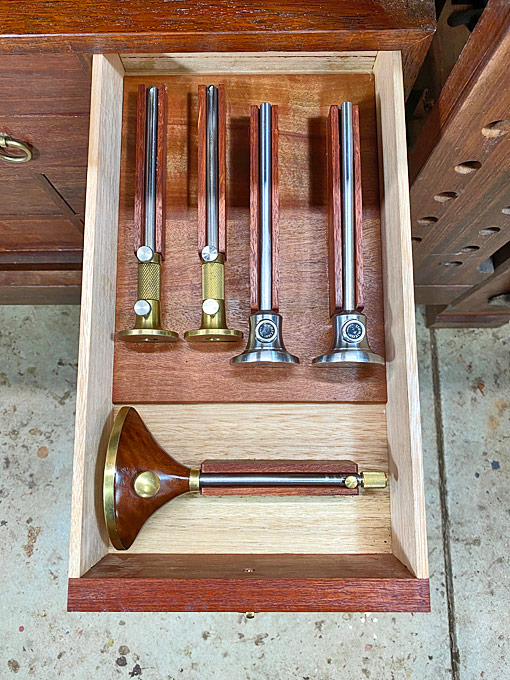
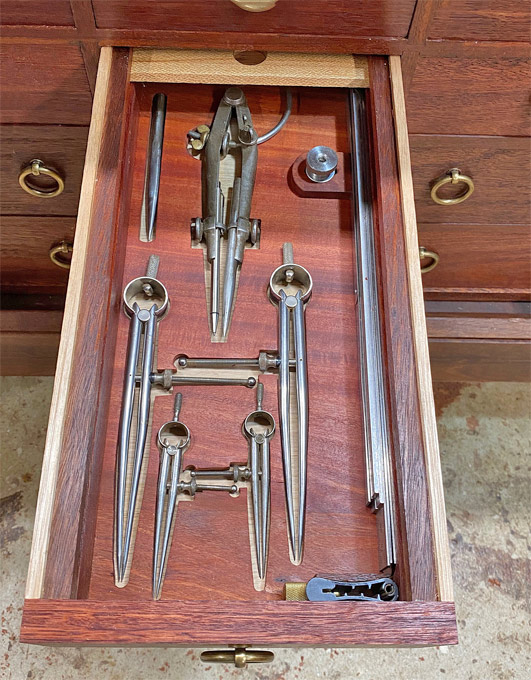
Moving across to top right. This is a drawer for wheel cutting gauges ...
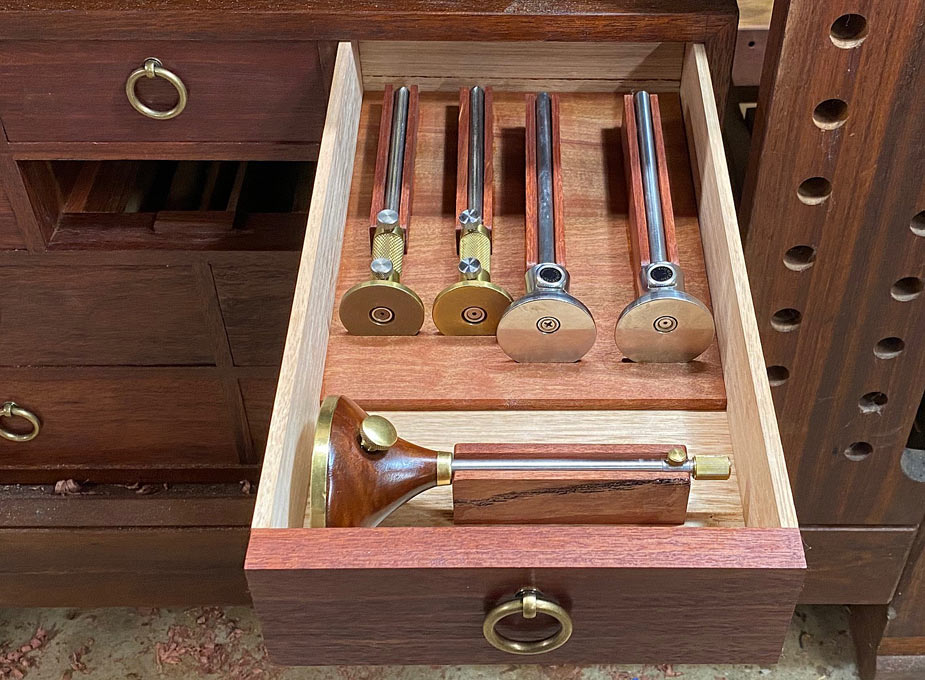
I went through many ideas before coming up with this design. Simple, but effective for access and keeping the gauges from moving around.
Two Tite Marks with fine adjusters and two Veritas gauges (these were a steal several years ago - Anniversary gauges in stainless steel. Brilliant!). The gauge at the front is one I built. My idea of Veritas-going-Japanese
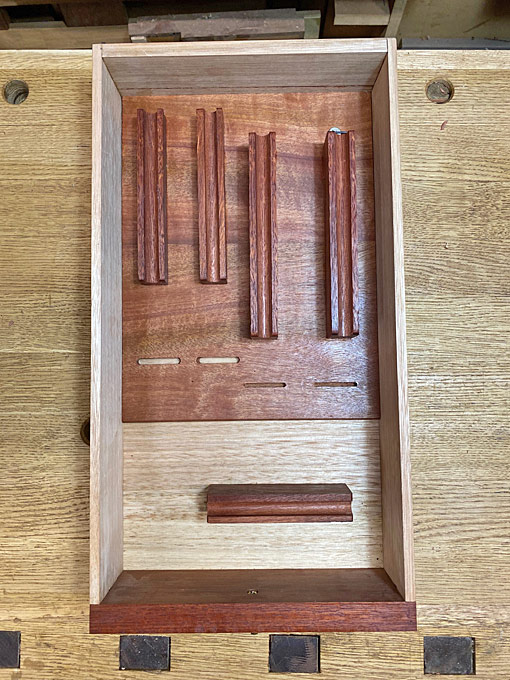
Everything is removable. The slots for the arms were made with a fluting blade in a Veritas Combination Plane ...

Drawer #4 was much more work. Much more.
This is the middle drawer, second row. The drawer above holds large squares. This drawer holds more squares, small ones for joinery ....
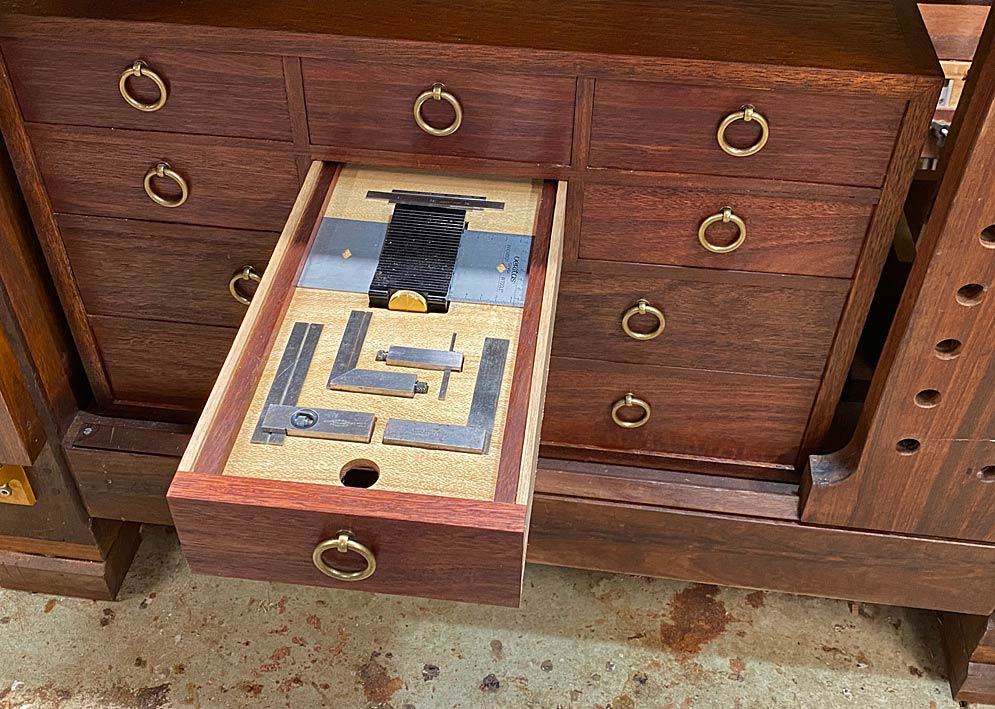
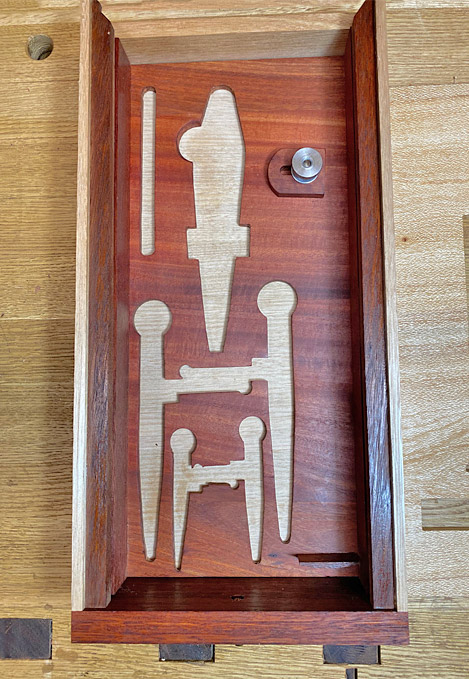
The only way to keep these from moving around in a drawer is to french fit them ...
The little "dot" at the top end is a rare earth magnet. This is to keep extra blades (for the squares) from getting lost.
This is where I moved the Veritas sliding square. There is a Vesper small double square along with a similar Starrett. These are so useful for checking dovetail sockets. Below is my favourite double square, a 4" Moore & Wright, along with a 4" vintage Browne & Sharpe machinist square.
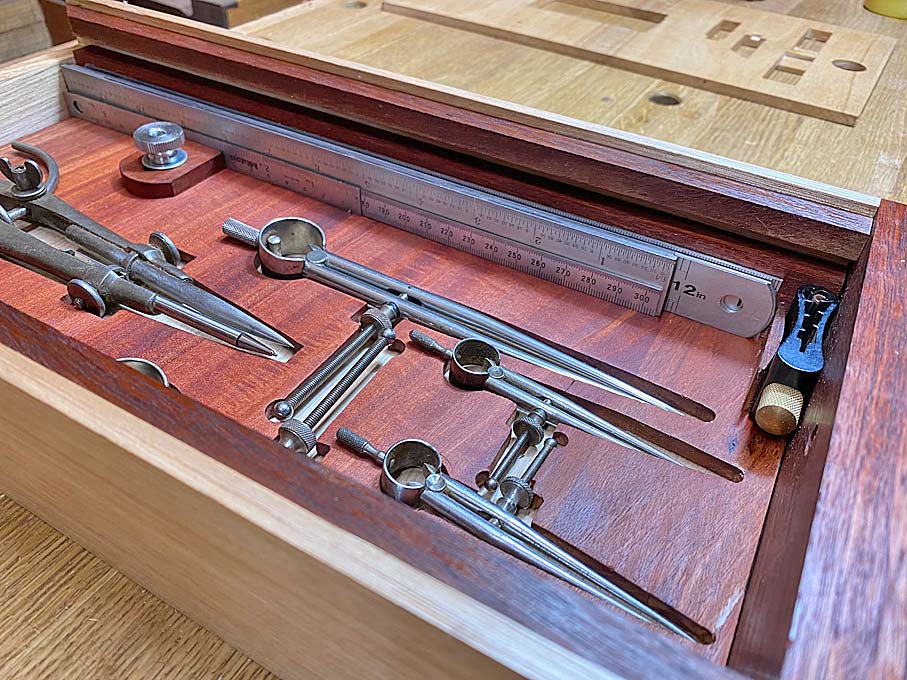
Now slide the top tray away, and below are large and small Starrett dividers, and a vintage Starrett compass ...
Again french fit to prevent any sliding around ...
I managed to get all these rules inside the drawer - Starrett and Mitutoyo in metric and imperial ...
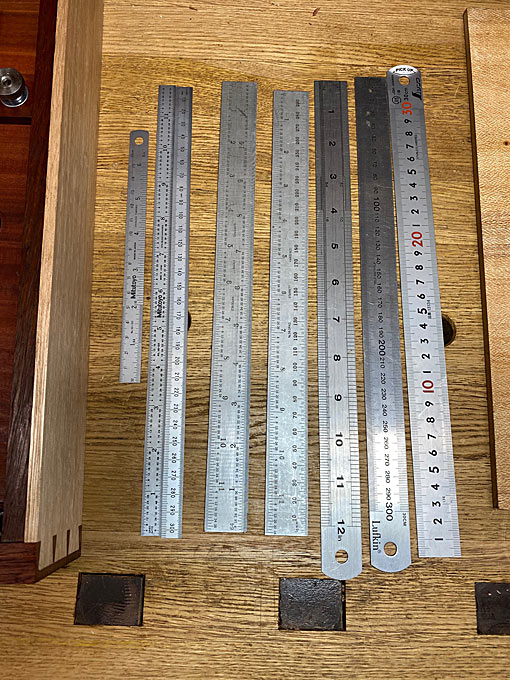
Easier to stack them this way ...
Two more drawers, and I am going to call it quits for a while. Lynndy has orders for night stands.
I hope you are still having fun!
Regards from Perth
Derek
Moving across to top right. This is a drawer for wheel cutting gauges ...
I went through many ideas before coming up with this design. Simple, but effective for access and keeping the gauges from moving around.
Two Tite Marks with fine adjusters and two Veritas gauges (these were a steal several years ago - Anniversary gauges in stainless steel. Brilliant!). The gauge at the front is one I built. My idea of Veritas-going-Japanese
Everything is removable. The slots for the arms were made with a fluting blade in a Veritas Combination Plane ...
Drawer #4 was much more work. Much more.
This is the middle drawer, second row. The drawer above holds large squares. This drawer holds more squares, small ones for joinery ....
The only way to keep these from moving around in a drawer is to french fit them ...
The little "dot" at the top end is a rare earth magnet. This is to keep extra blades (for the squares) from getting lost.
This is where I moved the Veritas sliding square. There is a Vesper small double square along with a similar Starrett. These are so useful for checking dovetail sockets. Below is my favourite double square, a 4" Moore & Wright, along with a 4" vintage Browne & Sharpe machinist square.
Now slide the top tray away, and below are large and small Starrett dividers, and a vintage Starrett compass ...
Again french fit to prevent any sliding around ...
I managed to get all these rules inside the drawer - Starrett and Mitutoyo in metric and imperial ...
Easier to stack them this way ...
Two more drawers, and I am going to call it quits for a while. Lynndy has orders for night stands.
I hope you are still having fun!
Regards from Perth
Derek
rmhinden
Member
Very impressive as usual!
Bob
Bob
derekcohen
Member
- Joined
- Jun 22, 2008
- Messages
- 1,060
Drawers #5, 6 and 7
[Drawer #5: french fitted sliding bevels (Shinwa, Stanley and Chris Vesper) ...

Drawer #6:
This one is about the tools ... just because I think that they are beautiful, and I love using them. They give me joy.
All the tools in this cabinet have a story, or a connection. This is one of the reasons I keep them, even though I do not "need" them as I have others. All get used. In the case of the chisels in this drawer, they are my go-to for dovetails and close-up detail work. Mainly because they are all fully bevelled at the sides and have minimal lands. In spite of the absence of hoops, all may be used with mallet. The condition here being that the mallet head is UHMW. This is firm for feedback but yielding to avoid damage.
This is another skeleton drawer. The top tray are home to Veritas PM-V11 chisels. Most here are aware that I have road-tested tools for Lee Valley (Veritas) for many years. Not only are these just superb chisels, but I like the way they feel in the hand, particularly the smaller sizes. For dovetails, these run 1/8" upwards to 1".

The five on the left have custom Ebony handles (they are also round and not shaped with flats). The far right is a fishtail I made from a spare (pre-production) 3/8" chisel. I am sure that Veritas will have fishtails for sale at some stage. This is my design, not theirs (I have no idea what they have in mind).
The lower tray house Blue Spruce dovetail/detail chisels. This was the first set of premium chisels I purchased. Dave Jeske had just begun making them, and I was one of the first to order. In fact, the 3/4" (which is the largest size here) was the first made. I asked Dave for a 3/4". He had made 2, one for another order, and sent me the spare. I sent it back. His idea at the time was to make the steel thicker as the chisels became wider, and the one he sent was 3/16" thick. It felt heavy and clumsy. I requested 1/8", and that is what che then made for me.
My one concern about the chisels, prior to purchase, was that they are A2 steel, and that, for paring, a 30 degree bevel might not be ideal. Then it dawned on me that all the Japanese chisels I had were 30 degrees ... These blades get very sharp. They do not hold an edge as long as PM-V11, and need to be honed more frequently. But that does not detract from the absolute pleasure in using them.

These are light blades in beautiful African Blackwood handles. Sized 1/8", 3/16" and up to 3/4". There are two 1/4" skew chisels. I nagged Dave to make a fishtail, but he was skeptical there was an advantage over the skews (there is indeed a big advantage when cleaning out socket corners). Later he did make them, and I chanced on a sale of tools at a deceased estate in Oz. They had not been used, which brought me some sadness for the previous owner.
Drawer #7. Here is another drawer holding cutting and marking gauges.
This is a drawer intended to be dedicated to wooden mortice and cutting gauges, but does have two wheel gauges that could not be fitted elsewhere.
The mortices gauges fall into these three types ...

Veritas Dual Marking Gauge, Kinshiro, and one of my designs.
The Kinshiro is my absolute favourite, and I was gifted one several years ago (thanks Wiley!). Found another about a year back. They are no longer made by Kinshiro, and no longer available. I have made a number of single-blade cutting gauges in a similar manner to these double-blade gauges. The Kinshiro may be used as single blade gauges as well, plus one can set up a reversed blade as well, which is useful when paring shallow mortice walls, such as here!
The shopmade mortice gauge is in the style of Kinshiro, but uses a cassette to house double-sided blades to match a range of mortice and tenon widths ...

Here is the drawer ...

Bottom right is a cutting gauge from Colen Clenton. This was a prize in an Australian tool making competition in 2009.
The holders are made from Hard Maple ...


Regards from Perth
Derek
[Drawer #5: french fitted sliding bevels (Shinwa, Stanley and Chris Vesper) ...
Drawer #6:
This one is about the tools ... just because I think that they are beautiful, and I love using them. They give me joy.
All the tools in this cabinet have a story, or a connection. This is one of the reasons I keep them, even though I do not "need" them as I have others. All get used. In the case of the chisels in this drawer, they are my go-to for dovetails and close-up detail work. Mainly because they are all fully bevelled at the sides and have minimal lands. In spite of the absence of hoops, all may be used with mallet. The condition here being that the mallet head is UHMW. This is firm for feedback but yielding to avoid damage.
This is another skeleton drawer. The top tray are home to Veritas PM-V11 chisels. Most here are aware that I have road-tested tools for Lee Valley (Veritas) for many years. Not only are these just superb chisels, but I like the way they feel in the hand, particularly the smaller sizes. For dovetails, these run 1/8" upwards to 1".
The five on the left have custom Ebony handles (they are also round and not shaped with flats). The far right is a fishtail I made from a spare (pre-production) 3/8" chisel. I am sure that Veritas will have fishtails for sale at some stage. This is my design, not theirs (I have no idea what they have in mind).
The lower tray house Blue Spruce dovetail/detail chisels. This was the first set of premium chisels I purchased. Dave Jeske had just begun making them, and I was one of the first to order. In fact, the 3/4" (which is the largest size here) was the first made. I asked Dave for a 3/4". He had made 2, one for another order, and sent me the spare. I sent it back. His idea at the time was to make the steel thicker as the chisels became wider, and the one he sent was 3/16" thick. It felt heavy and clumsy. I requested 1/8", and that is what che then made for me.
My one concern about the chisels, prior to purchase, was that they are A2 steel, and that, for paring, a 30 degree bevel might not be ideal. Then it dawned on me that all the Japanese chisels I had were 30 degrees ... These blades get very sharp. They do not hold an edge as long as PM-V11, and need to be honed more frequently. But that does not detract from the absolute pleasure in using them.
These are light blades in beautiful African Blackwood handles. Sized 1/8", 3/16" and up to 3/4". There are two 1/4" skew chisels. I nagged Dave to make a fishtail, but he was skeptical there was an advantage over the skews (there is indeed a big advantage when cleaning out socket corners). Later he did make them, and I chanced on a sale of tools at a deceased estate in Oz. They had not been used, which brought me some sadness for the previous owner.
Drawer #7. Here is another drawer holding cutting and marking gauges.
This is a drawer intended to be dedicated to wooden mortice and cutting gauges, but does have two wheel gauges that could not be fitted elsewhere.
The mortices gauges fall into these three types ...
Veritas Dual Marking Gauge, Kinshiro, and one of my designs.
The Kinshiro is my absolute favourite, and I was gifted one several years ago (thanks Wiley!). Found another about a year back. They are no longer made by Kinshiro, and no longer available. I have made a number of single-blade cutting gauges in a similar manner to these double-blade gauges. The Kinshiro may be used as single blade gauges as well, plus one can set up a reversed blade as well, which is useful when paring shallow mortice walls, such as here!
The shopmade mortice gauge is in the style of Kinshiro, but uses a cassette to house double-sided blades to match a range of mortice and tenon widths ...
Here is the drawer ...
Bottom right is a cutting gauge from Colen Clenton. This was a prize in an Australian tool making competition in 2009.
The holders are made from Hard Maple ...
Regards from Perth
Derek
Freetime101
Member
- Joined
- May 10, 2021
- Messages
- 13
Wow...
Thanks for taking the time to write such a detailed post - the craftmanship in outstanding!
Thanks for taking the time to write such a detailed post - the craftmanship in outstanding!
bertv
Member
[member=4358]derekcohen[/member]
It may be my fault, but I tried with two browsers & I can’t see the pictures in your latest post. ??
It may be my fault, but I tried with two browsers & I can’t see the pictures in your latest post. ??
hdv
Member
You're not alone. I am seeing the same here. [blink] A shame, because I was really curious... [wink]
derekcohen
Member
- Joined
- Jun 22, 2008
- Messages
- 1,060
I am not sure why you cannot see them. I see them, as do others. ????
Try my website:http://www.inthewoodshop.com/Furniture/UnderbenchCabinetDrawers567 .html
Also, for the full build (scan down to Underbench Cabinet):http://www.inthewoodshop.com/Furniture/index.html
Regards from Perth
Derek
Try my website:http://www.inthewoodshop.com/Furniture/UnderbenchCabinetDrawers567 .html
Also, for the full build (scan down to Underbench Cabinet):http://www.inthewoodshop.com/Furniture/index.html
Regards from Perth
Derek
bertv
Member
Since my fellow European hdv has the same issue this could be a proxy server issue. Hope it resolves, or at least not gets worse. Damn computers!
Similar threads
- Replies
- 5
- Views
- 1K