Uneven Router Sled Planing

GoingMyWay

Member
Joined
Oct 11, 2017
Messages
3,821
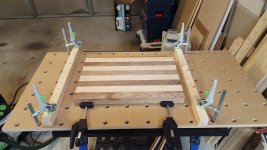
I've done my initial glue up for my end grain cutting board.  Now I'm trying to flatten my glued up board.  I initially started using my Stanley 12-139 Bailey No.60-1/2 Low Angle Block Plane to clean up the dried glue squeeze out.  It wasn't that hard to use the plane (I don't have a lot of experience using any type of hand planes) and it was cutting well so I proceeded to try to flatten the whole piece.  I realized this not the correct sized plane for the job, but I flattened both sides as best I good.  It was a marked improvement in evenness from before, but when I put a 12 inch steel ruler across the surface I could still see it was not flat.

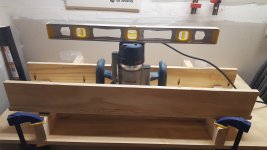
I had made a simple router planing sled based on Matt Cremona's design.  I used a 2x4 that I squared up for the rails and 3/4" plywood for the sled itself.  I made the rails 3" tall because I wanted to make sure I had plenty of capacity - I think this might have been a mistake making the rails this tall - I had to put a 1/4" piece of plywood and a 3/4" piece of MDF spacer to get the cutting board high enough to make contact with the router bit fully plunged.  The plywood was warped a little so the bottom of the sled didn't sit perfectly flat.  I put a level on the inside of the sled as well as on top of my router inside of the sled at various locations across my cutting board and it was all basically level so I didn't think it was a problem.  I went to work taking passes across the top using a 1 1/4" dish carving bit.  The planed surface was a little bit wavy/uneven and not nearly as smooth as it was when I had planed it with my block plane by hand.  I laid the cutting board onto my granite countertop to check for level.  To my surprise, the side that I had just planed with my router is very uneven!  There's a significant amount of rocking.  The other side that I planed by hand is actually fairly flat - there are still gaps, but it doesn't rock.

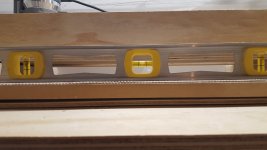
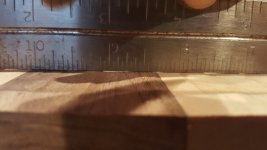
I went back and rechecked the levelness of my router sled setup and saw that I could shim the left front of the sled by about 1/4" and then the level was pretty much spot on.  I figured that must have been the source of my uneven planing.  I double sticked the shim and replaned the cutting board again.  I believe I took off about another 1/16th of an inch.  That was more than I really wanted to take off, but at least I know I was cutting deep enough.  I brought it back inside and found the cutting board still rocked.  I know I still need to sand the side that I used the router to plane, but there is about a 3/32" gap when I push down on one side of the cutting board against the granite countertop.  I think it's a little more than just needing a sanding to correct this unevenness.

What am I doing wrong??
 

Attachments

  • 20171101_150326.jpg
    20171101_150326.jpg
    3.5 MB · Views: 1,231
  • 20171101_150755.jpg
    20171101_150755.jpg
    3.4 MB · Views: 841
  • 20171101_150913.jpg
    20171101_150913.jpg
    3.7 MB · Views: 857
Yeah that's to keep the wood from sliding.  I didn't use those mats the first time I tried planing the board and the cutting board moved around a lot.  The MDF and 1/4" plywood are also bowed with the crown side up so I guess they could also be deflecting as I make my passes , but I wouldn't think it's deflecting that much though.  Is there that much downward pressure from the bit?  I'd think most of the load would be transferred across to the rails.

I tried to be as descriptive as possible.  I'm not sure what else I should say or show that might get me better advice.

I feel like if I can't figure what's wrong with this sled then the next "better" one may suffer from the same flaw that this one has.  As far as I can tell the one that I built *should* work.

 
So many things could go wrong based on your set-up/photos.

Is the plywood stock flat? Are all pairs of the rails identical in height?

The mat is another good source of your problem and wedges/solid shims could be used instead.

When you ran the sled, did you put any downward force which could vary the depth of cuts if the sled was not rigid enough?

Did you check if the router bit was level with the sled bottom?

Did you try out the sled with a smaller sample board after it was first built?
 
I agree about so many things could go wrong, that's why I'm generally not crazy about the idea of building something like this from scratch when it requires some degree of precision.

No the plywood/MDF stock is not flat.  It's bowed with the crown up.  The rails are identical in height, I did know that that was critical for this to work.  I ripped 1/4" off both sides of a 4' long piece of 2x4 and then cut it in half to make the 2 rails.

I had thought about cutting a new set of rails that would only be 1.75" tall.  That should eliminate the need for shims.

The first time I used the sled, I did apply an extra amount of force as I was trying to make sure I was fully bottomed out.  I don't believe I was applying downward pressure on my second attempt.  I was mostly concentrating on making left to right passes, but there's always the possibility that I did push down.

I did not check to see if the bit was level with the sled bottom - I'll go do that now.

Nope, I sure didn't try a sample board.  That would have a been a smart idea!  Too bad the thought never even crossed my mind.  I figured there's no time like the present to test this thing out on the the actual cutting board.
 
I'm actually *attempting* to make an end grain cutting board.  I'm going about it the really hard way - no table saw, no jointer, no planer.

After my initial cleanup of my glue joints with the block plane, I did briefly contemplate squaring the ends and then making my final crosscuts, but I knew if the surface wasn't flat the end grain butcher block was going to be a complete failure with huge glue joints.

I guess my glue up could have been better.  This was my first time doing a glue up like this.  I used 2 pair of Jet Parallel Clamps to do the initial clamp up and then filled in with pipe clamps.  I may be guilty of putting a little excess clamping pressure in an attempt to make up for poor glue joints  [embarassed].  I really wanted to get some additional Bessey Parallel Clamps, but I didn't.  I think more clamps would have helped.  Cauls definitely would have helped me.  I even thought about picking up a pair of these clamps:http://www.rockler.com/damstom-38-in-panel-clamp-blue, but they're pretty pricey since you need 2 of them and then it kinda got mixed reviews.  I used Titebond III and I was surprised by how thin its consistency was.  It also seemed to setup pretty fast on me so maybe I wouldn't have even really had time to secure a whole bunch of clamps in all directions.
 
Yeah, it's always better to run a test before cutting into the project stock, especially when trying out a new method.  As others have said, there's a lot of places in your setup that either individually or cumulatively could have produced the error you describe.  After you've lowered your rails and ensured that the bed is flat, I would do an initial test for level by simply zeroing the bit off a scrap piece on one part of the bed, then reposition it several times to see if the router bit (while plunged to the same depth) still makes contact with it.

In addition to wedges, you can use stop blocks temporarily screwed into the bed on which the workpiece is resting to prevent movement, and even add hot glue in a couple of strategic places.

You can make your own clamping cauls pretty easily with metal, assuming you have a grinder to cut the metal and a drill press:http://festoolownersgroup.com/vario...-topics/diy-panel-clamps/msg519289/#msg519289
 
ear3 said:
Yeah, it's always better to run a test before cutting into the project stock, especially when trying out a new method.  As others have said, there's a lot of places in your setup that either individually or cumulatively could have produced the error you describe.  After you've lowered your rails and ensured that the bed is flat, I would do an initial test for level by simply zeroing the bit off a scrap piece on one part of the bed, then reposition it several times to see if the router bit (while plunged to the same depth) still makes contact with it.

In addition to wedges, you can use stop blocks temporarily screwed into the bed on which the workpiece is resting to prevent movement, and even add hot glue in a couple of strategic places.

You can make your own clamping cauls pretty easily with metal, assuming you have a grinder to cut the metal and a drill press:http://festoolownersgroup.com/vario...-topics/diy-panel-clamps/msg519289/#msg519289

I cut my new shorter rails last night.  I'll test it out with a scrap piece of wood later today.

I have neither a metal grinder nor a drill press.  I guess a metal cutting blade in my reciprocating saw or jigsaw might work since the ends don't matter that much, but I reckon the holes would need to be positioned as close to vertical as possible for best results.  That's not really feasible with an unguided hand drill.

Rob-GB said:
This link may help you out

Shows how I stopped movement and shimmed the work to get one face flat before facing the opposite side.

Rob.

That's a brilliant idea to use the router table as the sled.  Too bad my Bosch router table is not wide enough for this application - that would be a known flat surface unlike my sled's warped plywood base.

Your and ear3's suggestion to use stop blocks and wedges is a good idea.  My garage floor is pitched which means my Kreg Mobile Project Center's tops are also out of level. So I'm doing this work off my wall mounted folding work "bench" since it is level.  I'd rather not drill into this top, but I could go get another piece of 2'x4' FLAT sheet material and clamp it to the top.  I'd have no issue drilling/screwing into that.  I went to my local Home Depot that I always go to on Monday and they didn't have any of the precut 2'x4' 3/4" MDF or 3/4" sanded plywood that I always buy.  They did have some 2'x4' 3/4" birch plywood, but I felt that was too pricey for just a shop project.  It was probably flat and not warped though - go figure.

I wonder if not having the back of the rails clamped could also be causing me an issue.  Sigh - I've got more problems and really should be asking - "what, if anything have I done right?" as opposed to "what I am doing wrong?"  [doh]
 
Yeah, if your work surface/table is not level, then using a level to check the sled setup is not necessarily going to help (though here BTW is where a digital level might be more useful, like the Stabila IP Tech, since you can more easily check the setup relative to any pre-existing out-of-plumb offset of your work surface).  But that's not an obstacle, provided you can be assured that the sled bed and the rails are flat and straight.

It's possible to control/cancel out bowing in the plywood bed by laminating two pieces together to make a double thick surface (~1 1/2").  When you cut the plywood or MDF, look to see whether the pieces have any convexity/concavity.  Then simply flip/mirror the two pieces so that the concave or convex sides face each other, glue, then clamp.

The thing I've found about using 2x4s as rails for router sled is, 1) store-bought 2x4s are rarely straight, and 2) even if they are close, when you cut into them, because they tend to be from fresher wood, they can warp further, especially if you are taking a large bite out of them.  This is why jointers exist to straighten one edge.  Or you can approximate a jointer with a tracksaw.  Failing that, just be sensitive to whether the 2x4 material of the rails is doing anything funky after you cut them, and cut them to width/height on the table saw using multiple cuts (and switching which side is referencing off the table saw fence), and not simply a single rip at final width.   
 
ear3 said:
Yeah, if your work surface/table is not level, then using a level to check the sled setup is not necessarily going to help (though here BTW is where a digital level might be more useful, like the Stabila IP Tech, since you can more easily check the setup relative to any pre-existing out-of-plumb offset of your work surface).  But that's not an obstacle, provided you can be assured that the sled bed and the rails are flat and straight.

It's possible to control/cancel out bowing in the plywood bed by laminating two pieces together to make a double thick surface (~1 1/2").  When you cut the plywood or MDF, look to see whether the pieces have any convexity/concavity.  Then simply flip/mirror the two pieces so that the concave or convex sides face each other, glue, then clamp.

The thing I've found about using 2x4s as rails for router sled is, 1) store-bought 2x4s are rarely straight, and 2) even if they are close, when you cut into them, because they tend to be from fresher wood, they can warp further, especially if you are taking a large bite out of them.  This is why jointers exist to straighten one edge.  Or you can approximate a jointer with a tracksaw.  Failing that, just be sensitive to whether the 2x4 material of the rails is doing anything funky after you cut them, and cut them to width/height on the table saw using multiple cuts (and switching which side is referencing off the table saw fence), and not simply a single rip at final width. 

Yup that's why I was using my wall mounted folding workbench to do the router planing since I know that is level.  I've always wanted a Stabila level, but they're so expensive - especially just for a hobbyist/hack like me.  I think I got the cheap level I'm using in a 2' and 4' combo pack from Home Depot.  I discovered this morning that I can make my Kreg Mobile Project Center level by sticking a piece of 3/4" plywood under 2 of the feet.

I was just using the bowed MDF/Plywood to elevate my cutting board up.  I actually thought the bow was "helping" me out since it was raising it up all the higher.  I never thought about how easily deflected it could be.  I'd rather avoid using shims if at all possible.  I didn't think about how short the overall length of the dish cutting bit is.  I saw a YouTube video where a big live edge board was being flattened with a router.  He was using a 1" straight bit, which looked very long so he had plenty of depth cutting capacity with it.  He was able to bring the bit to the wood instead of the wood to the bit.  I bought the dish carving bit on the recommendation that it leaves a smoother finish.

I knew 2x4's have a lot of issues on their own, but they are very cheap and readily available.  I just bought and cut the 2x4 on Monday.  I used my TS55 and Precision Dogs Parallel Guides to trim 1/4" off both sides of the 2x4.  Could it start warping and moving that fast?

Peter Halle said:
How thick are your cutting boards going to be?

Peter

I was planning on making it 1 1/4" thick.  We have a Boo's maple edge grain cutting board that's 1 1/2" thick.  It's rather heavy so I was trying to make this new board a little bit lighter.  Granted, using half maple and half walnut will already make it lighter than solid maple.  The finished height of the end grain cutting board should be ~1 1/2" once I put the rubber feet on the bottom.
 
GoingMyWay said:
I was planning on making it 1 1/4" thick.  We have a Boo's maple edge grain cutting board that's 1 1/2" thick.  It's rather heavy so I was trying to make this new board a little bit lighter.  Granted, using half maple and half walnut will already make it lighter than solid maple. 

FWIW...If your BOOS board is a typical 12' x 18" x 1 1/2" size, it should weigh around 8.4# in maple. Reduce the thickness to 1 1/4" and it should weigh in at 7#. If you use half maple and half walnut, at 1 1/4" thick it should weigh around 6.5#.  [big grin]
 
Cheese said:
GoingMyWay said:
I believe this is the cutting board that I have:https://www.amazon.com/John-Boos-R03-Reversible-Cutting/dp/B0000CFV4K.  Amazon says it's 12lbs.  It feels heavier that that to me, but I'm too lazy to take it to the bathroom to see how much it really weighs.

That should come in at 11.7#.

Wow that's very close.  It was 11.4 lbs when I just weighed it.

I thought more about the back of the rails not being secured and how I need a way to keep the cutting board from moving around so I figured I should just create a DIY MFT using my Kreg Mobile Project Center as the base.  I think this is a step in the right direction:
View attachment 1
I also bought some flat 3/4" plywood that I can use to remake the bottom of the sled.
 

Attachments

  • 20171102_163806.jpg
    20171102_163806.jpg
    4.1 MB · Views: 570
Back
Top