Using Festool TS 55 or TS 75 to Miter Joints

Joined
Jun 1, 2019
Messages
2
Hello all!

Bit of a woodworking noob here. I'm working toward being able to make furniture for myself or anyone who would purchase from me if they like what I've made for myself.

I was wondering about using either one of the track saws from Festool to make miter joints for my furniture such as a modern nightstand or the like. I like the idea of having the wood grain flow all around the piece if possible, and it seems like this method would be 'easy' to make that happen.

The idea being to create a piece of wood about 20 inches deep and about 5 feet or longer. Then, I'd take the track saw to cut bevels/miters along the wood so that it can create a box when 'rolled up.' Does anyone have experience using these saws specifically to accomplish something similar? I've seen it done with circular saws, but they weren't the most accurate. I'm hoping that maybe these would assist with that accuracy and make the process a bit easier and more repeatable.

If you have experience, would you recommend these tools for this? Why or why not?

Thanks for any help!
 
With the right blade you can certainly make bevel cuts like you described. It is important to use the right blade for ripping or crosscut. I believe that the general purpose blade will not give you that accuracy you need to make miter joint. Both Festool track saws will give you an acceptable finish. The TS75 is more suitable for thicker/harder wood but the TS55 may do the job also. If you plan on using very dense wood, go with the TS75, heavier but stronger.
 
Yes - this is certainly doable.

See this thread -

http://festoolownersgroup.com/member-projects/walnut-china-cabinet/msg488008/#msg488008

The cabinet had 45 degree mitered corners for joinery as well as the front edges.

All done with the TS55 saw.  I used both crosscut and rip blades.

You'll see in the photos that I made a 45 degree sanding block to clean up some of the cuts.

But I was very happy with the result.  The cabinet was made with very dry walnut and I never felt the saw bogging down for either rip or crosscuts.

Given the design, I was not as concerned about 'continuous grain' around the cabinet.  But that could be done easily.

Material thickness was about .8"

Neil

 
Nice job Neil...real nice job.  [big grin]. I'm a big fan of the 45º mitered faces.

A couple of questions:

1. How many hours do you think you have in the project?

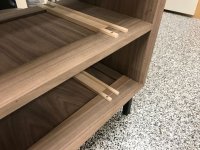
2. In this photo what, kind of drawer glides do these support?

[attachimg=1]

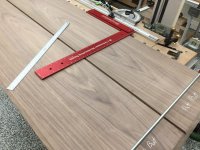
3. In this photo is that white chalk that you used to mark the walnut panels? If so, I'd have thought is would get caught in the grain.

[attachimg=2]

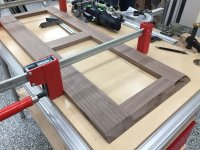
4. Curious if the mitering in this photo was done as an assembled item or was it done to each individual piece?  If individually, why?

[attachimg=3]

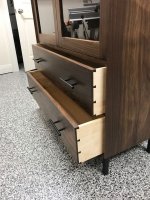
I typically use false drawer fronts, however this view of the drawers has me thinking about reconsidering that method. The dovetails really pop. That's a great look and design touch.  [thumbs up]

[attachimg=4]
 

Attachments

  • neil 9.jpg
    neil 9.jpg
    186.8 KB · Views: 1,981
  • neil 11.jpg
    neil 11.jpg
    176.5 KB · Views: 1,929
  • neil 10.jpg
    neil 10.jpg
    180.2 KB · Views: 1,914
  • neil 3.jpg
    neil 3.jpg
    242.7 KB · Views: 1,853
I find with a decent blade and a steady technique, you can do amazing bevel cuts with a track/plunge saw.

[member=44099]Cheese[/member] Very nice work  [thumbs up]
 
Cheese said:

Nice job Neil...real nice job.  [big grin] . I'm a big fan of the 45º mitered faces.

A couple of questions:

1. How many hours do you think you have in the project?

Probably about 40-50 for the woodworking and another 6 or so on the metal base.

2. In this photo what, kind of drawer glides do these support?

That's just half inch maple that I route out.  The bottom of the drawer has a similar 1/2" x perhaps 1 1/4" piece that slides between the guides.  I make most of my drawers with this technique - dust panels with inset drawer glides like this.  Inexpensive and hidden.  Wax on those and the bottom of the drawers and they close like butter.

3. In this photo is that white chalk that you used to mark the walnut panels? If so, I'd have thought is would get caught in the grain.

I use chalk for marking pieces all the time.  Between sanding and finishing, there is no residue left.

4. Curious if the mitering in this photo was done as an assembled item or was it done to each individual piece?  If individually, why?


It was done as an assembled piece.  That's the bottom of the cabinet where the metal base attaches.  All dominoes holding the pieces together.
Not sure why I had the clamps on those pieces at that point!


I typically use false drawer fronts, however this view of the drawers has me thinking about reconsidering that method. The dovetails really pop. That's a great look and design touch.  [thumbs up] 

I don't personally like false fronts on fine furniture.  Great for cabinets, but I prefer a fully assembled drawer.  And I frequently will use this dovetail technique.  Makes the drawer lighter and gives you a better look.


Thanks for the questions and feedback [member=44099]Cheese[/member]
and [member=66597]Mario Turcot[/member] !

Neil
 
Thank you all for the input! I'm not sure why it's so difficult to find examples of people doing this technique (especially for those of us without the ability to have a high quality table saw in our shop). Seems like this is a very viable option, and one that produces beautiful results such as those shown by [member=167]neilc[/member]! Thank you so much for sharing. Thank you as well for a couple of you stressing the importance of the blade. I shall make sure I get the right blade(s) for the job.

Just ordered a TS 75 for myself, and can't wait for it to get here and start building!  [thanks]
 
Just some tips that may help.
First of all make sure the saw is calibrated, so in it’s normal (non bevel) position, the saw is running parallel to the guide rail. Then check, using a square, or protractor or angle finder, that the saw bevel presets are calibrated and true. You should then be all set.

As for technique, when cutting on the bevels, it’s easy to not only push forwards but, also push down too much because of the angle of the now bevelled body of the saw.

You need to develop a technique, where you are plunging the saw at the set angle, without and pushing down side on, straining the bevel or pulling up, again knocking the blade out.
It needs to be almost a relaxed plunging action, whilst pushing the saw forward at the correct speed.
The speed and pressure going forward will depend on the stock thickness, stock type, hard or soft wood, and also the motor speed and blade type.

If you practice with some scrap wood, it’s a fairly quick and easy learning curve.
It’s certainly a more than doable way of cutting bevels, especially if the cut is too long for a mitre saw, or a table saw isn’t an option.
 
For calibration tips (including bevel setting) go hunt down Peter Parfitt's recent video on the very subject. Well worth a watch.
 
This the nicest waterfall edge coffee table I recall seeing.

Not much info on technique and photos are just thumbnails (from before Festool took over the FOG) but I pretty sure he used the TS 75 to cut the miters.

As Jiggy says, the operator is crucial when using a handheld saw to cut an extreme bevel. Cutting at 90* gravity is your friend. At 45* it’s your enemy. Practice.
 
Back
Top