You are using an out of date browser. It may not display this or other websites correctly.
You should upgrade or use an alternative browser.
You should upgrade or use an alternative browser.
Using MFT/3 Stop Profile without the Swivel/Protractor
- Thread starter DrD
- Start date
Woodwork Wizard
Member
- Joined
- Oct 25, 2013
- Messages
- 430
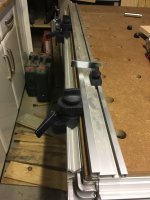
I have had to use bolts on my fence to keep it exactly where I want it as there's a mm scale on it. Despite the fact there are two protractors on it and 4 bench dogs behind the fence it has still moved out of calibration maybe 2 or 3 times. I don't think it will move now with a 6mm bolt at each end fastening in to a threaded insert in the MFT worktop.
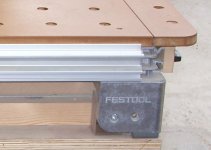
There's hardwood blocks inserted in to the MFT fence profile to prevent deforming it when tightening the bolts and because the block protrudes it also allows the additional fence on the left hand extension table to be lined up exactly with the main fence on the MFTs.

There's hardwood blocks inserted in to the MFT fence profile to prevent deforming it when tightening the bolts and because the block protrudes it also allows the additional fence on the left hand extension table to be lined up exactly with the main fence on the MFTs.
Attachments

sigmatango
Member
- Joined
- May 25, 2015
- Messages
- 78
that is a beast of a work bench... [tongue]
I got an extra 'additional clamp' and use them both at the back of the table. The only snag is that there is no adjustment available to square the profile to the dog holes, but it is fine if you use the standard crosscut guiderail setup as you can adjust that to be square to the rear profile.
Attachments
DrD
Member
- Joined
- Mar 29, 2013
- Messages
- 390
[member=24875]Woodwork Wizard[/member]
Now that's what I've been trying to put together! Please tell us about the long guide rail - I assume it is FS1400 - attachments to your work bench. Any information on how all the surfaces are aligned, etc. would ne most helpful - if you don't mind sharing.
Thanks, Don
Now that's what I've been trying to put together! Please tell us about the long guide rail - I assume it is FS1400 - attachments to your work bench. Any information on how all the surfaces are aligned, etc. would ne most helpful - if you don't mind sharing.
Thanks, Don
Woodwork Wizard
Member
- Joined
- Oct 25, 2013
- Messages
- 430
quote author=DrD
Please tell us about the long guide rail - I assume it is FS1400 - attachments to your work bench. Any information on how all the surfaces are aligned, etc. would be most helpful - if you don't mind sharing.
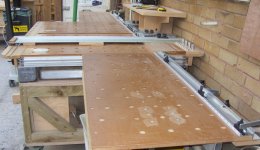
The guide rail is an FS-1400 LR-32 with a 906mm cross-cut capacity and it attaches to the MFT with standard Festool parts but with a feather key on each side and a Slop-Stop installed in the guide rail. The MFTs are on a very sturdy base, held down with a screw to a block of hardwood on the 4 external corners of the base. The 20mm holes in each bench were aligned to one another with a straight edge, a pair of Festool T-track MFT connector bars are used to join them and the MFTs are also bolted together with two M8 bolts through the holes where the Festool MFT legs were once attached. I have a workshop-built square to frequently check the rail is 90* to the fence.
After lots of use the only real weak spot was the fence had moved slightly a few times, so the mm scale didn't correspond with the guide rail splinter guard, so just recently I bolted the main fence to the table in the hope it will prevent any further movement.
The only things this MFT bench is ever used for is cutting (TS-55R) and (OF-1010) to rout dados and rebates in mostly 18mm sheet materials. Occasionally for Domino or pocket hole jig operations. Everything else is done on an 8'x4' work table with an MFT hole pattern all over it that I don't mind that much if it gets beaten up and glue spilled on it.
If there's anything else that I've missed do ask.
Ian
Please tell us about the long guide rail - I assume it is FS1400 - attachments to your work bench. Any information on how all the surfaces are aligned, etc. would be most helpful - if you don't mind sharing.
The guide rail is an FS-1400 LR-32 with a 906mm cross-cut capacity and it attaches to the MFT with standard Festool parts but with a feather key on each side and a Slop-Stop installed in the guide rail. The MFTs are on a very sturdy base, held down with a screw to a block of hardwood on the 4 external corners of the base. The 20mm holes in each bench were aligned to one another with a straight edge, a pair of Festool T-track MFT connector bars are used to join them and the MFTs are also bolted together with two M8 bolts through the holes where the Festool MFT legs were once attached. I have a workshop-built square to frequently check the rail is 90* to the fence.
After lots of use the only real weak spot was the fence had moved slightly a few times, so the mm scale didn't correspond with the guide rail splinter guard, so just recently I bolted the main fence to the table in the hope it will prevent any further movement.
The only things this MFT bench is ever used for is cutting (TS-55R) and (OF-1010) to rout dados and rebates in mostly 18mm sheet materials. Occasionally for Domino or pocket hole jig operations. Everything else is done on an 8'x4' work table with an MFT hole pattern all over it that I don't mind that much if it gets beaten up and glue spilled on it.
If there's anything else that I've missed do ask.
Ian
DrD
Member
- Joined
- Mar 29, 2013
- Messages
- 390
[member=24875]Woodwork Wizard[/member]
Thanks for the info! What is the apparently curved leading edge piece pf wood with the 2 dados attached to the MFT Profile at the head of the table? And the corresponding one up against the wall in the photo? How are they attached to the Profiles? If you don't mind, I'm going to build a pretty close copy of yours' for the cross-cutting/ripping station in my shop.
Thanks, Don
Woodwork Wizard
Member
- Joined
- Oct 25, 2013
- Messages
- 430
quote author=DrD
What is the apparently curved leading edge piece pf wood with the 2 dados attached to the MFT Profile at the head of the table? And the corresponding one up against the wall in the photo? How are they attached to the Profiles?
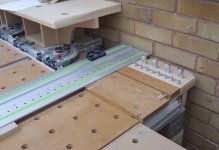
The 2 things you refer to are attached with t-bolts to the side profile of the MFTs and everything comes off/goes on very quickly and easily.
The curved edge piece on the right hand side is there to stop me bumping the guide rail, the rounded corner of which can't hurt like a 90* could and the dados were there for a pair of pencils, but I still use the gap between the MFTs. On the other side of the guide rail is a narrower piece that also prevents accidental bumping of the guide rail, I can clamp pieces to it and there's a block of wood right next to the guide rail edge which means I find the tab on the MFT guide rail attachment instantly which isn't that easy with a 1400 guide rail. It can also prevent accidental cuts in to the MFT aluminium profile when using a jigsaw.
The part at the back is just a raised table that makes use of the area above and behind the fence and extends out the back of the MFT slightly further than the guide rail overhangs. There's a piece on the right hand side of the guide rail for storage of 12 bench dogs. Both of these things protect the guide rail when I push the cart back to the wall as well as being a good place to put tools down that doesn't get in the way of anything such as moving sheets in and out.
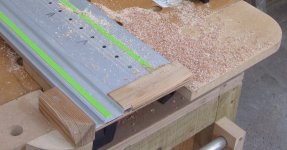
One of the best modifications is the hardwood fence to the right of the guide rail. Zero clearance for both saw and router, kerf marker for both saw and router, a 5mm dado depth setting gauge for the router as well as a fence on the right hand side of the guide rail which is very useful for narrow cuts that are less than 200mm with an additional protractor/fence assembly and also for precisely routing rebates with a very simple jig. I couldn't be without this brilliant modification on an MFT.
This fence idea is from a Peter Halle YouTube video so again I must say nice one Mr Halle...
What is the apparently curved leading edge piece pf wood with the 2 dados attached to the MFT Profile at the head of the table? And the corresponding one up against the wall in the photo? How are they attached to the Profiles?
The 2 things you refer to are attached with t-bolts to the side profile of the MFTs and everything comes off/goes on very quickly and easily.
The curved edge piece on the right hand side is there to stop me bumping the guide rail, the rounded corner of which can't hurt like a 90* could and the dados were there for a pair of pencils, but I still use the gap between the MFTs. On the other side of the guide rail is a narrower piece that also prevents accidental bumping of the guide rail, I can clamp pieces to it and there's a block of wood right next to the guide rail edge which means I find the tab on the MFT guide rail attachment instantly which isn't that easy with a 1400 guide rail. It can also prevent accidental cuts in to the MFT aluminium profile when using a jigsaw.
The part at the back is just a raised table that makes use of the area above and behind the fence and extends out the back of the MFT slightly further than the guide rail overhangs. There's a piece on the right hand side of the guide rail for storage of 12 bench dogs. Both of these things protect the guide rail when I push the cart back to the wall as well as being a good place to put tools down that doesn't get in the way of anything such as moving sheets in and out.
One of the best modifications is the hardwood fence to the right of the guide rail. Zero clearance for both saw and router, kerf marker for both saw and router, a 5mm dado depth setting gauge for the router as well as a fence on the right hand side of the guide rail which is very useful for narrow cuts that are less than 200mm with an additional protractor/fence assembly and also for precisely routing rebates with a very simple jig. I couldn't be without this brilliant modification on an MFT.
This fence idea is from a Peter Halle YouTube video so again I must say nice one Mr Halle...
Attachments

Woodwork Wizard
Member
- Joined
- Oct 25, 2013
- Messages
- 430
quote author sigmatango
that is a beast of a work bench... [tongue]
Nice one.
that is a beast of a work bench... [tongue]
Nice one.
Woodwork Wizard
Member
- Joined
- Oct 25, 2013
- Messages
- 430
quote author=tjbnwi
On one of my MFT's I bolted the fence in place. Stays nice and square.
Tom
Nice one about the bolts to clamp the MFT fence in place. Stays nice and square and exactly where I left it is precisely what I'm after...
Ian
On one of my MFT's I bolted the fence in place. Stays nice and square.
Tom
Nice one about the bolts to clamp the MFT fence in place. Stays nice and square and exactly where I left it is precisely what I'm after...
Ian
Woodwork Wizard
Member
- Joined
- Oct 25, 2013
- Messages
- 430
Quote - I got an extra 'additional clamp' and use them both at the back of the table.
I have 3 of these fence clamps that I purchased with the same idea of using them at the back of the MFT/3. I've never used them for doing this as I have 906mm as it is and attempting to reach any more would be a really bad idea. If anyone wants them at a very very reasonable price email me. I'll throw in a guide rail deflector thing while I'm at it as I'll never use that thing again either.
I have 3 of these fence clamps that I purchased with the same idea of using them at the back of the MFT/3. I've never used them for doing this as I have 906mm as it is and attempting to reach any more would be a really bad idea. If anyone wants them at a very very reasonable price email me. I'll throw in a guide rail deflector thing while I'm at it as I'll never use that thing again either.
Similar threads
- Replies
- 14
- Views
- 2K
- Replies
- 10
- Views
- 704
- Replies
- 58
- Views
- 3K
- Replies
- 40
- Views
- 3K