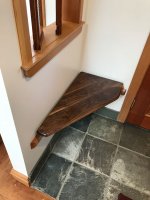
I wanted to build a little corner bench in our entryway butting an outside masonry wall and a little wing wall. The mud and tape in corner is pretty thick and rather than just put up a couple cleats and scribe the seat in I decided to make a floating seat with 3/4" gap from wall.
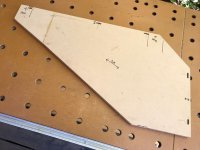
The wing wall is not bad for framing, (sorta-kinda 90 degrees, but not really) and between that and mud and tape bulges it wasn't going to work to pre build the bench and bolt it up. What I did instead was build an MDF template, scribe it to the wall shape and then used Domino to build the bench to match shape of the wall:
View attachment 1
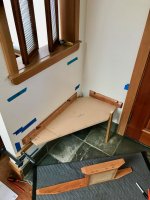
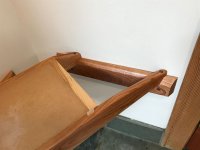
Next I built the wall cleats and stringer assembly that supports the seat on my MDF template. Cleats are set at whatever angle the scribe left me with. Stringer assembly is set in dados cut with my TS55 at an angle around 60/30 degrees to the cleats, but everything is a bit crooked so I don't really know what the angle is (or care, really). Flush trimmed the stringer ends to match the cleats.
Dry mounted the whole assembly and then screwed cleats to walls
View attachment 2
View attachment 3
View attachment 4
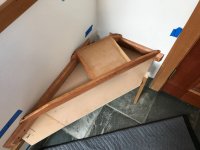
Stringer assembly mounted to the cleats and screw holes plugged with contrasting walnut plugs. Very happy with the fit of both the dados and the flush fit against the wall.
View attachment 5
View attachment 6
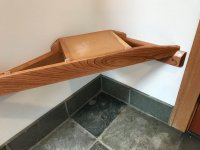
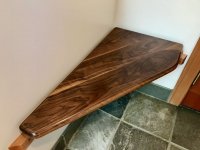
Floating Walnut seat attached to the assembly. Used three 4mm Dominos for alignment and then Z-clips to hold it down.
Really pleased with the finish on the Walnut. Started using Abranet to sand varnish last fall with excellent results. I use plain old Minwax satin, start with two brushed on coats full strength and sand both fairly aggressively with 240. Next I dilute the varnish 50% and wipe on a couple coats, sand with 400 then repeat and sand with 600 and finally wipe on 3 more coats without sanding.
View attachment 7
View attachment 8
The wing wall is not bad for framing, (sorta-kinda 90 degrees, but not really) and between that and mud and tape bulges it wasn't going to work to pre build the bench and bolt it up. What I did instead was build an MDF template, scribe it to the wall shape and then used Domino to build the bench to match shape of the wall:
View attachment 1
Next I built the wall cleats and stringer assembly that supports the seat on my MDF template. Cleats are set at whatever angle the scribe left me with. Stringer assembly is set in dados cut with my TS55 at an angle around 60/30 degrees to the cleats, but everything is a bit crooked so I don't really know what the angle is (or care, really). Flush trimmed the stringer ends to match the cleats.
Dry mounted the whole assembly and then screwed cleats to walls
View attachment 2
View attachment 3
View attachment 4
Stringer assembly mounted to the cleats and screw holes plugged with contrasting walnut plugs. Very happy with the fit of both the dados and the flush fit against the wall.
View attachment 5
View attachment 6
Floating Walnut seat attached to the assembly. Used three 4mm Dominos for alignment and then Z-clips to hold it down.
Really pleased with the finish on the Walnut. Started using Abranet to sand varnish last fall with excellent results. I use plain old Minwax satin, start with two brushed on coats full strength and sand both fairly aggressively with 240. Next I dilute the varnish 50% and wipe on a couple coats, sand with 400 then repeat and sand with 600 and finally wipe on 3 more coats without sanding.
View attachment 7
View attachment 8