What - non Festool - tool / workshop related gizmo/stuff did you buy today?

  • Thread starter Thread starter six-point socket
  • Start date Start date
Cheese said:
Ya, I'm just curious in how Makita holds the sandpaper to the sanding pad...the hook & loop or even the PSA ( [eek]  stink  [eek]) options work well...the clamping method...not so much as it's just abrasives vibrating against thin metal structures.

BO4900V
1/2 Sheet Finishing Sander
PERFORMANCE : 2.9 AMP motor rotates pad 4,000 - 10,000 OPM for smooth finish sanding
EFFICIENCY : Efficient through-the-pad dust collection system
CAPACITY : 4-1/2" x 9" pad size accepts 4-1/2" x 9-1/8" hook and loop or 1/2 sheet abrasive paper
COMFORT : Low vibration and contoured grips
INCLUDES : Abrasive paper, dust bag and dust bag holder
 
Not necessarily a new purchase, but it feels "new" since I use it so infrequently: Tom's (not me!) Tilting Planer Table

I purchased it from the Woodcraft website years ago, but it appears it may be discontinued since now I can only find listings on e-Bay. It's a handy tool, and if it's discontinued I'm tempted to pick up an extra to put in deep storage.

The appeal of the tool is that it allows for very precise setting of bevels in a thickness planer, between 0 and 30 degrees. Prior to picking up the tool I was using home-made adjustable jigs which worked "fine", but dialing-in a particular angle usually involved some amount of trial-and-error. With the Tilting Planer Table, there's a Vernier scale which allows for very precise angles, and adjustments are very fast and secure with two 9/16" nuts.

[attachimg=1]

For this particular project, I needed to produce a few different White Oak thresholds for a 2.5m wide doorway. I tackled the more extreme angles with my shaper and Rangate's Vari Angle Cutter, but the shallow, wide bevels were a perfect application for the Tilting Planer Table.

[attachimg=2]


Attachments

  • IMG_8396.jpeg
    IMG_8396.jpeg
    529.7 KB · Views: 265
  • IMG_8403.jpeg
    IMG_8403.jpeg
    530.5 KB · Views: 269
Michael Kellough said:
Tom's (not me!) Tilting Planer Table

What a cool idea! What could go wrong with this that you might need a spare?

Hi Michael,

I've never been tested, but I have no doubt that I'd likely land somewhere on an anxiety spectrum disorder, so I worry about things like "what if my Shop is hit by an asteroid?".... I also have some regrets about missing out on some pretty unique/useful tools/accessories which have been discontinued (Aigner is a great example), so I guess I'm just sensitive to losing something I already have. That being said, yeah the impulse can easily get out of control, so I try to reserve backups to the most extreme cases where my business would take a big hit if I were to be without a given item.

Anyways, yeah, it's a really handy accessory! It's worth every penny of the $300 retail cost, but knowing that woodworkers are often a thrifty bunch, I imagine they just didn't sell enough volume to justify the product. Very glad I purchased mine when I did  [big grin]
 
There is currently one of these tilting planer tables on sales "new" on ebay for $250 plus about $120 shipping if anyone is interested.
 
That's a pretty sweet fixture Tom.  [smile]  Certainly a lot more convenient than lugging around the 10' long sled I made to angle the tops of deck railings.  [blink]  For $300 there's a lot of value in that item just from a storage perspective.
 
Cheese said:
That's a pretty sweet fixture Tom.  [smile]  Certainly a lot more convenient than lugging around the 10' long sled I made to angle the tops of deck railings.  [blink]  For $300 there's a lot of value in that item just from a storage perspective.

Hi Cheese,

Yes, I think the device is a tremendous value, and is compact enough to store, but long enough to be effective (~450mm support on either side of the cutter block):

View attachment 1

The scale is large and very easy to read. In this case, I used the vernier scale to nail a 7.5 degree bevel:

View attachment 2

I'm not sure how wide of an appeal this would have for hobbyists, but I build a lot of door- and window- sills, so being able to produce precise, wide bevels is really handy. I'm really bummed that the product seems to be discontinued, it's very robust and a thoughtful design.
 

Attachments

  • IMG_8416.jpeg
    IMG_8416.jpeg
    457.1 KB · Views: 48
  • IMG_8418.jpeg
    IMG_8418.jpeg
    618.8 KB · Views: 46
Cheese said:
That's a pretty sweet fixture Tom.  [smile]  Certainly a lot more convenient than lugging around the 10' long sled I made to angle the tops of deck railings.  [blink]  For $300 there's a lot of value in that item just from a storage perspective.

Such a cool idea. Personally, I'd have done the tablesaw with tall fence and tilted blade approach, but I could see how that might get gnarly for some profiles that this would handle pretty easily.

For occassional, one-time use, one could build a tilting table out of phenolic plywood or similar, hinge the two pieces and use shims to dial in the angle. Not nearly as convenient/accurate, of course.
 
smorgasbord said:
Cheese said:
That's a pretty sweet fixture Tom.  [smile]  Certainly a lot more convenient than lugging around the 10' long sled I made to angle the tops of deck railings.  [blink]  For $300 there's a lot of value in that item just from a storage perspective.

Such a cool idea. Personally, I'd have done the tablesaw with tall fence and tilted blade approach, but I could see how that might get gnarly for some profiles that this would handle pretty easily.

For occassional, one-time use, one could build a tilting table out of phenolic plywood or similar, hinge the two pieces and use shims to dial in the angle. Not nearly as convenient/accurate, of course.

Hi Smorgasbord,

Yes, these bevels could be produced on a table saw, but you'd be limited in height, and would likely require sanding. A bandsaw would allow for much taller work, but like the table saw it would require sanding or other clean up work. And, as you point out, that's a pretty sketchy operation without a power feeder and appropriate setup.

Another option would be to use a scarfing jig with a router, but, again, would require some clean-up work.

My last shaper had a tilting spindle, but even then I was limited by the spindle height and available spiral cutters (usually ~150mm), and jigging/fixturing was a bit fussy. When I bought my current shaper, I traded a tilting spindle for a heavy duty tenoning table...

The advantage of using a thickness planer for this particular operation is there should be little- to no- clean-up work after milling. I realize there's a huge variety of cutter blocks out there, but the 120mm diameter Tersa head on my combo machine leaves a finish that is ready for stain right off the machine (using the slowest feed rate and sharp knives (I prefer M+ for hardwoods, and HSS for softwoods)). Smaller cutter blocks and/or faster feed rates will obviously leave more marks/scallops....

As you suggest, this product can certainly be produced using a piano hinge and shop scraps, as seen below. This is how I started off, but I got frustrated with a trial-and-error process of hitting a particular bevel angle. Again, this is a pretty niche product for a niche market, but REALLY handy if it's a task you perform regularly. I just love mine, really appreciate that someone put in the time and effort to develop it.

View attachment 1

View attachment 2


Attachments

  • IMG_4736.jpeg
    IMG_4736.jpeg
    623.1 KB · Views: 40
  • IMG_2369.jpeg
    IMG_2369.jpeg
    552.9 KB · Views: 43
Tom Gensmer said:
Not necessarily a new purchase, but it feels "new" since I use it so infrequently: Tom's (not me!) Tilting Planer Table

Ouf, that's such a cool and well-made accessory. That would have been an instant buy-now from me. Didn't know they existed. I do like your shop-made one as well. For me, that one would work pretty well so I added it to a jigs-to-make list. I like the planer for large bevels for the same reason as you: very little work left to get a finish surface.
 
Tom Gensmer said:
.. the 120mm diameter Tersa head on my combo machine leaves a finish that is ready for stain right off the machine (using the slowest feed rate and sharp knives (I prefer M+ for hardwoods, and HSS for softwoods)). Smaller cutter blocks and/or faster feed rates will obviously leave more marks/scallops....

So, a while back I retrofitted my MiniMax FS350 with a Tersa 3-knife cutterhead, about 85mm diameter:
[attachimg=1]

I also jury-rigged a variable speed feed control using an old Sears drill with router speed control box:
[attachimg=2]

And I use the M+ knives, and I have them marked as "semi-worn" and "mostly fresh" - I do the initial planing on the semi-worn (not really worn, btw), and then the final passes with the "mostly fresh" knives since they're so easy to swap.

But I would never stain/finish right off the planer. What am I doing wrong?

BTW, I do have a 12" tablesaw, and I find the extra inch depth of cut to come in handy quite often.
 

Attachments

  • Tersa.jpg
    Tersa.jpg
    89.1 KB · Views: 249
  • DrillDrive.jpg
    DrillDrive.jpg
    70.9 KB · Views: 246
Hi [member=77266]smorgasbord[/member] ,

You're not necessarily doing anything "wrong", but the smaller diameter cutter blocks just won't deliver the same quality of cut as a larger diameter cutter blocks, due to the geometry of the knives as they present to the work. My A3-41 had a ~75mm diameter cutter block with Felder's "SilentPower" spiral head, and the 120mm diameter Tersa cutter block on my FS-52es delivers a dramatically better finish.

The larger diameter cutter block was one of the deciding factors for me when deciding between the FS-41es (95mm diameter cutter block), and the FS-52es (120mm diameter cutter block). The FS-52es also has four feed rate options, whereas I believe the FS-41es only has two feed rates.

I believe that Martin uses a 125mm diameter cutter block on their T45 and T54 machines.

Edit: I should say that I mostly produce doors and windows. The milled surface I get off the 120mm Tersa cutter block is nearly identical to the surfaces produced by my door- and window- shaper tooling (major diameter 160mm, minor diameter 130mm), so they all accept finish essentially the same.
 
Tom Gensmer said:
...the smaller diameter cutter blocks just won't deliver the same quality of cut as a larger diameter cutter blocks, due to the geometry of the knives as they present to the work. My A3-41 had a ~75mm diameter cutter block with Felder's "SilentPower" spiral head, and the 120mm diameter Tersa cutter block on my FS-52es delivers a dramatically better finish.

Thanks, I guess size does matter.... [embarassed]
 
That tilting fixture is very slick looking. I had no idea that anything like that existed, as a commercial product. I have always just made a one-off platform, whenever needed. It's not a frequently used item, but it sure would be handy to have it so easy, rather than figuring/shimming each time.
The last couple of times were for door thresholds, but there are other situations. I have done it with a bandsaw, followed up with a jointer, but it's not as precise.

Michael Kellough said:
Tom's (not me!) Tilting Planer Table

What a cool idea! What could go wrong with this that you might need a spare?

Well, as a guy who has suffered a shop fire, that took everything, I can see it. However, you would have to store that spare "off-site" or you lose both. The likelihood of keeping spares at home seems pretty small, but you could.

Cheese said:
Just curious what the clip-on wheels are?

Michael nailed it. That quick locking system is nice, instant and toolless, but not necessarily as easy to find locally. The consumables are also a bit more expensive too, but it's mainly about options.
I know I can get cup-type wire wheels easily, as well as the flap wheels pictured.
 
I've had a angle grinder on my to-get list for a couple years now. I'm on the Makita battery platform - which model did you get? I have the XAG04Z in my cart.

 
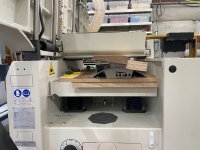
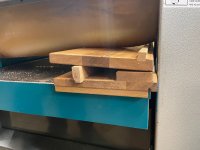
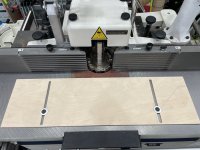
Not so much a product as a technique, but I get a lot of use out of a simple "back fence" or "outboard fence" on my shaper. The "fence" itself is a piece of 6mm plywood with two slots milled to line up with a pair of tapped holes in the machine table, secured with a pair of low-profile, washer-head bolts.

[attachimg=1]

The outboard fence is really handy when processing very short pieces, for instance cabinet door rails, where the piece might so short that it wouldn't be properly supported by the in-feed and out-feed fences. The outboard fence provides for continuous support, and accommodates various widths of stock to be milled to an identical finished width.

In this case, I had milled some stop moulding at 50mm width, only to later decide I want a finished width of 42mm. For thicker stock, I would normally rip the pieces at ~44mm at the bandsaw, then run through the thickness planer at 42mm. In this case, I had already milled a profile on the edge of the stop, and didn't feel confident about having a sufficiently wide reference face to safely run through the thicknesser.

So, I used the outboard fence and the shaper as a sort of modified thickness planer. "Programming" the outboard fence is easy:
-- Shaper cutter has a major diameter of 160mm
-- Shaper fences are indexed to the centerline of the spindle
-- Desired finished dimension is 42mm
-- The face of the outboard fence should be 122mm from the spindle (80mm + 42mm= 122mm)
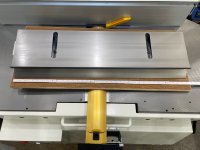
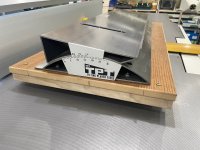
-- Rather than crank the fences all of the way out to 122mm, I instead use metric 1-2-3 setup blocks, utilizing the 50mm face, and set the shaper fences to 72mm (122mm - 50mm=72mm)
-- With the fences secured at 72mm, with 50mm setup blocks, I press the outboard fence against the setup blocks, and tighten the bolts.
-- To remove the setup blocks, I retract the fence plates slightly
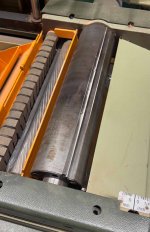
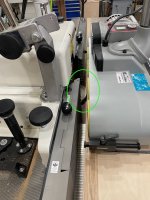
-- Position the power feeder so the wheels are skewed towards the outboard fence
-- Perform the normal safety checks (Proper spindle speed, cutter spins freely, hood is secured, fences are secured, outboard fence is secured, power feed is secured, proper elevation, wheels are skewed towards outboard fence, etc....), then run the pieces.
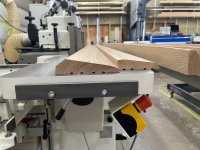
[attachimg=2]

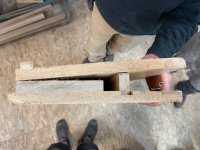
In this case, the pieces were 50mm x 18mm x 2.5m White Oak, and I much preferred to let the power feeder perform the work than hand-feeding long lumber through a saw. The setup listed above may seem like a lot, but I'd guess it probably took me all of three or four minutes to generate the setup and run the boards.

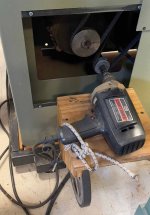
I hope it goes without saying that this technique requires the use of a power feeder, there's just no other safe way to do it. That being said, it does not necessarily require a shaper, you could perform this same operation on a router table with a power feeder, but you may need multiple passes (I removed 18mm x 8mm of material in a single pass withe the shaper).

Anyways, this outboard fence setup cost ~$10 in materials, but opens up a lot of opportunities to safely process short- or narrow- stock which might otherwise be challenging to handle. In addition to processing particularly short cabinet door pieces, I regularly use this outboard fence to "rip" materials.

I'll wrap up with the standard disclaimer that I'm not necessarily recommending the technique, and that I can't be held responsible for your setup, not responsible for injury/damage, etc....
 

Attachments

  • IMG_8425.jpeg
    IMG_8425.jpeg
    527 KB · Views: 155
  • IMG_8424.jpeg
    IMG_8424.jpeg
    338.8 KB · Views: 152
I use a router table, not a shaper.  But it seems that the concept it similar.

My question is:  Is it safe?

It looks like the stock could get trapped between the fence and the shaper bit, potentially launching the stock across the room much like kick back on a table saw.

But I don’t use this type of equipment and my observation is just by looking at the photos.
 
Packard said:
I use a router table, not a shaper.  But it seems that the concept it similar.

My question is:  Is it safe?

It looks like the stock could get trapped between the fence and the shaper bit, potentially launching the stock across the room much like kick back on a table saw.

But I don’t use this type of equipment and my observation is just by looking at the photos.

Hi Packard,

This setup is, in theory, no different than ripping at the table saw with a full-length fence. In both cases, the work is indeed "trapped" between the cutting tool and the fence. With a table saw, the feed mechanism is a woodworker standing in line with the work, usually feeding by hand, so there's a lot of opportunities for injury, whether that's from contact with the blade, or a kick-back event launching the material into the woodworker.

For this shaper setup, the woodworker can position themself perpendicular to the kickback direction, and the power feeder is handing the feeding of the material, so there's no risk of amputation or kickback related injury. Normal precautions should be taken regarding making sure there is sufficient downward pressure with the feed wheels, that there is sufficient skew so the material has constant pressure against the outboard fence, and no one is in the kickback danger zone.

Also, there should be a gap between the material and the in-feed and out-feed fences, particularly when processing stock of varying widths. In theory, you could conceivably completely remove the hood assembly, but for obvious reasons it's enough to just back off the hood/fences a few MM to account for varying material widths.

This technique is commonly used for processing door, window, and cabinet door parts. The advantage is you can feed S3S parts of varying widths and yield identical finished parts. This also works particularly well for processing flexible urethane moulding stock and other materials which require continuous support.
 
O.K.  That makes sense to me.  I think you should add a caveat to your original post as not all shapers come with automatic feeds as near as I can tell.  I think the automatic feed is optional with lower cost shapers.

Also, I knew about kickback and took care to avoid it.  But I did not know that on short lengths the kick back can launch the stock upwards instead of backwards. 

One of my fingernails was entirely ripped off and it necessitated a visit to the emergency room. 

It was an easy problem to avoid.  My problem was that I didn’t know it was a problem at all and I didn’t know enough to avoid it. 
 
Back
Top