Bedroom Set

cpw

Member
Joined
Jan 6, 2017
Messages
486
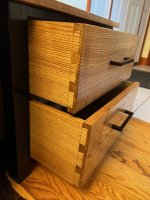
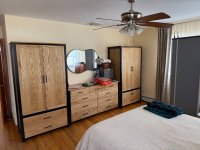
I just finished a 6 piece bedroom set, which ended up taking me about 15 months.  There was quite a bit of pause between the bed and the nightstands to figure out how to handcut dovetails. Chuck Bender's class at the woodworking show was really helpful and a revelation as far as the saw is doing the work and that for half-blinds you can overcut them on the inside [which was a typical American technique] to save a bunch of chisel work.

I tried posting a few times, but the forum ate my post with pictures, so I'm going to dribble it out instead.

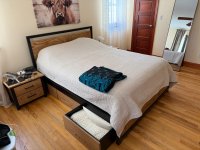
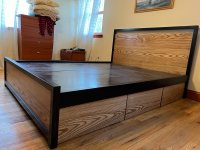
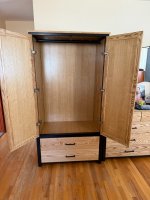
Up first is a queen bed.  The headboard and footboard have solid ash frames with a solid ash panel.  The drawer fronts on each side are one single piece that is cut into the three fronts, using Blum movento slides so no hardware is necessary.  The platform is 3/4" birch plywood with 1/2" plywood drawer boxes.  The drawers are Minwax true black (1 coat) followed by 3 sprayed coats of General Finishes high performance water based top coat.  The frame, panels, and drawer fronts are Minwax special walnut or true black with 3 coats of satin polyurethane on top.  For the frames, I had to put a toner coat of 50/50 true black and poly between the stain and top coat to get the black that I wanted without the solvents lightening the color of the frame.
 

Attachments

  • Bed 1.jpg
    Bed 1.jpg
    1.1 MB · Views: 117
Next are two nightstands.  They are solid ash, with 5-piece drawers on center mount drawer slides.  I didn't want to lose the space to the undermounts on these because they are so small.  The fun part about these was learning how to do hand cut dovetails.  They are not perfect, but are certainly serviceable.
 

Attachments

  • Nightstand.jpg
    Nightstand.jpg
    1,018.1 KB · Views: 93
  • Bed2.jpg
    Bed2.jpg
    1,016.5 KB · Views: 85
The last three pieces are a dresser and two armoires.  The sides and back panels are 3/4" ash plywood.  The frames and top are again solid ash.  The drawers are 1/2" birch with ash fronts.  The armoire doors are mitered ash frames with a 3/4" plywood panel on the inside.
 

Attachments

  • Armoire and Dresser.jpg
    Armoire and Dresser.jpg
    969.5 KB · Views: 100
  • Armoire Inside.jpg
    Armoire Inside.jpg
    887.3 KB · Views: 76
That looks really great. I love the frame and panel style, in the first place. The black and Ash are a great combination. Maintaining the grain match is a nice touch.
 
[member=63643]cpw[/member] the furniture looks great! How many hours would you estimate you spent on the project in total?  I am about ready to paint the armoire I made and think night stands are coming up next. Just curious how long it takes others to build pieces like these. 

Again, great work! 
 
Beautiful work, I like how the grain blends in with the furniture. Great grain combo!
 
That's some really beautiful furniture!

I have a project coming up where I still need to decide whether I'll go for white frames with wood surfaces or choose black frames instead. Downstairs we already have a lot in white/oak, so I am not sure yet. I really like your choice of black frames!

I see you have a solid "floor" in the bed frame. Aren't you worried about proper ventilation for the mattresses?
 
The black looks nice and does show the grain through, but it is among the most finicky finishes I've applied.  I did get better at this as the pieces progressed.  For the bed, I prefinished both the panels and the frames then glued up.  Nightstands, I did the panels but not the frames.  Taping everything 3x was a real PITA.  I compromised on the armoires and did 2 coats before glue up and 1 coat after; so only had to tape off the panels 1x.

I don't know how many hours I put into everything, but my best guess is something like 70-80 for the two armoires.  I finished the dresser on 1/6 and then probably spent 10-12 hours for 7 weeks.  There is a fair bit of waiting for things to dry.  Even though they are slightly more complex than the dresser (because of the bigger size if nothing else), it helped that I did a lot of the components at the same time. 

If I had more space, I could have been more efficient; but I assembled the first one before assembling the second one as I do not have a lot of space for the large completed pieces in my shop.  So that meant that instead of 1 LR32 setup for the side pieces, I had to break things down between the first and the second; which means it took maybe an extra half hour of setting everything up for the 20 minutes of actually boring holes; when if I did that once it would not have taken that much longer.  The setup takes a while, but there was a lot of measuring twice, because after spending $150 a sheet on the plywood, and then many hours getting things to the point where it was captured in a frame I did not want to mess that up.  My wife doesn't understand why I spent time on the 32mm holes because she doesn't plan to have any shelves in there - just hang things, but I wanted to make sure that I could do that later if the use of the piece changes/evolves.

The dresser was probably about 40 hours, but all these numbers are just a guess.

I modeled everything in Fusion.  I'm not at all an expert and was watching Youtube and had a screen share with a friend who coaches a robotics team to get over some of hurdles.  I think I spent probably 15 hours or so on that.  The lumber for the dresser/armoire I ended up making a 4 hour round trip to save $5-600 compared to my local yard. I also spent maybe 2 hours looking through the Blum hinge guide to figure out which hinges were right for my inset frameless application; with minimal protrusion so that I could can put a pullout in one of them.

The bed was probably around 25-30.  The lumber I got for the bed was already surfaced and very wide so that saved a fair bit of time not needing to glue up anything but the back panel.

The nightstands were probably less actually building than the bed, but I spent a lot of time practicing dovetails and sharpening chisels.  I originally thought about getting a Leigh jig to do something more interesting than my simple PC jig; but instead of crying once I did it in dribs and drabs. I've certainly spent more money on chisels, stones, saws, guides, and finally a Tormek than if I did this by machine.  Learning to do it by hand was more fun though.

Ash was chosen simply because my wife thought it looked decent, and I got the lumber for the bed/nightstands for about $2.50 a board foot on Craigslist.
 
Thanks for the time estimates and other details. I am always interested in the approach, thought process, and effort others put into projects. Again, great work on all the pieces!
 
Back
Top