Packard
Member
Typically, changing a lock set on an interior door is a simple matter. You remove the old lock set and replace it with the new one.
However, on my 1950s era home, the original lock sets required a smaller diameter, and with a slightly different set back.
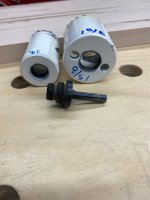
Lacking anything for the center drill on my hole saw to drill into, the hole saw is unusable.
Before I figured out how to do this, I used a rasp to remove the crescent shaped piece to allow the new lock set to fit. Needless to say this was a lot of work (about an hour of filing and fitting).
For the second door, I figured out how to do this efficiently.
All lock sets are sold with a paper drilling pattern. You tape the pattern to the door and use the center mark for your hole saw’s center bit. Drill and you are ready for the latch cross drill.
Instead of applying this pattern to the door, I applied it to a 12” square of 3/4” thick particle board (plywood or MDF will work also).
Important: Draw the center line of the hole across the sheet and down the edge. You will need that to locate the cross drilled hole.
After applying the template and drawing the centerline, I drilled the hole through the plywood.
Once that is done, I clamped the plywood over the older hole. It showed a crescent shaped bit to remove.
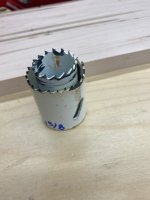
At that point is is simply a matter of using the plywood as a jig for the hole saw. Drill through.
Also important: Make sure the centerline you drew aligned with the center of the existing cross drilled hole.
Once the template is made, execution takes just minutes. If you are replacing the lock sets for all the interior doors, it makes sense to do them all at the same time or to save the template for future use.
Note: You need a fairly sizable piece of plywood as you will need to apply two clamps to hold it in place and still leave room to drill. On the first jig I made, I added a strip of wood to the edge of the plywood to locate the jig accurately. That proved to be unnecessary. It is easy enough to align it visually.
It seems so obvious now, that I wonder why I ever tried to use a rasp on the first door.
Maybe this will save one of you some time for your lock set replacement.
However, on my 1950s era home, the original lock sets required a smaller diameter, and with a slightly different set back.
Lacking anything for the center drill on my hole saw to drill into, the hole saw is unusable.
Before I figured out how to do this, I used a rasp to remove the crescent shaped piece to allow the new lock set to fit. Needless to say this was a lot of work (about an hour of filing and fitting).
For the second door, I figured out how to do this efficiently.
All lock sets are sold with a paper drilling pattern. You tape the pattern to the door and use the center mark for your hole saw’s center bit. Drill and you are ready for the latch cross drill.
Instead of applying this pattern to the door, I applied it to a 12” square of 3/4” thick particle board (plywood or MDF will work also).
Important: Draw the center line of the hole across the sheet and down the edge. You will need that to locate the cross drilled hole.
After applying the template and drawing the centerline, I drilled the hole through the plywood.
Once that is done, I clamped the plywood over the older hole. It showed a crescent shaped bit to remove.
At that point is is simply a matter of using the plywood as a jig for the hole saw. Drill through.
Also important: Make sure the centerline you drew aligned with the center of the existing cross drilled hole.
Once the template is made, execution takes just minutes. If you are replacing the lock sets for all the interior doors, it makes sense to do them all at the same time or to save the template for future use.
Note: You need a fairly sizable piece of plywood as you will need to apply two clamps to hold it in place and still leave room to drill. On the first jig I made, I added a strip of wood to the edge of the plywood to locate the jig accurately. That proved to be unnecessary. It is easy enough to align it visually.
It seems so obvious now, that I wonder why I ever tried to use a rasp on the first door.
Maybe this will save one of you some time for your lock set replacement.