CMS router table fence improvements ( micro adjust using crown stop) "updated"

Thanks [member=11629]GarryMartin[/member] for remembering this.

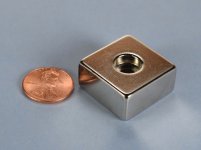
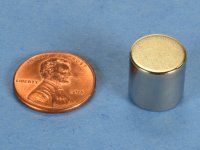
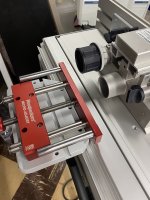
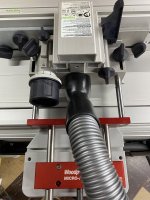
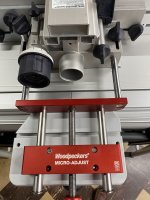
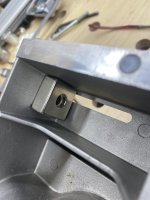
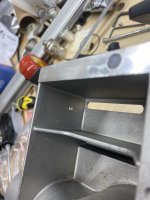
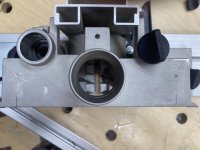
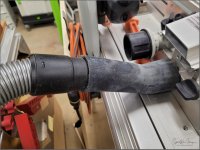
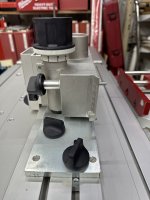
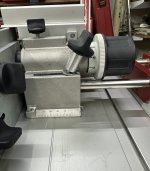
I use it on both the CMS-OF and CMS-TS and it is very useful. I am surprised that Festool did not make one as an optional extra.

I must apologise for my infrequent visits to the FOG but we are still trying to find a new house (and workshop). We made an offer on one house, which was accepted but then the seller asked for 10% more money ! So, we are back to the drawing board with much of my workshop stuff in boxes ready to be moved. That house did have lots of awful wallpaper which I would have wanted to remove in the first few weeks and so that is one consolation I suppose. The workshop would have been wonderful.

I have a Workshop Notes video in the pipeline and I have built a new solid bench which will be the subject of 3 or 4 videos.

Also, I have built a folding bench which is the same size as the MFT3 and a dash lighter. I may release the plans for that, free of charge, when I can get around to drawing them.

Cheers.

Peter
 
Was wondering where to source the gray table that clamps on the router table. Many thanks.
 
onevw said:
Many thanks for these post on using the Woodpecker micro adjust with the CMS.

I was looking for a way to make fine adjustment in the fence on my CMS Router.

So I have come up with this set up. I still need to finish the 2 inch aluminum channel ,and install  the adjustment knobs.
 
Hmmm...a few N52 magnets and and some 440C stainless rod, I wonder what a guy could fabricate with that stuff?

[attachimg=1]

[attachimg=2]

[attachimg=3]
 

Attachments

  •  K&J Magnetics BX0X08DCB .jpg
    K&J Magnetics BX0X08DCB .jpg
    157.4 KB · Views: 860
  •  K&J Magnetics D88-N52.jpg
    K&J Magnetics D88-N52.jpg
    217 KB · Views: 865
  • 12357.JPG
    12357.JPG
    580.4 KB · Views: 862
[member=44099]Cheese[/member] I like the looks of that square magnet with the through hole. Do you have a link to a source?
 
I've been wanting to add the Woodpeckers Micro Adjust to the CMS for several years now.

1. The problem I've had is that I don't have the room to store the Festool fence when it's attached to the Micro Adjust and attached to whatever Micro Adjust attachment plate that is used on the CMS. So, I needed to be able to quickly disassemble the individual items and store them as small sub-assemblies.

2. At the same time I also didn't want to be fumbling with nuts, fasteners & wrenches when I separated the items. The longer the time it takes to assemble the individual items, the more likely they'll remain in that unassembled state and not be used.

3. I wanted to be able to remove and replace the upper dust connection hose easily, again without disassembling anything. I also wanted to make the dust collection port as efficient as possible so a straight or 45º fitting was preferred. 

This was my solution a "carriage" connected with 440C stainless rod and some strategically placed N42 & N52 magnets.

[attachimg=1]

[attachimg=2]

[attachimg=3]

And here's what the "carriage" looks like once the stainless rods are simply removed. Just grab each rod and pull them towards the side and they're gone. Then place each rod backwards on the Micro Adjust and the magnets retain the stainless rods and it becomes it's own small sub-assembly.

[attachimg=4]

[attachimg=5]

[attachimg=6]
 

Attachments

  • 12372.JPG
    12372.JPG
    980 KB · Views: 806
  • 12371.JPG
    12371.JPG
    1 MB · Views: 796
  • 12365.jpg
    12365.jpg
    989.4 KB · Views: 764
  • 12363.JPG
    12363.JPG
    869 KB · Views: 776
  • 12364.JPG
    12364.JPG
    989.1 KB · Views: 888
  • 12362.jpg
    12362.jpg
    1,013.8 KB · Views: 837
Cheese said:
Hmmm...a few N52 magnets and and some 440C stainless rod, I wonder what a guy could fabricate with that stuff?

Great idea, Cheesy One!  It looks like you embedded the magnets in the fence and the movable surface of the adjuster.  Epoxy to set them?  And where did you find the stainless rod material?  I've been dithering with the same space conundrum and was planning on using all-thread, but your methodology is so much more clever.  Well done!  [smile]  And by the way, where did you get the vacuum elbow?  I've been using a radiator hose sized to accept the extractor hose end fitting. 
 
Sparktrician said:
Great idea, Cheesy One!  It looks like you embedded the magnets in the fence and the movable surface of the adjuster.  Epoxy to set them?  And where did you find the stainless rod material?  I've been dithering with the same space conundrum and was planning on using all-thread, but your methodology is so much more clever.  Well done!  [smile]  And by the way, where did you get the vacuum elbow?  I've been using a radiator hose sized to accept the extractor hose end fitting.

Thanks Sparky...I'll give you a quick rundown on your questions and offer a couple of tips that I learned in the process.

I started with disassembling the Micro Adjust and reassembling it with the pre-drilled holes in the movable surface in the upper position.

That then allowed me to use the Micro Adjust and a transfer punch to locate the magnet retaining holes on the wall of the fence housing. Lika this...

[attachimg=1]

[attachimg=2]

[attachimg=3]

The magnets were installed with #8 fasteners. This 1/4" bit and the ratchet wrench are a MUST. It'll never happen otherwise, because the magnets are so strong they attract everything within 2" of them.

[attachimg=4]
https://www.kjmagnetics.com/proddetail.asp?prod=BX0X08DCB&cat=19
https://www.kjmagnetics.com/proddetail.asp?prod=D88-N52

The movable surface on the Micro Adjust is drilled out with a GOOD 1/2" drill bit and the magnets are pressed into the aluminum. I did the drilling in about 6 steps so to take just a little bit at a time and to prevent the bit from grabbing.

The 440C stainless was chosen because it retains 80-85% of the magnetic properties of cold rolled or hot rolled steel, and it still has the majority of the virtues of SST. I ordered both 3/8" & 1/2" round but used the 1/2" because it really holds on well through the aluminum casting.
https://www.onlinemetals.com/en/buy...tainless-round-bar-440c-cold-finish/pid/13971

The rear dust collection fitting is a standard Festool 450575 but massaged with a band saw. Festool Ekat USA doesn't offer the fitting but if you call Festool Service they'll sell you one. The extra port was removed and 1 1/4" was removed from the large end. Then that opening had to opened up a bit with a sanding drum in a drill press. Add a little aluminum HVAC tape to the opening.

[attachimg=5]

[attachimg=6]

[attachimg=7]

[attachimg=8]
 

Attachments

  • 12352.JPG
    12352.JPG
    875.5 KB · Views: 682
  • 12350.jpg
    12350.jpg
    869.7 KB · Views: 686
  • 12351.JPG
    12351.JPG
    1 MB · Views: 694
  • 12376.jpg
    12376.jpg
    1.2 MB · Views: 685
  • 12375.jpg
    12375.jpg
    1.2 MB · Views: 714
  • 12338.JPG
    12338.JPG
    931.5 KB · Views: 714
  • 12337.jpg
    12337.jpg
    791.9 KB · Views: 711
  • 12340.JPG
    12340.JPG
    843.2 KB · Views: 734
Hey Willy [member=7493]Sparktrician[/member] I just received the extra 450575 Y-piece from Festool today. This is a better comparison photo between the original & the modified part.

[attachimg=1]

An additional nice feature which happened by chance  [smile]  is that when you loosen the fence hold down studs and knobs, they're both drawn immediately to the square magnets attached to the inside of the housing and they permanently retain the stud/knob/washer/spacer so there are no extra parts to lose...pretty slick actually. You fight the power of the magnet to reinstall the hold down studs but in this case that's a good fight.  [cool]
 

Attachments

  • 12381.jpg
    12381.jpg
    1.1 MB · Views: 913
Good stuff, [member=44099]Cheese[/member]!  Now I recognize that fitting as being one and the same that came with my CMS.  Methinks I'll stay with the radiator hose that has pretty much the same angle as the Festool fitting, but without the extra piece that needs to be cut off.  Several years ago I went through an extensive search for a matching size radiator hose at the local auto parts place.  I found one that is an exact fit, but I had to surgically remove an extra bend in the hose.  I'll have to go down and see if I can find the part number.  OK, the part number is on the lower attached photo, but be aware that this is the end I surgically removed.  In the upper photo, the end that is closest to the CMS fence just easily slips over the casting with no muss, no fuss.  The end of the radiator hose on the CMS came with a larger inside diameter than the opposite end.  The DE hose end just slips right into the smaller end of the radiator hose.  I don't need hose clamps at all to keep everything in place.  I like that the end I am using has only a ~25° bend (little effect on the extraction compared to a sharper bend), and it will slip right over the top of the micro-adjuster when I get that part finished.  [smile]
 

Attachments

  • 20221006_152139_FOG.jpg
    20221006_152139_FOG.jpg
    715.3 KB · Views: 197
  • 20221006_152412_FOG.jpg
    20221006_152412_FOG.jpg
    794.6 KB · Views: 166
Sparktrician said:
I like that the end I am using has only a ~25° bend (little effect on the extraction compared to a sharper bend), and it will slip right over the top of the micro-adjuster when I get that part finished.  [smile]

Ya, it's one of those rare cases where smaller is better... [big grin]...I hate 90º angles for dust extraction or HVAC connections with a passion. For HVAC, a simple 90º connection is equivalent to an additional 10 feet of ductwork.

Curious as to what attaches the Micro Adjust to the Festool fence structure?
 
Cheese said:
Sparktrician said:
I like that the end I am using has only a ~25° bend (little effect on the extraction compared to a sharper bend), and it will slip right over the top of the micro-adjuster when I get that part finished.  [smile]

Ya, it's one of those rare cases where smaller is better... [big grin]...I hate 90º angles for dust extraction or HVAC connections with a passion. For HVAC, a simple 90º connection is equivalent to an additional 10 feet of ductwork.

Curious as to what attaches the Micro Adjust to the Festool fence structure?

Right now, nothing.  I've had the project on hold for quite a while due to the issue that you mentioned of the added bulk of the fence with the Micro Adjust attached.  Your solution has gotten me back on track with the project, so I thank you for the idea and details.  [smile]
 
FWIW Sparky...those 440C rods are 3.75" long but that's not a magic number. Yours just need to be long enough to work with your DC connection.

Note that 3/8" diameter rod will also work and give you a bit more room if you need it.

Finally, those magnets want to center the rods even the large 1" square one which surprised me. However, there is more fudge factor with the square magnet.

A lot of design layout can be done with the magnets and a couple of transfer punches used as rods...just to give you a sense of space.

On a different note...I'll be looking for the weekly Sedge shout-out to you on Festool Live.  [cool] [cool]
 
Cheese said:
On a different note...I'll be looking for the weekly Sedge shout-out to you on Festool Live.  [cool] [cool]

[sad]...I missed the weekly Friday Sedgely shout-out yesterday... [sad]

Hey Sparky [member=7493]Sparktrician[/member] I had to move the CMS yesterday so I thought I'd take a couple of pics on how things work.

Like I mentioned previously, when the fence studs are loosened, the magnets immediately attract and hold them along with the spacer & washer.

[attachimg=1]

When you lift the fence up off of the router plate, then the magnet pulls the stud assembly completely to the magnet for safe keeping. 

[attachimg=2]

Place the Micro Adjust on top of the fence and you have a nice compact package to move or store.

[attachimg=3]

When setting it back up, align the center line mark on the router plate with the mark on the Micro Adjust.

[attachimg=4]

[attachimg=5]
 

Attachments

  • 12366.jpg
    12366.jpg
    913.7 KB · Views: 807
  • 12365.jpg
    12365.jpg
    989.4 KB · Views: 797
  • 12418.JPG
    12418.JPG
    659.7 KB · Views: 807
  • 12416.JPG
    12416.JPG
    522 KB · Views: 826
  • 12415.jpg
    12415.jpg
    772.9 KB · Views: 819
I've been wanting to add a DRO to the CMS to measure both router bit height and fence movement. A sort of Y & Z axis hybrid. After months of searching I never really found a unit that was small enough for the task, all the units available become pretty bulky to be adding to a router table that was designed to be PORTABLE in the first place. Kind of defeats the nature of the table. [tongue]

I decided for now to just add the Z axis and chose the Wixey WR525 model.
http://www.wixey.com/remote/index.html

It's a really easy installation as long as you take your time. A #8-32 FH screw to secure the vertical magnetic scale and a #8-32 BH screw to secure the readhead. This installation on the CMS is with a 2200 router installed.

Here's a photo of the magnetic scale suspended from the CMS aluminum base plate while the redhead is supported by the CMS plastic carriage.

[attachimg=1]

To support the readhead I used the existing hole that's in the plastic carriage.

[attachimg=2]

It's a snug fit but everything works well.

[attachimg=3]

A single countersunk hole had to be added to the CMS aluminum plate but that gets lost with all of the other countersunk fasteners on the surface.

[attachimg=4]

Now I need to find a place to mount the DRO display. I'm thinking magnets... [smile]

[attachimg=5]

[attachimg=6]
 

Attachments

  • 12646.JPG
    12646.JPG
    540.9 KB · Views: 706
  • 12647.JPG
    12647.JPG
    704.9 KB · Views: 685
  • 12648.JPG
    12648.JPG
    531 KB · Views: 693
  • 12649.JPG
    12649.JPG
    719 KB · Views: 685
  • 12652.JPG
    12652.JPG
    538 KB · Views: 701
  • 12653.jpg
    12653.jpg
    593.2 KB · Views: 690
Great mod, [member=44099]Cheese[/member] O Cheesy One!  I may have to emulate what you've done sometime in the spring.  [smile] 
 
Back
Top