Down with the old & Up with the new

Cheese

Member
Joined
Jan 16, 2015
Messages
12,498
I've not been a very active participant lately on the FOG but that's because I've had bigger fish to fry. I'm having a new garage erected...

This project started over 20 years ago when I rallied a bunch of friends and like-minded neighbors to pitch in and build a new garage.

The resources I had at the time were considerable, from framers to block layers to roofers to concrete professionals and the access to equipment was incredible. Lull lifts, Dingos, excavators, Bobcats, there was literally nothing I needed to rent as all was available from friends.
But, there's a very serious lesson here...

We all get older...we all get weaker...and we all develop physical issues, some minor, some major. The lucky folks move slower, the unlucky ones don't move at all.

At this point I decided history was the final arbiter and it was now or never. So after promising my wife for 20 years I'd build a garage, I decided to take it out of the community/friend realm and pay to get it done. Besides...a significant part of that community no longer existed.  [sad] [sad]

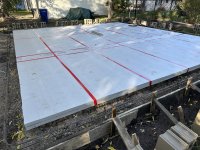
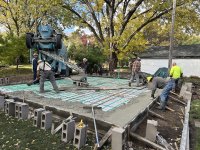
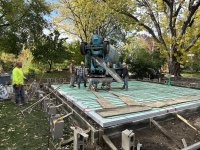
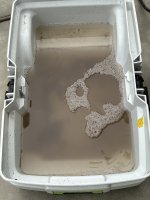
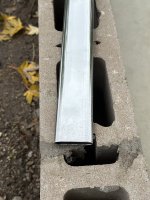
Here's the first move...although it really wasn't, because after 30 years of collecting and storing "valuables" in a garage, you need to expunge the stuff before you can move forward. So after a 8 yard dumpster was filled, this was actually the next necessary move to be made before a clean start could be initiated.

[attachimg=1]

[attachimg=2]


Attachments

  • 14076.JPG
    14076.JPG
    1.4 MB · Views: 35,566
  • 14087.JPG
    14087.JPG
    1 MB · Views: 35,526
Congrats on starting the project.  Come clean... Is this a garage-garage or garage-shaped shop?

I can emphasize in many ways, being in a similar demographic cohort. Always figured I'd be forced to slow down, what's been surprising is the inertia to tackle major projects.

Looking forward to following along.

RMW
 
Richard/RMW said:
Congrats on starting the project.  Come clean... Is this a garage-garage or garage-shaped shop?

I can emphasize in many ways, being in a similar demographic cohort. Always figured I'd be forced to slow down, what's been surprising is the inertia to tackle major projects.

Looking forward to following along.

RMW

Hey Richard...it's both...a garage-garage AND a garage-shaped shop.  [big grin]

It's 28' wide by 26' deep with a single vehicle so there should be some room to move. Am installing a 200 amp service so welding shouldn't be an issue. For sure the metal working tools will be moved to the garage because they're so dirty. The wood shop will probably stay in the basement but larger/heavier wood working projects will also go to the garage. I hate lugging big stuff down the stairs and then back up.

Here's the footing formed up with 2 layers of 2" foam taped & stacked.

[attachimg=1]
 

Attachments

  • 14144.JPG
    14144.JPG
    1.1 MB · Views: 33,411
Very cool. When we expanded our house it had to be raised a certain height above mean high tide, which left it a minimum of ~5' off the ground. I was coming out of a 24 by 36 free standing shop sans garage but was on a simplify-life kick and convinced myself I didn't want/need a big shop again.

The boss reminds me from time to time about asking if I was sure I didn't want to raise the house a few more feet so I could use the 2,400 SF under it for a new shop. Nooooooo, I'm going to make do with the 10 by 12 shed, I told her, and I'll have more time for fishing... [doh]

Dummy.

RMW
 
Richard/RMW said:
The boss reminds me from time to time about asking if I was sure I didn't want to raise the house a few more feet so I could use the 2,400 SF under it for a new shop.

That's an interesting option Richard... [big grin]...the house is already on 5' stilts so crib it up an additional 3+ feet, build the foundation and then lower it down. That's house moving 101 and it's been practiced a million times plus in the States. [smile]  The only issue is when the "big one" hits landfall, how do you then protect the equipment in the basement.

If my math skills are working tonight...2400 sq ft is a 48' x 50' shop. Now that's a nice sized shop although really not that much different than a 10' x 12' shed.  [poke]

Real question, are shipping containers water proof?

So here's how I spent the last weekend, installing in-floor pex tubing and stainless manifolds. There's just something about stainless that I just love. It's such a thing of beauty.

The basic tools for in-floor heat installation.

[attachimg=1]

[attachimg=2]

[attachimg=3]

[attachimg=4]

A side note, I helped a neighbor install in-floor Pex tubing about 8-10 years ago and all the connections to the manifold were crimp connections and for tubing runs longer than 200' we had to install crimp unions. All those crimp connections made me a bit nervous for long-term service life.

The most recent method is to purchase 300' long lengths of Pex and all the connections to the manifold are now via o'rings...not a crimp connection in sight...thank God. The downfall...I have 150' of scrap Pex that would be perfect for a smaller project...think tool shed, play house or heated garage apron...even a heated sidewalk would work.

[attachimg=5]

[attachimg=6]

[attachimg=7]
 

Attachments

  • 14164.JPG
    14164.JPG
    1.4 MB · Views: 27,473
  • 14158.JPG
    14158.JPG
    1.1 MB · Views: 29,849
  • 14156.JPG
    14156.JPG
    1.1 MB · Views: 30,243
  • 14151.JPG
    14151.JPG
    978.3 KB · Views: 30,349
  • 14150.JPG
    14150.JPG
    901.6 KB · Views: 30,420
  • 14149.jpg
    14149.jpg
    772.3 KB · Views: 30,862
  • 14148.jpg
    14148.jpg
    967.1 KB · Views: 31,026
Michael since [member=44099]Cheese[/member] lives in MinneSNOWta and his vehicle will be covered in ice and snow for 9 months each year  [tongue] that's probably for a floor drain for the melting precip to run off to.

My question is what is the round manhole thing over against the side for? Entrance to your secret lair/bunker?

Looking good so far.

Ron
 
Radiant heat... this is going to be so much fun to follow along with!  [popcorn]

As Ron pointed out, snow. Aren't you racing the elements to get the slab down, not to mention getting a shell up and dried in?

You've got me curious what other surprises are lurking up your sleeves. Knowing how you approach projects, doubtless there are going to be tons of useful little features.

Cheese said:
...crib it up an additional 3+ feet, build the foundation and then lower it down. That's house moving 101 and it's been practiced a million times plus in the States. [smile] 

That's the real head-slapper. The final time she asked, she was standing beneath the original house just after it had been raised the first 4 feet and all I had to say was "keep going another X feet".

[attachimg=1]

Like I said, "Dummy". [Edit: just noticed, if you look past the house in the open space, beyond the old rear deck you can see the old shed before it had been rotated and dragged to the other side of the yard to become the "shop".]

Cheese said:
The only issue is when the "big one" hits landfall, how do you then protect the equipment in the basement.

Sandy visited us just about 2 years after raising the house. Before the evacuation was called, I covered windows/doors with the plywood we had been required to have available for the purpose to receive our final CO. Absolutely NEVER occurred to me to prepare for 2+ feet of water in our yard, under the house and in the shop.

Keep the updates coming, I'm excited to tune in for the long winter months. Perhaps time for a Youtube channel...?  [poke]

RMW
 

Attachments

  • 2009-02-18 16.16.32 (Small).jpg
    2009-02-18 16.16.32 (Small).jpg
    96.7 KB · Views: 24,525
Michael Kellough said:
That tube stapler is neat!

What is the trough in the middle for?

Ya, I also thought the tube stapler was neat until it jammed for the 100+ time  [mad].  The last hydronic floor I put in we used the red screw-in clips which take a long time to install, but once installed, the Pex snaps in easily and it becomes a 1-person job. The stapler however, takes 2 people or maybe I should say 2 people make it a lot easier to use. One person to align the hose to the marks & staple and the second person to keep unwinding the Pex and rotating the Pex coil in whatever direction that's needed.

As the coil memory changes, the Pex coil rotation direction also keeps changing so it takes a sharp eye to decide in what direction the coil needs to be rotated.

Once the stapler works it's really slick and I could lay down 15-20 staples but then it would jam for the next 3-4 staples. Also, I rented the stapler from Menards so who knows what sort of personal hell it's been through.

At the end of the project I just put all of the discarded staples in a pile like this.

Something else that kept happening is that the staple secured the Pex but then split. After the job was completed I walked the entire area and replaced all of the split staples. Again, none of this happens if you use the screw-in clips.

[attachimg=1]

[attachimg=2]

[attachimg=3]

Ya Ron nailed it...a floor drain that runs to a 4' deep sump basket.

Interestingly enough, 15 years ago when I first started to explore the local garage permit rules, a floor drain was taboo unless it was connected directly to the city sewer. That made it pretty much impossible for 99% of garage owners because of the expense involved in burying 150'-200' of DWV 5' deep or burying DWV up to the house but then going down an additional 3' and jack hammering the basement floor to connect it up to the present house drain.

It seems the popularity of hydronic heating forced the city to reconsider their code requirements...thank God.  [cool]
 

Attachments

  • 14154.jpg
    14154.jpg
    854.3 KB · Views: 11,493
  • 14153.jpg
    14153.jpg
    672.4 KB · Views: 12,091
  • 14157.jpg
    14157.jpg
    1,011.6 KB · Views: 20,812
I suppose the staple supplier would just say you whacked it too hard? If they can not supply better staples they should make the feet/pads larger to prevent over driving.

You’re off to a great start. Going to be a very nice shop I’m sure.
 
Ok, so is this just me or is this connection slower than molasses? This seems to be the same situation we were in a few weeks ago.
 
Seems pretty quick at the moment but I noticed earlier when the Jonathanmarshall bot was online it was veeeeeerrrry slow.
 
Defintely will be following the progress.

Connection was intermetintely slow yesterday for me as well

 
The concrete crew showed up around 1:00 to tweek the forms and to finish laying & tying the rebar.

[attachimg=1]

At 2:30 the Cemstone truck arrived and the crew of 6 jumped into action.

[attachimg=2]

This is what the progress looked like after 5 minutes.  [blink]

[attachimg=3]

And this is what it looked like at 5:00, just 2-1/2 hours after the first cement truck arrived. It took 3 different cement deliveries in all. Did I mention that they already poured a 24' x 24' garage in the morning?

[attachimg=4]

[attachimg=5]

[attachimg=6]
 

Attachments

  • 14198.JPG
    14198.JPG
    1.1 MB · Views: 6,885
  • 14196.JPG
    14196.JPG
    1.5 MB · Views: 7,204
  • 14197.JPG
    14197.JPG
    1.3 MB · Views: 7,460
  • 14192.JPG
    14192.JPG
    1.7 MB · Views: 7,802
  • 14191.JPG
    14191.JPG
    1.8 MB · Views: 8,392
  • 14183.JPG
    14183.JPG
    1.6 MB · Views: 8,725
It's amazing how fast a good concrete crew can complete a slab, while making it look simple. I guess they are pretty experienced with radiant heat now. Doesn't seem like that long ago it was cutting edge.

I'd been wondering about control joints but it's simpler than expected. No concerns about stress to the PEX from movement?

RMW
 
Richard/RMW said:
I'd been wondering about control joints but it's simpler than expected. No concerns about stress to the PEX from movement?

Ya, these were formed in-place control joints. I originally wanted saw-cut joints to help ease moving tool chest roll-cabs over the surface. The formed in-place joints have that small radius on each side of the joint and I thought that may be an issue. However, if you have 4" or larger diameter casters, they easily bridge that small gap, besides, they look SO MUCH BETTER than saw-cut joints.

Again these were done by hand and eye sight alone all while handling a 4' wide bull float along with 30' handle of aluminum tubing over his head.

No worries about the Pex as any movement will be small and probably measured in 32nds of an inch. However for a non-elastic material, that amount of movement might prove to be fatal.

So the next step was to foam fill the concrete block cavities.

After a good rainfall filled the block cavities, I first needed to convert the MIDI I to a wet vac.

[attachimg=1]

The conversion is quick & easy but there are 2 issues. The wet capacity of a MIDI I is really limited and sometimes the auto shut-off tripped early...as in VERY early [mad] [mad]. I assumed it was from water splashing around the inside of the canister.

[attachimg=2]

This Milwaukee stainless wand was a blessing as it's narrow to get into tight areas and is 27" long to keep the bending over to a minimum. As a bonus round the Festool hose fits snugly inside.

[attachimg=3]

[attachimg=4]

Just vacuum away until the sensor kicks in and turns the vac off. Empty, re-set the vac and continue.

[attachimg=5]
 

Attachments

  • 14219.JPG
    14219.JPG
    947 KB · Views: 5,567
  • 14225.JPG
    14225.JPG
    691.5 KB · Views: 5,349
  • 14223.JPG
    14223.JPG
    857.9 KB · Views: 5,119
  • 14224.JPG
    14224.JPG
    810.4 KB · Views: 4,953
  • 14220.JPG
    14220.JPG
    877.8 KB · Views: 4,849
Congratulations Cheese  [smile]
Exciting project and inevitable a great space for you!

I’m pretty much in the same boat, finally started the restoration of my outhouse/shed.
It’s been me mostly alone, digging out soil floor [eek] jacking half the building up into former heights with hydraulic bottle jacks (I did dig out the bottom sills with a spade.. they once where 6x6” beams.. [huh])

Now after filling in 6 tonnes of gravel inside and outside, having poured 3 cubic meter of concrete delivered by a cement truck with hydraulic gutter all laid within 1 1/2 hour I leveled myself it’s a 322 sq feet (30sq m) of slab now.

It’s a fresh start. 10sq m of that is an extension. I’ve built the walls for the extension in modules (framing) and have now started to mount the wall modules to the concrete blocks. All the hard dirty work is now (nearly..) forgotten as it’s working with wood and as a framer (picky one  [big grin] but I’m the only boss though!)

Looking forward to your progress Cheese, in before Christmas too you also?  [wink]
 
[member=44099]Cheese[/member] That looks very nice and at the rate you are going you should have it dried in by the weekend. [tongue]

Quickie question, this is a floating slab with a thickened edge? You don't need to go down below the frost line?

Ron
 
Back
Top