Justin Michael
Member
- Joined
- Oct 10, 2014
- Messages
- 43
Thought I would share the first project I completed since catching the Festool bug in early October. I started with a TS55 REQ which quickly multiplied into 75" rail, MFT/3, CT26, and RO150. I've been woodworking for about two years now acquiring the traditional hand and power tools - starting with my father's 1940 unisaw (original bullet motor still going strong), 12" planer, 6" jointer, mortiser, hand planes, etc. I recently built a router table based on the Incra fence system that was invaluable to creating the raised panels and moldings for this project.
That said, Festool has made woodworking significantly more enjoyable. I know that cross cuts are perfect 90deg, edges are glue ready, the cherry wasn't burned by the blade, and I don't dread sanding anymore. The wife has allergies and was very impressed with the dust control - she was standing in the shop while I was using the Rotex and was not bothered at all.
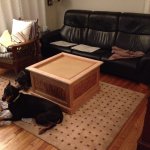
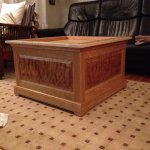
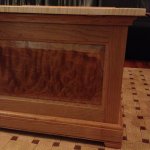
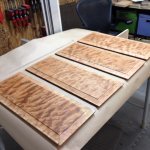
I had been saving this 8 foot long 10 inch wide figured cherry 4/4 board for years for just the right project. When the wife said she wanted a new coffee table for our first house, I knew this is where it would be deployed. For this project, I used the TS55 and MFT/3 to first set a straight edge on bowed boards and cross cut to length. Then planed and jointed the rough cut cherry for the rails, stiles, and trim. Next it was on to the router table to make raised panels, rails, stiles, cove trim, and the profiled baseboard.
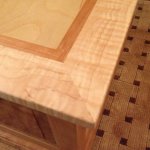
Everything was sanded with the Rotex 150 using 80, 120, and 220 granat. I hand sanded in between coats of Enduro Var with 400. I was reluctant to drop the $$ on the RO150 as my first sander, but the wife was very supportive and I wasn't disappointed.
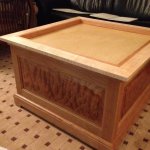
The top is maple plywood framed with cherry and soft maple trim. All top surface irregularities and glue squeeze out were easily sanded flush with the RO150 is rotary mode. What a beast! The top is hinged to provide access to storage for blankets and linens.
All in all, it came out as i envisioned it in my mind's eye. As we all know, that don't happen often (at least for me). Thought i would share. I picked up a lot of tips and advice from the FOG in my short time trolling here that went into this project. Thanks for looking.
That said, Festool has made woodworking significantly more enjoyable. I know that cross cuts are perfect 90deg, edges are glue ready, the cherry wasn't burned by the blade, and I don't dread sanding anymore. The wife has allergies and was very impressed with the dust control - she was standing in the shop while I was using the Rotex and was not bothered at all.
I had been saving this 8 foot long 10 inch wide figured cherry 4/4 board for years for just the right project. When the wife said she wanted a new coffee table for our first house, I knew this is where it would be deployed. For this project, I used the TS55 and MFT/3 to first set a straight edge on bowed boards and cross cut to length. Then planed and jointed the rough cut cherry for the rails, stiles, and trim. Next it was on to the router table to make raised panels, rails, stiles, cove trim, and the profiled baseboard.
Everything was sanded with the Rotex 150 using 80, 120, and 220 granat. I hand sanded in between coats of Enduro Var with 400. I was reluctant to drop the $$ on the RO150 as my first sander, but the wife was very supportive and I wasn't disappointed.
The top is maple plywood framed with cherry and soft maple trim. All top surface irregularities and glue squeeze out were easily sanded flush with the RO150 is rotary mode. What a beast! The top is hinged to provide access to storage for blankets and linens.
All in all, it came out as i envisioned it in my mind's eye. As we all know, that don't happen often (at least for me). Thought i would share. I picked up a lot of tips and advice from the FOG in my short time trolling here that went into this project. Thanks for looking.

")