First use of Carvex PS420 (A lot to learn)

iamnothim

Member
Joined
Feb 5, 2014
Messages
1,436
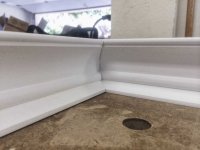
I broke out my Carvex PS420 for the first time today.  I set it up with a phenolic 18TPI blade "0" pendulum and preceded to cut some 3/4" x 6" MDF that I milled.  It has a back rabbet slot for bead board and a top cove with a small shoulder.  This was another "first" for me because I wanted to cope the base rather than cut a 45.

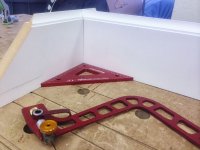
For this I took Paul-Marcel's suggestion and purchased a Knew Concepts fret saw.  I've had the saw a month and all I can say is Wow! buy one.

Anyway I started cutting out the long section with the Carvex.  This was my first use of a barrel type saw and I have to practice a Lot.  The first thing I noticed is I had trouble finding the On/Off.  The second was the "A" speed was way too aggressive for what I was doing.  I backed it off to "1".  I took me several tries to get close to straight. I probably picked a tough thing to start with because a 6" piece is barely wider then the foot..... starting and ending the cut straight will take practice.

I want to learn how to cope molding because I want to add a piece of molding to existing molding after the fact.   The good news is I was able to produce a pretty good cope of the cove molding for a first time (for me at least) .....  I've always wanted to do this and the fret saw makes it much easier.  Here's the first one...

Any tips will be appreciated

[attachimg=#]


Attachments

  • cope.jpg
    cope.jpg
    151.4 KB · Views: 1,013
Coping saw or fret saw. Just for the part with the moulding. I personally would never bother with a jigsaw to cope with. For the straight part use either the kapex or a hand saw to cut to the mould also if fitting between 2 walls add about an 1/8 so the joint pushes up tight
 
wrightwoodwork said:
Coping saw or fret saw. Just for the part with the moulding. I personally would never bother with a jigsaw to cope with. For the straight part use either the kapex or a hand saw to cut to the mould also if fitting between 2 walls add about an 1/8 so the joint pushes up tight

Thanks  !

I'm fresh outa Kapexes
 
Also as I see you are using white painted mdf, after you have cut the 45 on the chop saw when making the coping cut, basically have the saw so they are kissing the white bit never cutting into the white area. If that makes sense
 
wrightwoodwork said:
Also as I see you are using white painted mdf, after you have cut the 45 on the chop saw when making the coping cut, basically have the saw so they are kissing the white bit never cutting into the white area. If that makes sense

Got it.

Guess what?  I didn't cut a 45 on the coped piece.  Glad you mentioned that.  It makes a lot of sense because only the leading edge needs to hit and there's less material to cope.
As I said... coping newbie.  Thanks
 
The old fashioned way of doing it is to cut the 45 on the moulding down to the flat part. Then square a line down and cut with the hand saw for the straight as coping saws are not very good at cutting straight lines.    Also another thing I do is turn the blade 90 degrees in the frame. The reason I do is I find it gives me a better view of the blade. Also holding the saw so my index finger is pointing down the blade and becomes an extension of my finger. It's all practice
 
iamnothim said:
 Here's the first one...

Looks good to me.

iamnothim said:
Any tips will be appreciated

I would get a Collins coping foot Collins coping foot and build the Jig to hold your molding.


At about 7:00 min. in this video Tommy from TOH demos coping.

Tim
 
Thanks Tim,

For a second I thought the hand saw would win...  until it hit the meat.

EDIT:  Still have to say the Knew Concepts fret saw rocks.   With the Pegasus blades it goes through materials quickly.
 
I just watched the Katz coping video..... Awesome !!!
Can't believe it !  Exactly what I wanted to see!  Both by hand and with the Triton.
I only have a few inside corners to do, so I can practice with the fret saw now and order the Collin foot in a bit....  If I have the willpower to not order another tool today.  [smile]

Thanks Jay.

 
The video helped.  A Lot.

OK... so it took me 20+ minutes and some carving.  [blink]
I did not use the Carvex.
[attachimg=#]


Attachments

  • Cope-1.jpg
    Cope-1.jpg
    90.4 KB · Views: 622
Looking good.  That video and website has a lot of useful information.  In the beginning, i used a coping saw and that worked great.  After using a coping foot there was no going back.  I even had dedicated bosch jigsaw that had a coping foot attached to it.  Having just purchased a carvex and finding out that there was a collins coping foot for it, the path was clear.  It is a deal at $62.

Couple of small things to note if you do buy one for your carvex.  You will have to remove that metal loop that goes in front of the blade.  To remove, squeeze loop together near saw housing and wiggle out.  The other thing I did was to remove some material at the back the blade cutout (rear of blade) on the coping foot.  It does not touch, but the back of the blade seemed a little to close for me.  Collins also recommends bosch t244D jigsaw blades, but others work.

 
The RAS with 80 grit works great for tuning up the cope as well as scribing. It works especially good with hardwoods.
Curt
 
Thanks.

My Rotex RO 90 arrived yesterday.  Probably my favorite tool.  I have not tried it on the cope yet.  I only have a couple pieces and the Knew Concepts fret saw and a chisel has worked out.  I know I'll be ordering a Collins foot just a matter of when.

That Katz video also taught be how to handle the fret saw.  I was doing it wrong and breaking blades.  He really explains things well.

I think the LS 130 will be my next purchase.......  Any thoughts on this?   
 
Back
Top