Home Office Remodel

Time to transform my shop again:

i-HnWv34C-X2.jpg


I get my maple S4S in 8-10' lengths from my supplier. I ordered 2.5" knowing I'd have to rip it down to the dimension I wanted for the shelf lips and face frame. To make the material manageable I cut about two lengths of shelf worth off one of the 8-10' boards then ran the two pieces through the table saw:

i-jkvFRpC-X2.jpg


i-rQz3Cp4-X2.jpg


The shortened 36mm hose did a surprisingly good job of capturing dust all things considered:

i-qmkrPRK-X2.jpg


Most of it just shot back onto me then to the floor.

A little clean up and putting things back to normal:

i-nwxCJDt-X2.jpg


This is what the shelves will look like more or less from the front:

i-R8xXGGr-X2.jpg


Matt
 
I received a block plane as a gift almost a year ago and haven't used it because I have no background in hand tools or sharpening. Yesterday I got off my butt and tried out the scary sharp system shown in this video:


It all turned out surprisingly easy and I wish I would've just done it sooner.

i-2xKtTkT-X2.jpg


i-rw3mXKF-X2.jpg


i-9qxPSm6-X2.jpg


i-WQjgwTB-X2.jpg


I have a feeling I'll be reaching for the block plane a lot more around the shop.

Matt
 
To apply the lipping to the shelves I decided to use 5x30 dominos on the loose setting. 15mm plunge into each the shelf and the 3/4 edging and I didn't have to mess with settings on the domino. Made it pretty straightforward. The two materials aren't perfectly flush where there aren't dominos but they're really close.

i-jFddFJL-X2.jpg


i-4v5QDn6-X2.jpg


i-TRxCbr8-X2.jpg


i-dqzwdLP-X2.jpg


i-SQzrCTW-X2.jpg


Matt
 
DynaGlide said:
To apply the lipping to the shelves I decided to use 5x30 dominos on the loose setting. 15mm plunge into each the shelf and the 3/4 edging and I didn't have to mess with settings on the domino. Made it pretty straightforward. The two materials aren't perfectly flush where there aren't dominos but they're really close.

Matt

Good job, Matt!  A Rotex will reduce any variations and make things flush.  Are you going to kiss the edges with a 1/16" (1.5 mm) round-over bit?  [smile]
 
Sparktrician said:
DynaGlide said:
To apply the lipping to the shelves I decided to use 5x30 dominos on the loose setting. 15mm plunge into each the shelf and the 3/4 edging and I didn't have to mess with settings on the domino. Made it pretty straightforward. The two materials aren't perfectly flush where there aren't dominos but they're really close.

Matt

Good job, Matt!  A Rotex will reduce any variations and make things flush.  Are you going to kiss the edges with a 1/16" (1.5 mm) round-over bit?  [smile]

Thanks Willy! Yes I plan on giving them the roundover treatment. I'm tempted to do a chamfer instead since the face frames will likely receive one so I can carry it through to the inside corners with a chisel. Thoughts?
 
DynaGlide said:
Sparktrician said:
DynaGlide said:
To apply the lipping to the shelves I decided to use 5x30 dominos on the loose setting. 15mm plunge into each the shelf and the 3/4 edging and I didn't have to mess with settings on the domino. Made it pretty straightforward. The two materials aren't perfectly flush where there aren't dominos but they're really close.

Matt

Good job, Matt!  A Rotex will reduce any variations and make things flush.  Are you going to kiss the edges with a 1/16" (1.5 mm) round-over bit?  [smile]

Thanks Willy! Yes I plan on giving them the roundover treatment. I'm tempted to do a chamfer instead since the face frames will likely receive one so I can carry it through to the inside corners with a chisel. Thoughts?

I think you might want to do a mock-up of each to see which one looks better.  Long-term, I suspect that the round-over might work better in that constantly shifting contents in and out might have less adverse wear effect on the rounded over surfaces than on the crispness of the alternative chamfered edges.  Your decision (or hers), in any case.  [smile]
 
FWIW, I tried a small, 1/8" chamfer on some oak for cabinets and by the time I had sanding done, it was almost a round-over anyway.  Probably my technique but maybe keep that in mind.
 
I decided to have some fun with the 1010 with a guide bushing, MFK 700 with a 1/16" roundover bit, and my track saw to add a place for wires to go to the shelves. The track saw was the last step since I left the shelves too deep on purpose. I really like how these shelves are turning out.

i-XVSg37v-X2.jpg


i-XtVrRBW-X2.jpg


i-ZVSVb2k-X2.jpg


i-ctHvGzX-X2.jpg


i-xGjVGbH-X2.jpg


i-SkbhhcP-X2.jpg


I'm liking the shelves with the thick fronts Matt...a real nice place to hide a LED strip behind. And with the nice relief you routed into the rear of the shelf for wiring I'd just rout another pathway on the underside to the front of the shelf for LED wires.

I know you originally wanted an adjustable LED system in case you moved the shelves, but if you think about, once the shelves are set, they rarely ever get moved. I don't think our kitchen shelves or the bookcase shelves in the office have been moved in 15-20 years. Besides, if you do move them it'll probably be just a couple of holes up or a couple of holes down, nothing that can't be compensated with some extra wire length that could be incorporated into a neat "roll up/wind up" system on the bottom of each shelf.

Just an idea... [smile]
 
[poke] [poke] [member=44099]Cheese[/member] I'm listening. You have a point. A white wire going up the center of each cabinet wouldn't really be noticed if it was run neatly or covered. Plus with that setup I like that everything is accessible. I just couldn't get behind the idea of hiding wiring in areas I wouldn't be able to reach them if they failed for whatever reason.

I know next to nothing about LED lighting. I'm guessing I'd put a transformer/control unit in the center cabinet with doors, then run wires to each shelf, where self adhesive LED strips would be placed near the front behind the overhang of the maple lip?
 
DynaGlide said:
[poke] [poke] [member=44099]Cheese[/member] I'm listening. You have a point.
1. A white wire going up the center of each cabinet wouldn't really be noticed if it was run neatly or covered.

2. Plus with that setup I like that everything is accessible. I just couldn't get behind the idea of hiding wiring in areas I wouldn't be able to reach them if they failed for whatever reason.

3. I'm guessing I'd put a transformer/control unit in the center cabinet with doors, then run wires to each shelf, where self adhesive LED strips would be placed near the front behind the overhang of the maple lip?

This may get a bit lengthy Matt but stay with me.  [smile]

1. You'll be able to easily hide a pair of 16 or 18 gauge wires in the rear of the cabinet. You may even be able to run 20 gauge if the run isn't too long. 

2. You absolutely want to be able to easily access each component in the system. LED's don't last forever, usually in the 30,000 to 50,000 hour range, so it's something to think about if you decide to use these as "night lights".

3. For a transformer, in LED speak they're called drivers. I prefer Meanwell drivers because they're reliable, compact and inexpensive. I purchase my electronic stuff from Mouser because they have fast delivery and there is no minimum quantity. This is the LP series drivers however the AP series will also work. You're just looking for a constant voltage driver in the appropriate wattage & voltage. For a small system 12 volts will be fine. Here is a 60 watt/12 volt and a 20 watt/12 volt for the kitchen & bath respectively.
https://www.mouser.com/new/meanwell/meanwell-lp-power-supplies/

[attachimg=1]

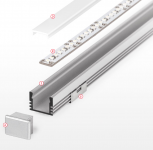
Now for the rest... [smile]...I'd absolutely use an aluminum profile screwed to the bottom of the shelf, that's the easiest method for assembly and servicing. Besides, the aluminum profile acts as a heat sink and will remove a lot of the heat from the LED tape strip and heat absolutely KILLS LED's and it also protects the LED's from damage with books/binders.  Besides, the profile will also accept a clear/frosted plastic lens. Here's a typical aluminum extrusion, LED tape, light cover and end cover.

[attachimg=2]

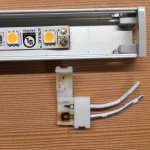
I prefer placing a small connector near the LED, again easier for assembly & servicing. If something happens, you unplug the connector and remove the shelf. The connector also gives you an easy way to check for voltage and there are no wires to remove and re-run. I'm a fan of small Molex connectors.

[attachimg=3]

Absolutely 
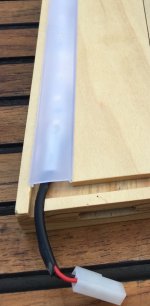
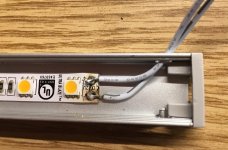
solder the wires to the LED tape. Do not use those quick attachment clips that they advertise. This is what can happen...this is pretty common.  [sad]  And this connector was purchased from one of the best in the business...Diode LED.

[attachimg=4]

[attachimg=5]

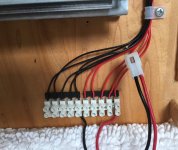
Place the LED driver in an area where you can also install a barrier terminal strip. So, 120 volts go in to the driver and 12 volts come out to the various LED runs. Here I also placed a Molex connector on the 14 gauge wires that go to the driver, while the individual runs are 18 gauge. In 99.99% of the time an LED will go bad or a driver will go bad but the wiring will be fine so it all stays in place. It's a lot easier to troubleshoot and repair with small connectors attached because the item can be brought to the bench.

[attachimg=6]

More questions...feel free, you know where I live.  [big grin]
 

Attachments

  • 6915.jpg
    6915.jpg
    302.4 KB · Views: 1,024
  • Klus Extrusions.png
    Klus Extrusions.png
    422.5 KB · Views: 1,026
  • 4503.JPG
    4503.JPG
    190.2 KB · Views: 1,042
  • 7574.JPG
    7574.JPG
    294.9 KB · Views: 1,049
  • 7575.jpg
    7575.jpg
    286 KB · Views: 1,039
  • 6858.JPG
    6858.JPG
    335.4 KB · Views: 1,029
[member=44099]Cheese[/member] , what kind of connectors are those that burned (in the fourth image)?  I've been using Molex connectors since the Dark Ages, and have never seen one get burned like that. 
 
Sparktrician said:
[member=44099]Cheese[/member] , what kind of connectors are those that burned (in the fourth image)?  I've been using Molex connectors since the Dark Ages, and have never seen one get burned like that.

I believe those are the LED light strip connectors that friction fit over the end for the two wires to attach. I wonder if that's a fluke or something common as I know a guy on IG who fits those lights on a regular basis using the supplied friction connectors.
 
Sparktrician said:
[member=44099]Cheese[/member] , what kind of connectors are those that burned (in the fourth image)?  I've been using Molex connectors since the Dark Ages, and have never seen one get burned like that.

Hey Sparky, that's the Diode LED connection that I purchased for $6 each that I thought would mitigate the risk of push-on connections. That's what happened within 10 months of use with under-counter lighting in the kitchen.

I'd always read that there were issues with these type connectors but I figured if I was using Diode LED strips, then I would be safe by using their connector...not so much.

I've since just soldered any LED connection and that's worked really well. Easier to solder when the light strip hasn't yet been installed [smile] and it only takes 5-10 seconds once the iron is hot.

 
I bought some grommets to help with the wiring on the cabinets. I felt it would be easier/cleaner to rout out for them before paint using a circle template from Rockler:

i-kZXm8qR-X3.jpg


i-92M7Pq2-X3.jpg


They're a nice snug fit. Everything was going great until I oriented the jig the wrong way on the third panel and put the hole in the wrong spot.

After sleeping on it I was able to use the same jig and a different bushing and cutter to make a plug:

i-RDphLVL-X3.jpg


i-ngpCZ6h-X3.jpg


i-hD9Rfhq-X3.jpg


i-qhjfX5Z-X3.jpg


The fix should work out once I paint everything.

Matt

 
Matt and all you other contributors:
- what an informative and helpful thread for anyone considering one or more elements of this project - including handling of surprises.

Taking the time to illustrate the project adds that much more to the usefulness of all the helpful information!

Matt, you serve the FOG's "Just do it" Award - seriously.

Hans
PS: been just a tad busy at TSO this past year or so . . .
 
Sparktrician said:
Nicely documented, Matt!  One suggestion, though - when you're joining two rails with the Betterley, I'd suggest that you use the
Guide Rail Index LA-LR 32 FS, Item number 496938 to space the holey rails properly to get a consistent 32mm pattern at the join point.  Feel free to ping me if this doesn't make sense.  [smile]

[member=7493]Sparktrician[/member]: Is this 496938 accessory different than the two blocks that come with the LR-32 kit?

Thanks, Dick
 
TSO_Products said:
Matt and all you other contributors:
- what an informative and helpful thread for anyone considering one or more elements of this project - including handling of surprises.

Taking the time to illustrate the project adds that much more to the usefulness of all the helpful information!

Matt, you serve the FOG's "Just do it" Award - seriously.

Hans
PS: been just a tad busy at TSO this past year or so . . .

Those are very kind words Hans. I'm just kind of making this up as I go. I envy those who had some form of formal training or apprenticeship.

I picked up 2 gallons Kem Aqua Plus this morning. I'll be off to painting before long.

Matt
 
Back
Top