DynaGlide said:
[poke] [poke] [member=44099]Cheese[/member] I'm listening. You have a point.
1. A white wire going up the center of each cabinet wouldn't really be noticed if it was run neatly or covered.
2. Plus with that setup I like that everything is accessible. I just couldn't get behind the idea of hiding wiring in areas I wouldn't be able to reach them if they failed for whatever reason.
3. I'm guessing I'd put a transformer/control unit in the center cabinet with doors, then run wires to each shelf, where self adhesive LED strips would be placed near the front behind the overhang of the maple lip?
This may get a bit lengthy Matt but stay with me. [smile]
1. You'll be able to easily hide a pair of 16 or 18 gauge wires in the rear of the cabinet. You may even be able to run 20 gauge if the run isn't too long.
2. You absolutely want to be able to easily access each component in the system. LED's don't last forever, usually in the 30,000 to 50,000 hour range, so it's something to think about if you decide to use these as "night lights".
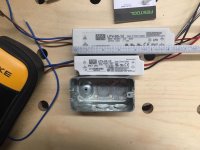
3. For a transformer, in LED speak they're called drivers. I prefer Meanwell drivers because they're reliable, compact and inexpensive. I purchase my electronic stuff from Mouser because they have fast delivery and there is no minimum quantity. This is the LP series drivers however the AP series will also work. You're just looking for a
constant voltage driver in the appropriate wattage & voltage. For a small system 12 volts will be fine. Here is a 60 watt/12 volt and a 20 watt/12 volt for the kitchen & bath respectively.
https://www.mouser.com/new/meanwell/meanwell-lp-power-supplies/
[attachimg=1]
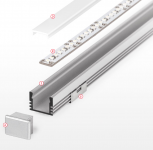
Now for the rest... [smile]...I'd absolutely use an aluminum profile screwed to the bottom of the shelf, that's the easiest method for assembly and servicing. Besides, the aluminum profile acts as a heat sink and will remove a lot of the heat from the LED tape strip and heat absolutely KILLS LED's and it also protects the LED's from damage with books/binders. Besides, the profile will also accept a clear/frosted plastic lens. Here's a typical aluminum extrusion, LED tape, light cover and end cover.
[attachimg=2]
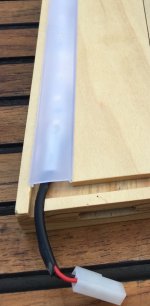
I prefer placing a small connector near the LED, again easier for assembly & servicing. If something happens, you unplug the connector and remove the shelf. The connector also gives you an easy way to check for voltage and there are no wires to remove and re-run. I'm a fan of small Molex connectors.
[attachimg=3]
Absolutely
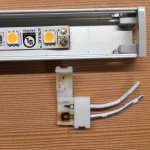
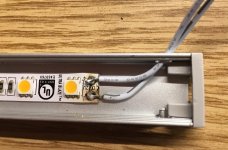
solder the wires to the LED tape. Do not use those quick attachment clips that they advertise. This is what can happen...this is pretty common. [sad] And this connector was purchased from one of the best in the business...Diode LED.
[attachimg=4]
[attachimg=5]
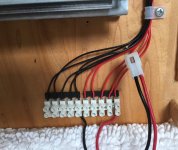
Place the LED driver in an area where you can also install a barrier terminal strip. So, 120 volts go in to the driver and 12 volts come out to the various LED runs. Here I also placed a Molex connector on the 14 gauge wires that go to the driver, while the individual runs are 18 gauge. In 99.99% of the time an LED will go bad or a driver will go bad but the wiring will be fine so it all stays in place. It's a lot easier to troubleshoot and repair with small connectors attached because the item can be brought to the bench.
[attachimg=6]
More questions...feel free, you know where I live. [big grin]


